Preface
This manual describes the features and operation of the Hyrax data server, a data server developed by OPeNDAP, Inc. as a reference server for the Data Access Protocol, versions 2 and 4. the Hyrax server is modular software with a number of handlers that are loaded into a core framework based on the contents of configuration files. Each of the server’s modules provides a distinct functional capability, such as reading data from a certain kind of file, encoding data, or processing data in different ways.
The text contained here was built up over several years as modules were added to the system. Originally, the documentation was built using a Wiki (because it was a collaborative writing tool for a distributed group of people), where each component had a separate page. Over time, as information was spread across many web pages and the Wiki, this became unmanageable. We hope this new format reads more like a guide for people who want to install and configure the server and less like a design document.
Development Sponsored By
Acknowledgments
The High Altitude Observatory at NCAR contributed the BES framework that is the basis for the server’s data processing engine and modular extensibility.
Keith Seyffarth extracted the Wiki’s text that forms the basis of this manual, and Alexander Porrello and Leonard Porrello edited the text.
1. Hyrax New Features (1.17.1)
The new release of Hyrax contains many improvements to the DMR++ build, generation and testing process, as well as a broader coverage for many of NASA’s HDF4 / HDF4-EOS2 / HDF5 datasets. In particular, the scripts to generate DMR++ have major improvements in performance, with better testing, checks, and improved documentation on how to generate the DMR++ files and map the variables inside these files to the mature and broadly used OPeNDAP DAP4 protocol.
In this new version of Hyrax, DMR++ now supports a wide range of HDF5, HDF4, and HDF4-EOS2 features, allowing for direct data access in the cloud for many of NASA’s datasets. This means that DMR++ files can be generated for a wide range of NASA’s datasets, including those that may have missing grid information. The DMR++ software includes better support for DAP4, including mapping HDF4 Grids to DAP4 Groups and dimensions. When CF grid variables are missing, these grid variables are generated and embedded in the DMR++ . In addition to more complete support for these archival data file formats, various optimizations to the dmrpp generator have been included to improve the generation, checks, and testing of DMR++ .
DMR++ increases its support for HDF5 by supporting (compressed) compound data types, arrays of strings, and subsetting of HDF5 compact arrays. In addition, there are various fixes to how DMR++ reads variable string data. Lastly, this release provides a fix to reported issues when building DMR++ from NetCDF-4 datasets with enable-CF option set true.
Some minor fixes to Hyrax’s HDF5 handler are incorporated in the new version, along with an improved testsuite. Hyrax’s HDF4 handler is greatly expanded to directly support the DAP4 protocol for NASA’s HDF4 and HDF4-EOS2 datasets. Previously, DAP4 support was available by translating the DAP2 objects, which meant important features of DAP4 were not available. This new 'native' DAP4 implementation continues to support CF grids/variables and the default options of the older software. Finally, the overall performance of the HDF4 handler has been improved resulting in shorter response times.
Various fixes are now incorporated to Hyrax to improve performance and support for DAP4 and DAP4 to DAP2 mappings for various NetCDF cases. Lastly, a better handling of BES Error types and exception cases and improvements to the BESLog has been implemented resulting in more meaningful error messages and timing data for BES commands.
For those with NASA access to JIRA, see the completed issue list for this release: NASA JIRA
1.1. Configuration and behavior updates
As of Hyrax 1.16.8 we have deprecated the following
DEPRECATED: <UseDAP2ResourceUrlResponse />.
Instead, we recommend to use
a). <DatasetUrlResponse type="…" /> ` to configure the type of response that the server will generate when a client attempts to access the unadorned Dataset URL. The type of response is controlled by the value of the type attribute.
where the default type above is `download
Allowed values:
-
download(default)
If the configuration parameterAllowDirectDataSourceAccessis set (present) then the source data file will be returned for the dataset URL. If the configuration parameterAllowDirectDataSourceAccessis not present then a 403 forbidden will be returned for the dataset URL. (This is basically a file retrieval service, any constraint expression submitted with the unadorned dataset URL will be ignored.) -
dsr.
The dap4 DSR response will be returned for the dataset URL.
| This setting is not compatible with DataRequestForm type of “dap2” as the DSR response URL collides with the DAP2 Data Request Form URL. |
-
requestForm
The Hyrax Data Request Form Page will be returned for the dataset URL. Which form is returned is controlled by the DataRequestForm configuration element
b) <DataRequestForm type="…" />
Defines the target DAP data model for the dataset links in the “blue-bar” catalog.html pages. These links point to the DAP Data Request Form for each dataset. This element also determines the type of Data request form page returned when the DatasetUrlResponse type=”requestForm” and the request is for the Dataset URL
Allowed values: dap2 or dap4
c) <AllowDirectDataSourceAccess />
When enabled users will be able to use Hyrax as a file server and download the underlying data files/granules/objects directly, without utilizing the DAP APIs.
* default: disabled
d) <ForceDataRequestFormLinkToHttps />
The presence of this element will cause the Data Request Form interfaces to “force” the dataset URL to HTTPS. This is useful for situations where the sever is sitting behind a connection management tool (like AWS CloudFront) whose outward facing connections are HTTPS but Hyrax is not using HTTPS. Thus the internal URLs being received by Hyrax are on HTTP. When these URLs are exposed via the Data Request Forms they can cause some client’s to have issues with session dropping because the protocols are not consistent.
Default: disabled
2. Overview
This section describes the installation, configuration, and operation of the Hyrax Data server, a data server that integrates structured data with the world wide web. Hyrax is one example of a number of data servers that implement OPeNDAP’s Data Access Protocol (DAP).
For information on how to get Hyrax downloaded and running, please see the Hyrax Downloading and Installation guide that appears later in this manual.
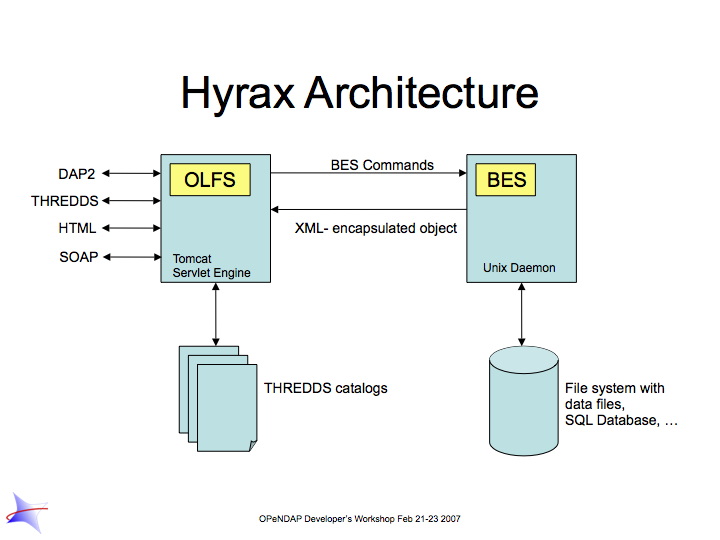
Hyrax uses the Java servlet mechanism to hand off requests from a general web daemon to DAP format-specific software. This provides higher performance for small requests. The servlet front end, which we call the OPeNDAP Lightweight Front end Server (OLFS) looks at each request and formulates a query to a second server (which may or may not on the same machine as the OLFS) called the Back End Server (BES).
The BES is the high-performance server software from HAO. It reads data from the data stores and returns DAP-compliant responses to the OLFS. In turn, the OLFS may pass these response back to the requestor with little or no modification, or it may use them to build more complex responses. The nature of the Inter Process Communication (IPC) between the OLFS and BES is such that they should both be on the same machine or able to communicate over a very high-bandwidth channel.
The OLFS and the BES will run and serve test data immediately after a default installation. Additional configuration is required for them to serve site specific data.
2.1. Features
-
DMR++ : DMR++ provides direct access to data in S3, and so Hyrax supports direct I/O transfers from HDF5 to NetCDF4 when using DMR++ . Hyrax can find the effective URL for a data item when it is accessed via a series of redirect operations, the last of which is a signed AWS URL. This is a common case for data stored in S3. In addition, the BES can sign S3 URLs using the AWS V4 signing scheme. Hyrax implements lazy evaluation of DMR++ files. This improves the efficiency/speed for requests that subset a dataset that contains a large number of variables as only the variables requested will have their Chunk information read and parsed.
-
EDL: EarthDataLogin Hyrax has extensitve support for Earthdata Login Authentication. For configurations that require Hyrax to authenticate remote resources, Hyrax can now utilize
~/.netrc(or anetrcfile may be specified insite.conf) and Hyrax will use the appropriate credentials. Moreover, Hyrax supports EDL token chaining and the handling of tokens is much improved so that redirected are not issues and session (cookie) management is not required of the client. -
THREDDS Catalog Support: Hyrax supports the THREDDS catalogs. It can serve user supplied static catalogs and it will dynamically generate THREDDS catalogs of it’s internal holdings.
-
Dataset Aggregation: Collections of related data resources can be collected into a single dataset using the aggregation features. Typically these are formed for geographic tiles, time series, etc.
-
Adding/modifying dataset content.: Datasets can be modified by the server without having to actually change the underlying files. These views are independently accessible from the original data. Both dataset metadata and data values may be added or changed.
-
Supports multiple source data formats: Server can ingest source data stored as HDF4, HDF4-EOS, HDF5, HDF5-EOS, NetCDF-3, NetCDF-4, CEDAR, FITS, Comma Separated Values, and raw ASCII and Binary formats. Because of Hyrax’s extensible design, it’s easy to add new source data formats.
-
Supports data retrieval in multiple return formats: Hyrax is able to return data in DAP, DAP4, NetCDF-3, NetCDF-4, JSON, CSV, and ASCII formats, Or, you can add your own response types.
-
Gateway: Hyrax supports a gateway feature that allows it to provide DAP (and other Hyrax) services for remotely held datasets that are stored in any of Hyrax’s source data formats.
-
RDF: Hyrax provides RDF descriptions of it’s data holdings. These can enable semantic web tools to operate upon the metadata content held in the server.
-
Server Side Functions: Hyrax supports a number of Server side functions out of the box including (but not limited to):
-
geogrid: Subset applicable DAP Grids using latitude and longitude values.
-
grid: Subset any DAP Grid object using the values of it’s map vectors.
-
linear_scale: Apply a linear equation to the data returned, including automatic use of CF attributes.
-
version: The version function provides a list of the server-side processing functions available.
-
New ones are easy to add.
-
-
Extensible WebStart functionality for data clients: Hyrax provides WebStart functionality for a number of Java based DAP clients. It’s simple to add new clients to the list that Hyrax supports.
-
Extensible/Configurable web interface: The web interface for both Hyrax and the administrator’s interface can be customized using CSS and XSL. You can add your organizations logo and specialize the colors and fonts in the presentation of data sets.
-
WMS services: Hyrax now supports WMS services via integration with ncWMS.
-
JSON responses: Both metadata and data are now available in a JSON encoding.
-
w10n: Hyrax comes with a complete w10n service stack. W10n navigation is supported through the default catalog where all datasets and "structure" variables appear as graph nodes. Data can be acquired for atomic types or arrays of atomic types in a number of formats.
-
Feature Request: If there is a feature you would like to see but don’t, let us know: support@opendap.org or opendap-tech@opendap.org. (You need to subscribe first.)
2.2. Modules
Hyrax has a number of modules that provide the actual functionality of the server: Reading data files, building different kinds of responses and performing different kinds of server processing operations. Most of these modules work with the BES but some are part of the front (web facing) part of the server.
2.2.1. BES modules
-
Gateway handler (Interoperability between Hyrax and other web services)
-
SQL handler (Unsupported)
Additional Java Modules that use the BES
-
WMS - Web Mapping Service via integration with ncWMS.
Reference Documentation
2.3. Contact Us
We hope you find this software useful, and we welcome your questions and comments.
Technical Support:
-
opendap-tech@opendap.org (You need to subscribe first.)
3. Installation
Hyrax is a data server that implements the DAP2 and DAP4 protocols, works with a number of different data formats and supports a wide variety of customization options from tailoring the look of the server’s web pages to complex server-side processing operations. This page describes how to build the server’s source code. If you’re working on a Linux or OS/X computer, the process is similar so we describe only the linux case; we do not support building the server on Windows operating systems.
There are broadly three ways to install and run Hyrax Data Server
3.1. Docker Installation (Recommended)
This is the simplest way to install and use the latest release of Hyrax.
3.1.1. Prerequisites
-
Docker daemonprocess is running in the background. -
You have a data folder. In this guide, we will assume it is
~/tmp/data/. -
Your data is stored in HDF5/NetCDF4 format, csv, or any other file format for which Hyrax has a data Handler (see all supported file formats by Hyrax)
-
OSX or Linux platform.
3.1.2. Run Hyrax and serve data
-
Open a terminal and download hyrax via DockerHub
You have two options. To download the latest official release of Hyrax data server run:
docker pull opendap/hyrax:latestThis will install the version of Hyrax as described on the official Hyrax data server page. The official releases are labor intensive to produce and only happen once or twice a year.
You can also download the absolute most recent version of Hyrax data server, i.e. that associated with the latest merged commit to the Master branch on Github, by running:
docker pull opendap/hyrax:snapshotBoth of the options above are fully tested using Travis for CI/CD, and pack with the correct versions needed to build Hyrax.
-
Run Hyrax and make your data available on port
8080
Say, in the case you installed the latest using DockerHub,
docker run -d -h hyrax -p 8080:8080 \
--volume ~/tmp/data:/usr/share/hyrax \
--name=hyrax opendap/hyrax:latest
If you are on an OSX system running on Apple silicon (M-series CPUs) docker deployment, you will need the following extra line: --platform linux/amd64 \.
|
The command above identifies the location of your data volume (~/tmp/data) and assigns it to /usr/share/hyrax, which is where Hyrax looks for data in the docker container.
-
Check data is available on local host
By now, you can paste onto any browser the following url to see Hyrax’s landing page
http://localhost:8080/opendap/hyraxMake sure all your data is available and try to download some of it.
The installation of Hyrax comes with various default configutations. If you want to learn how to change the various default configurations, check the overview on the Configuration
3.2. (pre-compiled) Binaries
Prerequisites:
-
Java>=11 -
Tomcat>=9
Installing a Hyrax binary release typically involves the following steps
-
Download the latest Hyrax release (Hyrax 1.17-1). It is composed of:
-
2 RPM files (one for
libdap, one for theBES). -
The OLFS binary distribution file. You can also install the
OLFS Automatic robots.txt, if available.
-
-
Install the
libdapRPM. -
Install the
BESRPM. -
Unpack the
OLFSdistribution file, and install theopendap.warfile into your Tomcat instance’swebappsdirectory. -
(optional)
ncWMS2. You will need to use the EDAL web page to locate the latestncWMS2“Servlet Container” software bundle as a WAR file. Install it into the same Tomcat instance as the OLFS. See here for more instructions.
| The detailed download and installation instructions for Hyrax are published on the download page for each release of the server. Find the latest release and its associated installation details on the Hyrax downloads page. |
3.2.1. BES Installation
Download
It is necessary that you download and install both the libdap and BES binaries.
-
Visit the official OPeNDAP website and go to Latest Release.
-
Scroll down the following page until you reach the section entitled Linux Binaries, then continue scrolling until you see the heading titled BES.
-
You need to download both the
libdapandBESRPMs which should be namedlibdap-x.x.xandbes-x.x.x. -
The downloaded files should be named something like
libdap-x.x.x.el6.x86_64.rpmandbes-x.x.x.static.el6.x86_64.rpm.
| In order to install the RPMs on your system, you must be running a 64bit OS. If you are running 32bit OS, attempting to install the libdap and BES RPMs will result in errors. |
Install
-
Install the libdap and bes RPMs:
sudo yum install libdap-3.x.x.rpm bes-3.x.x.rpm -
Test the
BES:-
start it:
sudo service besd start
(Or use the script in /etc/init.d with sudo: /etc/init.d/besd start) -
connect using a simple client:
bescmdln -
get version information:
BESClient> show version -
exit from
bescmdln:
BESClient> exit
-
| If you are upgrading to Hyrax 1.13.4 or newer from an existing installation older than 1.13.0, in the bes.conf file the keys BES.CacheDir, BES.CacheSize, and BES.CachePrefix have been replaced with BES.UncompressCache.dir, BES.UncompressCache.size, and BES.UncompressCache.prefix respectively. Other changes include the gateway cache configuration (gateway.conf) which now uses the keys Gateway.Cache.dir, Gateway.Cache.size, and Gateway.Cache.prefix to configure its cache. Changing the names enabled the BES to use separate parameters for each of its several caches, which fixes the problem of 'cache collisions.' |
3.2.2. OLFS Installation
Introduction
The OLFS comes with a default configuration that is compatible with the
default configuration of the BES. If you perform a default installation
of both, you should get a running Hyrax server that will be pre-populated
with test data suitable for running integrity tests.
Install Tomcat
-
Install tomcat.noarch:
sudo yum install tomcat.noarch. -
Create the directory
/etc/olfs, change its group to tomcat, and set it group writable:mkdir /etc/olfs chgrp tomcat /etc/olfs chmod g+w /etc/olfs)
Alternatively, get Apache Tomcat-8.x from the Apache Software Foundation and install it wherever you’d like—for example,
/usr/local/.
Download
Follow the steps below to download the latest OLFS distribution:
-
Visit the official OPeNDAP website and go to Latest Release.
-
Scroll down the following page until you reach the section entitled Linux Binaries
-
Directly underneath, you should see the
OLFSdownload link, named something likeOLFS_x.x.x._Web_Archive_File. Click to download. -
The downloaded file will be named something like:
olfs-x.x.x-webapp.tgz.
Unpack
Unpack the jar file with the command
tar -xvf olfs-x.x.x-webapp.tgz
This will unpack the files directory called olfs-x.x.x-webapp.
Install
Inside of the olfs-x.x.x-webapp directory, locate opendap.war and copy it into
Tomcat’s webapps directory:
cp opendap.war /usr/share/tomcat/webapps
Or, if you installed tomcat from the ASF distribution, its web application directory, for example…
/usr/local/apache-tomcat-8.5.34/webapps
CentOS-7/SELinux and Yum installed Tomcat
Recent versions of CentOS-7 are shipped with default SELinux settings that prohibit Tomcat from reading or opening the opendap.war file. This can be addressed by issuing the following two commands:
sudo semanage fcontext -a -t tomcat_var_lib_t /var/lib/tomcat/webapps/opendap.war
sudo restorecon -rv /var/lib/tomcat/webapps/
After this you will need to restart Tomcat:
sudo service tomcat restart
Starting and Stopping the OLFS/Tomcat
If you followed this tutorial and are using a YUM-installed Tomcat,
it should already be integrated into the system with a tomcat entry
in /etc/init.d and you should be able to…
-
Start Tomcat:
sudo service tomcat start -
Stop Tomcat:
sudo service tomcat stop
You can verify that the server is running by visiting http://localhost:8080/opendap/. If you have installed Hyrax on a virtual machine, replace localhost with the virtual machine’s IP address.
If you are installing the OLFS in conjunction with ncWMS2 version 2.0 or higher, copy both the opendap.war and the ncWMS2.war files into the Tomcat webapps directory. (Re)Start Tomcat.
|
If you are upgrading Hyrax from any previous installation older than 1.16.5, read this! The internal format of the olfs.xml file has been revised. No previous version of this file will work with Hyrax >=1.16.5. In order to upgrade your system, move your old configuration directory aside (mv /etc/olfs ~/olfs-OLD) and then follow the instruction to install a new OLFS. Once you have it installed and running you will need to review your old configuration and make the appropriate changes to the new olfs.xml to restore your server’s behavior. The other OLFS configuration files have not undergone any structural changes and you may simply replace the new ones that were installed with copies of your previously working ones.
|
To make the server restart with when host boots, use systemctl enable besd and systemctl enable tomcat, or chkconfig besd on and chkconfig tomcat on depending on the specifics of your Linux distribution.
|
3.3. Hyrax GitHub Source Build
If you would like to build Hyrax from source code, you can get signed source distributions from the download page referenced above. In addition, you can get the source code for the server from GitHub, either using the Hyrax project or by following the directions on our developer’s wiki.
3.3.1. Installing Hyrax in Developer Mode
If you are interested in working on Hyrax, we maintain a wiki with a section devoted to Developer Information specific to our software and the development process. You can find information there about developing your own modules for Hyrax.
4. Configuring and Customizing Hyrax
When you install Hyrax for the first time it is pre-configured to serve test data sets that come with each of the installed data handlers. This will allow you to test the server and make sure it is functioning correctly. After that you can customize it for your data.
4.1. BES Configuration
When you launch your Hyrax Data Server, the BES loads the bes.conf located in $prefix/etc/bes/, which instructs to read all the configuration files defined for each module, located in $prefix/etc/bes/modules/. There are 27 configuration files! For example, the $prefix/etc/bes/modules/h5.conf file declares all configuration options for the HDF5 handler.
By default $prefix is in /usr/local in Linux, or simply / if you followed the docker installation.
|
The last final directive in the bes.conf file is to read the $prefix/etc/bes/site.conf file, if it exists. And so, when the default configurations do not suit your needs, or that of your data users, the configuration of the BES can be customized by creating a site.conf and re-defining configuration parameters there. Any configuration reset in the site.conf file will override those set in the bes.conf file.
By default, there is no site.conf file, and thus Hyrax uses the default configurations.
|
The main advantages of having a separate site.conf file are:
-
The
bes.confis static (unaltered), providing a way to check the default configurations. -
The
site.conffile consolidates all of the used configurations into a single file. This is preferable over making changes across multiple files. -
The
site.conffile persists through Hyrax updates.
To learn how to create and configure such site.conf, along with many examples, jump to Custom Module Configuration subsection below.
4.1.1. Basic format of parameters
One way in which the parameters are set in the BES configuration file, is:
Name=Value1
Name+=Value2
The above assigns both Value1 and Value2 to Name, due to the += operator. If instead of += you have =, then Name would be overwritten in the second line, taking only the value of Value2.
The bes.conf file includes all .conf files in the modules directory with
the following:
BES.Include=modules/.*\.conf$
| Regular expressions can be used in the Include parameter to match a set of files. |
And if you would like to include another configuration file you would use the following:
BES.Include=/path/to/configuration/file/blee.conf
Another way to define configuration parameters, is by using key/value pairs. This applies to many of the parameters avaiable, but not all. For example:
SupportEmail = support@opendap.org

BES.ServerAdministrator = email:support@opendap.org
BES.ServerAdministrator += organization:OPeNDAP Inc.
BES.ServerAdministrator += street:165 NW Dean Knauss Dr.
BES.ServerAdministrator += city:Narragansett
BES.ServerAdministrator+=region:RI
BES.ServerAdministrator+=postalCode:02882
BES.ServerAdministrator+=country:US
BES.ServerAdministrator+=telephone:+1.401.575.4835
BES.ServerAdministrator+=website:http://www.opendap.org
| parser for the configuration ignores spaces around the '=' and '+=' operators. |
4.1.2. Custom Module Configuration via site.conf
The site.conf is a special configuration file that persists through Hyrax updates,
and here you can store custom module configurations. Below we provide instructions on how to customize a module’s configuration with site.conf
Configuration Instructions
The following instructions work generally for any way you install Hyrax. In addition, we provide instructions for using site.conf when running Hyrax via Docker.
-
Create an empty
site.confin$prefix\etc\beswith the following command:cd $prefix/etc/bes/ sudo touch site.conf
-
Locate the default
.conffile for the module that you would like to customize in$prefix/etc/bes/modules. -
Copy the configuration parameters that you would like to customize from the module’s configuration file into the
site.conf. -
Save your updates to
site.conf. -
Restart the server.
Included in $prefix/etc/bes/ is a template site.conf file, called site.conf.proto. To take advantage of this template you can simply copy it with the following command cp site.conf.proto site.conf. Then, uncomment the configuration parameters that you want to modify and update them.
|
Instructions When Running Hyrax via Docker
If you will be running Hyrax with Docker, you can first create an empty site.conf file on your machine, and point to it when running hyrax. This will allow the site.conf file to persist through any Hyrax update/restart, and even in accidental removing of Hyrax. For this, follow the (similar) steps as before:
-
Create a local
site.conffile. -
Run Hyrax via Docker adding the following line in Step 2 of the (see Docker Hub installation instructions):
--volume $prefix/path_to_your_configuration/site.conf:/etc/bes/site.conf \
-
Activate’s the docker container’s bash shell, by running:
docker exec -it hyrax bash
This will allow you to navigate the docker container, and therefore Hyrax’s directory.
-
Resume Steps 2-4 in general configuration instructions.
-
Restarting the server is optional / no longer needed. When running the server again, make sure to do Step 2.
Example: Pointing to data
There are two general ways to point to data, which depends on your preferred way to install and run Hyrax. When installing/running Hyrax via Docker, Step 2 describes the instruction to point data to Hyrax. Namely, add the following line to your docker run command:
--volume /full/path/data/root/directory:/usr/share/hyrax
By default, Hyrax will read data from /usr/share/hyrax. The /full/path/data/root/directory should be the root directory of your data catalog.
When installing Hyrax from Source or (pre-compiled) Binaries, you will have to set the value
BES.Catalog.catalog.RootDirectory=/full/path/data/root/directory
BES.Data.RootDirectory=/dev/null
in the site.conf.
The next step, is to (re)configure any mapping between data source names and data handlers. This is usually taken care of for you already, so you probably won’t have to set this parameter unless you would like to set a new configuration. Each data handler module (netcdf, hdf4, hdf5, freeform, etc…) will have this set depending on the extension of the data files for the data.
For example, in the nc.conf, for the netcdf data handler module, you’ll find the line:
BES.Catalog.catalog.TypeMatch+=nc:.*\.nc(\.bz2|\.gz|\.Z)?$;
When the BES is asked to perform some commands on a particular data
source, it uses regular expressions to figure out which data handler should be used to carry out the commands. The value of the BES.Catalog.catalog.TypeMatch parameter holds the set of regular expressions. The value of this parameter is a list of handlers and expressions in the form handler expression. The regular expressions used by the BES are like those used by grep on Unix and are somewhat cryptic, but once you see the pattern it’s not that bad.
|
For example, in the following 3 examples, the TypeMatch parameter is being told the following:
-
Any data source with a name that ends in .nc should be handled by the netcdf (nc) handler.
BES.Catalog.catalog.TypeMatch+=nc:.*\.nc(\.bz2|\.gz|\.Z)?$;
-
Any file with a .hdf, .HDF, or .eos suffix should be processed using the HDF4 handler (note that case matters)
BES.Catalog.catalog.TypeMatch+=h4:.*\.(hdf|HDF|eos)(\.bz2|\.gz|\.Z)?$;
-
Data sources ending in .dat should use the FreeForm handler.
BES.Catalog.catalog.TypeMatch+=ff:.*\.dat(\.bz2|\.gz|\.Z)?$;
If you fail to configure this correctly, the BES will return error messages stating that the type information has to be provided. It won’t tell you this, however when it starts, only when the OLFS (or some other software) makes a data request. This is because it is possible to use BES commands in place of these regular expressions, although the Hyrax won’t.
NetCDF-4 files and the HDF5 Handler
In the NetCDF example above, although not explicitly, the .nc suffix refers to NetCDF-3 files (i.e. NetCDF classic). NetCDF-3 is an older data model, and as such does not incorporate many of the DataTypes now widely used by the scientific community. As a result, data producers opt to use instead the Enhanced Data Model, i.e. the NetCDF-4. Unfortunately, both NetCDF3 and NetCDF4 data file formats have identical suffix, .nc.
Despite there becoming a common practice to assign the .nc4 suffix to NetCDF4 files, you can expect to find many NetCDF-4 files with a .nc suffix. Since Hyrax’s netcdf handler only covers the NetCDF3 model, any attributes or variable types that are only part of the NetCDF-4 data model will not be properly handled by Hyrax’s data server. At worst, Hyrax will be unable to serve the dataset.
To successfully serve NetCDF4 data, the HDF5 handler should be assigned to any such file. The reason behind this successfull approach is that the NetCDF-4 uses HDF5 library as its backend. However, in the case where your data has both NetCDF3 and NetCDF4, we strongly recommend to rename any NetCDF4 to include the .nc4 suffix. This will facilitate the mapping between NetCDF4 data and HDF5 handler. To find out whether your .nc data file is NetCDF3 or NetCDF4, you can use ncdump.
The mapping assigning the HDF5 handler to any .nc4 file should be defined in the site.conf file as follows:
BES.Catalog.catalog.TypeMatch+=h5:.*\.nc4(\.bz2|\.gz|\.Z)?$;
Below, we provide a concrete example of a site.conf file when serving NetCDF-4 datasets with Groups. Groups are part of both NetCDF4 and HDF5 data models.
Example: Groups in NetCDF4 and HDF5
By default, the Group representation on a dataset is flattened to accomodate CF 1.7 conventions. In addition, the default NC-handler that is used for any .nc4 dataset is based on "Classic NetCDF model" (netCDF-3), which does not incorporate many of the Enhanced NetCDF model (netCDF4) features. As a result, to serve .nc4 data that may contain DAP4 elements not present in DAP2 (see diagram for comparison with DAP2), or serve H5 datasets with unflattened Group representation, one must make the following 2 changes to the default configuration:
-
Set
H5.EnableCF=falseandH5.EnableCFDMR=true. -
Assign the h5 handler when serving
.nc4data via Hyrax.
To enable these changes the site.conf must have the following parameters:
BES.Catalog.catalog.TypeMatch=
BES.Catalog.catalog.TypeMatch+=csv:.*\.csv(\.bz2|\.gz|\.Z)?$;
BES.Catalog.catalog.TypeMatch+=reader:.*\.(dds|dods|data_ddx|dmr|dap)$;
BES.Catalog.catalog.TypeMatch+=dmrpp:.*\.(dmrpp)(\.bz2|\.gz|\.Z)?$;
BES.Catalog.catalog.TypeMatch+=ff:.*\.dat(\.bz2|\.gz|\.Z)?$;
BES.Catalog.catalog.TypeMatch+=gdal:.*\.(tif|TIF)$|.*\.grb\.(bz2|gz|Z)?$|.*\.jp2$|.*/gdal/.*\.jpg$;
BES.Catalog.catalog.TypeMatch+=h4:.*\.(hdf|HDF|eos|HDFEOS)(\.bz2|\.gz|\.Z)?$;
BES.Catalog.catalog.TypeMatch+=ncml:.*\.ncml(\.bz2|\.gz|\.Z)?$;

BES.Catalog.catalog.TypeMatch+=h5:.*\.(HDF5|h5|he5|H5)(\.bz2|\.gz|\.Z)?$;
BES.Catalog.catalog.TypeMatch+=h5:.*\.nc4(\.bz2|\.gz|\.Z)?$;

H5.EnableCF=false
H5.EnableCFDMR=true
Including and Excluding files and directories
Finally, you can configure the types of information that the BES sends back when a client requests catalog information. The Include and Exclude parameters provide this mechanism, also using a list of regular expressions (with each element of the list separated by a semicolon). In the example below, files that begin with a dot are excluded. These parameters are set in the dap.conf configuration file.
The Include expressions are applied to the node first, followed by the Exclude expressions. For collections of nodes, only the Exclude expressions are applied.
BES.Catalog.catalog.Include=;
BES.Catalog.catalog.Exclude=^\..*;
Example: Administrator parameters
The following steps detail how you can update the BES’s server administrator configuration parameters with your organization’s information:
-
Locate the existing server administrator configuration in
/etc/bes/bes.conf:BES.ServerAdministrator=email:support@opendap.org BES.ServerAdministrator+=organization:OPeNDAP Inc. BES.ServerAdministrator+=street:165 NW Dean Knauss Dr. BES.ServerAdministrator+=city:Narragansett BES.ServerAdministrator+=region:RI BES.ServerAdministrator+=postalCode:02882 BES.ServerAdministrator+=country:US BES.ServerAdministrator+=telephone:+1.401.575.4835 BES.ServerAdministrator+=website:http://www.opendap.org
When adding parameters to the ServerAdministrator configuration, notice how, following the first line, we use += instead of just
to add new key/value pairs. += indicates to the BES that we are adding new configuration parameters, rather than replacing those that were already loaded. Had we used just + in the above example, the only configured parameter would have been website. -
Copy the above block of text from its default .conf file to site.conf.
-
In site.conf, update the block of text with your organization’s information; for example…
BES.ServerAdministrator=email:smootchy@woof.org BES.ServerAdministrator+=organization:Mogogogo Inc. BES.ServerAdministrator+=street:165 Buzzknucker Blvd. BES.ServerAdministrator+=city: KnockBuzzer BES.ServerAdministrator+=region:OW BES.ServerAdministrator+=postalCode:00007 BES.ServerAdministrator+=country:MG BES.ServerAdministrator+=telephone:+1.800.555.1212 BES.ServerAdministrator+=website:http://www.mogogogo.org
-
Save your changes to site.conf.
-
Restart the server.
4.1.3. Administration & Logging
In the bes.conf or site.conf file, the BES.ServerAdministrator parameter is the address used in various mail messages returned to clients. Set this so that the email’s recipient will be able to fix problems and/or respond to user questions. Also set the log file and log level. If the BES.LogName is set to a relative path, it will be treated as relative to the directory where the BES is started. (That is, if the BES is installed in /usr/local/bin but you start it in your home directory using the parameter value below, the log file will be bes.log in your home directory.)
BES.ServerAdministrator=webmaster@some.place.edu BES.LogName=./bes.log BES.LogVerbose=no
Because the BES is a server in its own right, you will need to tell it which network port and interface to use. Assuming you are running the BES and OLFS (i.e., all of Hyrax) on one machine, do the following:
User and Group Parameters
In the bes.conf or site.conf file, the BES must be started as root. One of the things that the BES does first is to start a listener that listens for requests to the BES. This listener is started as root, but then the User and Group of the process is set using parameters in the BES configuration file:
BES.User=user_name BES.Group=group_name
You can also set these to a user id and a group id. For example:
BES.User=#172 BES.Group=#14
Setting the Networking Parameters
In the bes.conf or site.conf configuration file, we have settings for how the BES should listen for requests:
BES.ServerPort=10022 # BES.ServerUnixSocket=/tmp/opendap.socket
The BES.ServerPort tells the BES which TCP/IP port to use when listening for commands. Unless you need to use a different port, use the default. Ports with numbers less than 1024 are special, otherwise you can use any number under 65536. That being said, stick with the default unless you know you need to change it.
In the default bes.conf file we have commented the ServerUnixSocket parameter, which disables I/O over that device. If you need UNIX socket I/O, uncomment this line, otherwise leave it commented. The fewer open network I/O ports, the easier it is to make sure the server is secure.
If both ServerPort and ServerUnixSocket are defined, the BES listens on both the TCP port and the Unix Socket. Local clients on the same machine as the BES can use the unix socket for a faster connection. Otherwise, clients on other machines will connect to the BES using the BES.ServerPort value.
| The OLFS always uses only the TCP socket, even if the UNIX socket is present. |
4.1.4. Debugging Tip
In bes.conf, use the BES.ProcessManagerMethod
parameter to control whether the BES acts like a normal Unix server.
The default value of multiple causes the BES to accept many
connections at once, like a typical server. The value single causes it
to accept a single connection (process the commands sent to it and exit),
greatly simplifying troubleshooting.
BES.ProcessManagerMethod=multiple
Controlling how compressed files are treated
Compression parameters are configured in the bes.conf configuration file.
The BES will automatically recognize compressed files using the bz2,
gzip, and Unix compress (Z) compression schemes. However, you need to
configure the BES to accept these file types as valid data by making
sure that the filenames are associated with a data handler. For
example, if you’re serving netCDF files, you would set
BES.Catalog.catalog.TypeMatch so that it includes
nc:.*\.(nc|NC)(\.gz|\.bz2|\.Z)?$;. The first part of the regular
expression must match both the filename and the '.nc' extension, and the second
part must match the suffix, indicating the file is compressed (either .gz,
.bz2 or .Z).
When the BES is asked to serve a file that has been compressed, it first
must decompress it before passing it to the correct data handler (except
for those formats which support 'internal' compression, such as HDF4).
The BES.CacheDir parameter tells the BES where to store the
uncompressed file. Note that the default value of /tmp is probably less
safe than a directory that is used only by the BES for this purpose.
You might, for example, want to set this to <prefix>/var/bes/cache.
The BES.CachePrefix parameter is used to set a prefix for the cached files so that when a directory like /tmp is used, it is easy for the BES to recognize which files are its responsibility.
The BES.CacheSize parameter sets the size of the cache in megabytes. When the size of the cached files exceeds this value, the cache will be purged using a least-recently-used approach, where the file’s access time is the 'use time'. Because it is usually impossible to determine the sizes of data files before decompressing them, there may be times when the cache holds more data than this value. Ideally this value should be several times the size of the largest file you plan to serve.
Loading Software Modules
Virtually all of the BES’s functions are contained in modules that are loaded when the server starts up. Each module is a shared-object library. The configuration for each of these modules is contained in its own configuration file and is stored in a directory called modules. This directory is located in the same directory as the bes.conf file: $prefix/etc/bes/modules/.
By default, all .conf files located in the modules are loaded by the BES per this parameter in the bes.conf configuration file:
BES.Include=modules/.*\.conf$
So, if you don’t want one of the modules to be loaded, simply change its name to, say, nc.conf.sav and it won’t be loaded.
For example, if you are installing the general purpose server module (the dap-server module) then a dap-server.conf file will be installed in the modules directory. Also, most installations will include the dap module, allowing the BES to serve OPeNDAP data. This configuration file, called dap.conf, is also included in the modules directory. For a data handler, say netcdf, there will be an nc.conf file located in the modules directory.
Each module should contain within it a line that tells the BES to load the module at startup:
BES.modules+=nc BES.module.nc=/usr/local/lib/bes/libnc_module.so
Module specific parameters will be included in its own configuration file. For example, any parameters specific to the netcdf data handler will be included in the nc.conf file.
Symbolic Links
If you would like symbolic links to be followed when retrieving data and for viewing catalog entries, then you need to set the following two parameters: the BES.FollowSymLinks parameter and the BES.RootDirectory parameter. The BES.FollowSymLinks parameter is for non-catalog containers and is used in conjunction with the BES.RootDirectory parameter. It is not a general setting. The BES.Catalog.catalog.FollowSymLinks is for catalog requests and data containers in the catalog. It is used in conjunction with the BES.Catalog.catalog.RootDirectory parameter above. The default is set to No in the installed configuration file. To allow for symbolic links to be followed you need to set this to Yes.
The following is set in the bes.conf file:
BES.FollowSymLinks=No|Yes
And this one is set in the dap.conf file in the modules directory:
BES.Catalog.catalog.FollowSymLinks=No|Yes
Parameters for Specific Handlers
Parameters for specific modules can be added to the BES configuration file for that specific module. No module-specific parameters should be added to bes.conf.
4.2. OLFS Configuration
The OLFS is the outward facing component of the Hyrax server. This section provides OLFS configuration instructions.
| The OLFS web application relies on one or more instances of the BES to provide it with data access and basic catalog metadata. |
The OLFS web application stores its configuration state in a number of files. You can change the server’s default configuration by modifying the content of one or more of these files and then restarting Tomcat or the web application. These configuration files include the following:
-
olfs.xml: Contains the primary OLFS configuration, such as BES associations, directory view instructions, gateway service location, and static THREDDS catalog behavior. Located at/etc/olfs/olfs.xml. For more information aboutolfs.xml, please see theolfs.xmlconfiguration section. -
catalog.xml: Master(top-level) THREDDS catalog content for static THREDDS catalogs. Located at/etc/olfs/catalog.xml. -
viewers.xml: Contains the localized viewers configuration. Located at/etc/olfs/viewers.xml.
Generally, you can meet your configuration needs by making changes to
olfs.xml and catalog.xml. For more information about where these files
might be located, please see the following section, OLFS Configuration Files.
4.2.1. OLFS Configuration Files
If the default configuration of the OLFS works for your intended use, there is no need to create a persistent localized configuration; however, if you need to change the configuration, we strongly recommend that you enable a persistent local configuration. This way, updating the web application won’t override your custom configuration.
The OLFS locates its configuration file by looking at the value of
the OLFS_CONFIG_DIR user environment variable:
-
If the variable is set and its value is the pathname of an existing directory that is both readable and writable by Tomcat, the OLFS will use it.
-
If the directory
/etc/olfsexists and is readable and writable by Tomcat, the OLFS will use it. -
If the directory
/usr/share/olfsexists and is readable and writable by Tomcat, then the OLFS will use it. (This was added for Hyrax 1.14.1.)
If none of the above directories exist or the variable has not been set,
the OLFS uses the default configuration bundled in the web application
web archive file (opendap.war). In this way, the OLFS can start
without a persistent local configuration.
4.2.2. Create a Persistent Local Configuration
You can easily enable a persistent local configuration for the OLFS by
creating an empty directory and identifying it with the
OLFS_CONFIG_DIR environment variable:
export OLFS_CONFIG_DIR="/home/tomcat/hyrax"
Alternately, you can create /etc/olfs or /usr/share/olfs.
Once you have created the directory (and, in the first case, set the environment variable), restart Tomcat. Restarting Tomcat prompts the OLFS move a copy of its default configuration into the empty directory and then use it. You can then edit the local copy.
| The directory that you create must be both readable and writable by the user who is running Tomcat. |
4.2.3. olfs.xml Configuration File
The olfs.xml file contains the core configuration of the Hyrax
front-end service. The following subsections detailed its contents.
At the document’s root is the <OLFSConfig> element. It contains several
elements that supply the configuration for the OLFS.
The following is an example OLFS Configuration file:
<?xml version="1.0" encoding="UTF-8"?>
<OLFSConfig>
<BESManager>
<BES>
<prefix>/</prefix>
<host>localhost</host>
<port>10022</port>
<timeOut>300</timeOut>
<maxResponseSize>0</maxResponseSize>
<ClientPool maximum="200" maxCmds="2000" />
</BES>
<NodeCache maxEntries="20000" refreshInterval="600"/>
<SiteMapCache refreshInterval="600" />
</BESManager>
<ThreddsService prefix="thredds" useMemoryCache="true" allowRemote="true" />
<GatewayService prefix="gateway" useMemoryCache="true" />
<!-- DEPRECATED UseDAP2ResourceUrlResponse / -->
<DatasetUrlResponse type="download"/>
<DataRequestForm type="dap4" />
<!-- AllowDirectDataSourceAccess / -->
<HttpPost enabled="true" max="2000000"/>
<!-- AddFileoutTypeSuffixToDownloadFilename / -->
<!-- PreloadNcmlIntoBes -->
<!-- CatalogCache>
<maxEntries>10000</maxEntries>
<updateIntervalSeconds>10000</updateIntervalSeconds>
</CatalogCache -->
<!--
'Bot Blocker' is used to block access from specific IP addresses
and by a range of IP addresses using a regular expression.
-->
<!-- BotBlocker -->
<!-- <IpAddress>127.0.0.1</IpAddress> -->
<!-- This matches all IPv4 addresses, work yours out from here.... -->
<!-- <IpMatch>[012]?\d?\d\.[012]?\d?\d\.[012]?\d?\d\.[012]?\d?\d</IpMatch> -->
<!-- Any IP starting with 65.55 (MSN bots the don't respect robots.txt -->
<!-- <IpMatch>65\.55\.[012]?\d?\d\.[012]?\d?\d</IpMatch> -->
<!-- /BotBlocker -->
<!--
'Timer' enables or disables the generation of internal timing metrics for the OLFS
If commented out the timing is disabled. If you want timing metrics to be output
to the log then uncomment the Timer and set the enabled attribute's value to "true"
WARNING: There is some performance cost to utilizing the Timer.
-->
<!-- Timer enabled="false" / -->
</OLFSConfig><BESManager> Element (required)
The BESManager information is used whenever the software needs to access the BES’s services. This configuration is key to the function of Hyrax, for in it is defined each BES instance that is connected to a given Hyrax installation. The following examples will show a single BES example. For more information on configuring Hyrax to use multiple BESs look here.
Each BES is identified using a seperate <BES> child element inside
of the <BESManager> element:
<BESManager>
<BES>
<prefix>/</prefix>
<host>localhost</host>
<port>10022</port>
<timeOut>300</timeOut>
<maxResponseSize>0</maxResponseSize>
<ClientPool maximum="10" maxCmds="2000" />
</BES>
<NodeCache maxEntries="20000" refreshInterval="600"/>
<SiteMapCache cacheFile="/tmp/SiteMap.cache" refreshInterval="600" />
</BESManager><BES> Child Elements
The <BES> child elements provide the OLFS with connection and control
information for a BES. There are three required child elements
within a <BES> element and four optional child elements:
-
<prefix>element (required): This element contains the URL prefix that the OLFS will associate with this BES. It also maps this BES to the URI space that the OLFS services.The prefix is a token that is placed between the
host:port/context/part of the Hyrax URL and the catalog root. The catalog root is used to designate a particular BES instance in the event that multiple BESs are available to a single OLFS.If you have maintained the default configuration of a single BES, the tag must be designated by a forward slash:
<prefix>/</prefix>.There must be at least one BESelement in theBESManagerhandler configuration whose prefix has a value of/. There may be more than one<BES>, but only this one is required.When using multiple BESs, each BES must have an exposed mount point as a directory (aka collection) in the URI space where it is going to appear. It is important to note that the prefix string must always begin with the slash (
/) character:<prefix>/data/nc</prefix>. For more information, see Configuring With Multiple BESs. -
<host>element (required): Contains the host name or IP address of the BES, such as<host>test.opendap.org</host>. -
<port>element (required): Contains port number on which the BES is listening, such as<port>10022</port>. -
<timeOut>element (optional): Contains the timeout time, in seconds, for the OLFS to wait for this BES to respond, such as<timeOut>600</timeOut>. Its default value is 300. -
<maxResponseSize>element (optional): Contains in bytes the maximum response size allowed for this BES. Requests that produce a larger response will receive an error. Its default value of zero indicates that there is no imposed limit:<maxResponseSize>0</maxResponseSize>. -
<ClientPool>element (optional): Configures the behavior of the pool of client connections that the OLFS maintains with this particular BES. These connections are pooled for efficiency and speed:<ClientPool maximum="200" maxCmds="2000" />.Notice that this element has two attributes,
maximumandmaxCmds:-
The
maximumattribute specifies the maximum number of concurrent BES client connections that the OLFS can make. Its default value is 200. -
The
maxCmdsattribute specifies the maximum number of commands that can be issued over a particularBESClientconnection. The default is 2000.
-
If the <ClientPool> element is missing, the pool (maximum) size defaults
to 200 and maxCmds defaults to 2000.
<NodeCache> Child Element (optional)
The NodeCache element controls the state of the in-memory LRU cache for BES
catalog/node responses. It has two attributes, refreshInterval and
maxEntries.
The refreshInterval attribute specifies the time (in seconds) that any
particular item remains in the cache. If the underlying system has a lot of
change (model result output etc) then making this number smaller will increase
the rate at which the change becomes "available" through the Hyrax service, at
the expense of more cache churn and slower responses. If the underlying system
is fairly stable (undergoes little change) then refreshInterval can be larger
which will mean less cache churn and faster responses.
The maxEntries attribute defines the maximum number of entries to allowed in
the cache. If the serviced collection is large then making this larger will
definitely improve response times for catalogs etc.
Example:
<NodeCache maxEntries="20000" refreshInterval="600"/><SiteMapCache> Child Element (optional)
The SiteMapCache element defines the location and life span of the SiteMap
response cache. A cache for the BES SiteMap response can be time consuming to
produce for larger systems (~4 minutes for a system with 110k directories and
560k files) This configuration element addresses this by providing a location
and refresh interval for a SiteMap cache. SiteMapCache has two attributes,
cacheFile and refreshInterval.
The optional cacheFile attribute may be used to identify a particular location
for the SiteMap cache file, if not provided it will be placed by default into
cache directory located in the active OLFS configuration directory.
The refreshInterval attribute expresses, in seconds, the time that a SiteMap
is held in the cache before the system generates a new one.
Example:
<SiteMapCache cacheFile="/tmp/SiteMap.cache" refreshInterval="600" /><ThreddsService> Element (optional)
This configuration parameter controls the following:
-
The location of the static THREDDS catalog root in the URI space serviced by Hyrax.
-
Whether the static THREDDS catalogs are held in memory or read from disk for each request.
-
If the server will broker remote THREDDS catalogs and their data by following
thredds:catalogReflinks that point to THREDDS catalogs on other systems.
The following is an example configuration for the <ThreddsService> element:
<ThreddsService prefix="thredds" useMemoryCache="true" allowRemote="false" />Notice that <ThreddsService> has several attributes:
-
prefixattribute (optional): Sets the name of the static THREDDS catalogs' root in Hyrax. For example, if the prefix isthredds, thenhttp://localhost:8080/opendap/thredds/will give you the top-level static catalog, which is typically the contents of the file/etc/olfs/opendap/catalog.xml. This attribute’s default value isthredds.
-
useMemoryCacheattribute (optional): This is a boolean value with a default value oftrue.-
If the value of this attribute is set to
true, the servlet will ingest all of the static catalog files at startup and hold their contents in memory, which is faster but more memory intensive. -
If set to
false, each request for a static THREDDS catalog will cause the server to read and parse the catalog from disk, which is slower but uses less memory.
See this page for more information about the memory caching operations.
-
-
allowRemoteattribute (optional): If this attribute is present and its value is set totrue, then the server will "broker" remote THREDDS catalogs and the data that they serve. This means that the server, not the client, will perform the following steps:-
Retrieve the remote catalogs.
-
Render them for the requesting client.
-
Provide an interface for retrieving the remote data.
-
Allow Hyrax to perform any subsequent processing before returning the result to the requesting client.
This attribute has a default value of
false. -
<GatewayService> (optional)
Directs requests to the Gateway Service:
<GatewayService prefix="gateway" useMemoryCache="true" />The following are the attributes of <GatewayService>:
-
prefixattribute (optional): Sets location of the gateway service in the URI space serviced by Hyrax. For example, if the prefix isgateway, thenhttp://localhost:8080/opendap/gateway/should give you the Gateway Service page. This attribute’s default value isgateway. -
useMemoryCacheattribute (optional): See the previous section for more information.
<UseDAP2ResourceUrlResponse /> element (DEPRECATED)
The UseDAP2ResourceUrlResponse key has been deprecated.
Use DatasetUrlResponse and DataRequestForm to determine what kind of
response Hyrax will return for the dataset URL.
This element controls the type of response that Hyrax will provide to a client’s request for the data resource URL:
<UseDAP2ResourceUrlResponse />
When this element is present, the server will respond to
requests for data resource URLs by returning the DAP2 response
(either an error or the underlying data object). Commenting out or removing
the <UseDAP2ResourceUrlResponse /> element will cause the server to return the
DAP4 DSR response when a dataset resource URL is requested.
NOTE: DAP2 responses are not clearly defined by any specification, whereas DAP4 DSR responses are well-defined by a specification.
This element has no attributes or child elements and is enabled by default.
<DatasetUrlResponse type="download|requestForm|dsr"/>
The DatasetUrlResponse configuration element is used to configure the type of response
that the server will generate when a client attempts to access the Dataset URL.
The type of response is controlled by the value of the type attribute.
There are three supported values are: dsr, download, and requestForm.
-
download- If the configuration parameter AllowDirectDataSourceAccess is set (present) then the source data file will be returned for the dataset URL. If the configuration parameter AllowDirectDataSourceAccess is not present then a 403 forbidden will be returned for the dataset URL. (This is basically a file retrieval service, any constraint expression submitted with the dataset URL will be ignored.) -
requestForm- The Hyrax Data Request Form Page will be returned for the dataset URL. -
dsr- The dap4 DSR response will be returned for the dataset URL.
The default value is download:
<DatasetUrlResponse type="download"/><DataRequestForm type="dap2|dap4"/>
The value of the DataRequestForm element defines these server behaviors:
-
The DAP centric view of the catalog pages. This value controls if the catalog pages are of the DAP2 or DAP4 form. The "blue-bar" catalog(catalog.html) pages (catalog.html) for the preferred DAP data model contain links specifically associated with that data model. This includes the link to the Data Request Form.
-
This element also determines the type of Data request form page returned when the
DatasetUrlResponsetype is set torequestFormand the request is for the Dataset URL the request will be redirected to the DAP2 or DAP4 Data Request form.
Supported type values are: dap2 and dap4
The default value is dap4:
<DataRequestForm type="dap4" /><AllowDirectDataSourceAccess/> element (optional)
The <AllowDirectDataSourceAccess/> element controls the user’s
ability to directly access data sources via the Hyrax web interface:
<!-- AllowDirectDataSourceAccess / -->If this element is present and not commented out, a client can retrieve an entire data source (such as an HDF file) by requesting it through the HTTP URL interface.
This element has no attributes or child elements and is disabled by default. We recommend that you leave it unchanged, unless you want users to be able to circumvent the OPeNDAP request interface and have direct access to the data products stored on your server.
<ForceDataRequestFormLinkToHttps/> element (optional)
'ForceDataRequestFormLinkToHttps' - The presence of this element will cause the Data Request Form interfaces to "force" the dataset URL to HTTPS. This is useful for situations where the sever is sitting behind a connection management tool (like CloudFront) whose outward facing connections are HTTPS but Hyrax is not using HTTPS. Thus the internal URLs being received by Hyrax are on HTTP. When these URLs are exposed via the Data Request Forms they can cause some clients issues with session dropping because the protocols are not consistent.
<ForceDataRequestFormLinkToHttps /><AddFileoutTypeSuffixToDownloadFilename /> element (optional)
This optional element controls how the server constructs the download file name that is transmitted in the HTTP Content-Disposition header:
<AddFileoutTypeSuffixToDownloadFilename />For example, suppose the <AddFileoutTypeSuffixToDownloadFilename /> element is
either commented out or not present. When a user requests a data response from
somedatafile.hdf in netCDF-3 format, the HTTP Content-Disposition header will be set
like this:
Content-Disposition: attachment; filename="somedatafile.hdf"
However, if the <AddFileoutTypeSuffixToDownloadFilename /> is present, then the
resulting response will have an HTTP Content-Disposition header:
Content-Disposition: attachment; filename="somedatafile.hdf.nc"
By default the server ships with this disabled.
<BotBlocker> (optional)
This optional element can be used to block access from specific IP addresses or a range of IP addresses using regular expressions:
<BotBlocker>
<IpAddress>128.193.64.33</IpAddress>
<IpMatch>65\.55\.[012]?\d?\d\.[012]?\d?\d</IpMatch>
</BotBlocker><BotBlocker> has the following child elements:
-
<IpAddress>element: The text value of this element should be the IP address of a system that you would like to block from accessing your service. For example,<IpAddress>128.193.64.33</IPAddress>Will block the system located at128.193.64.33from accessing your server.There can be zero or more
<IpAddress>child elements in the<BotBlocker>element. -
<IpMatch>element: The text value of this element should be the regular expression that will be used to match the IP addresses of clients attempting to access Hyrax. For example,<IpMatch>65\.55\.[012]?\d?\d\.[012]?\d?\d</IpMatch>matches all IP addresses beginning with65.55, and thus blocks access for clients whose IP addresses lie in that range.There can be zero or more
<IpMatch>child elements in<BotBlockerelement.
Developer Options
These configuration options are intended to be used by developers that are engaged in code developement for components of Hyrax. They are not meant to be enabled in any kind of production environment. They are included here for transparency and to help potential contributors to the Hyrax project.
<Timer>
The <Timer> attribute enables or disables the generation of internal timing metrics for the OLFS:
<Timer enabled="true"/>
Timer has a single attribute, enabled, which is a boolean value.
Uncommenting this value and setting it to true will output timing metrics to the log.
Enabling the Timer will impose significant performance overhead on the
server’s operation and should ony be done in an effort to understand the
relative times spent in different operations--not as a mechanism for
measuring the server’s objective performance.
|
<ingestTransformFile> child element (developer)
This child element of the ThreddsService element is a special code development option
that allows a developer to specify the fully qualified path to an XSLT file that will be
used to preprocess each THREDDS catalog file read from disk:
Example:
<ingestTransformFile>/fully/qualified/path/to/transfrm.xsl</ingestTransformFile>The default version of this file, found in
$CATALINA_HOME/webapps/opendap/xsl/threddsCatalogIngest.xsl,
processes the thredds:datasetScan elements in each THREDDS catalog
so that they contain specific content for Hyrax.
4.2.4. Viewers Service (viewers.xml file)
The Viewers service provides, for each dataset, an HTML page that contains
links to Java WebStart applications and to WebServices, such as WMS,
that can be used in conjunction with the dataset. The Viewers
service is configured via the contents of the viewers.xml file, typically located
at the following location: /etc/olfs/viewers.xml.
viewers.xml Configuration File
The viewers.xml contains a list of two types of elements:
-
<JwsHandler>elements -
<WebServiceHandler>elements
The details of these are discussed elsewhere in the documentation. The following is an example configuration:
<ViewersConfig>
<JwsHandler className="opendap.webstart.IdvViewerRequestHandler">
<JnlpFileName>idv.jnlp</JnlpFileName>
</JwsHandler>
<JwsHandler className="opendap.webstart.NetCdfToolsViewerRequestHandler">
<JnlpFileName>idv.jnlp</JnlpFileName>
</JwsHandler>
<JwsHandler className="opendap.webstart.AutoplotRequestHandler" />
<WebServiceHandler className="opendap.viewers.NcWmsService" serviceId="ncWms">
<applicationName>Web Mapping Service</applicationName>
<NcWmsService href="/ncWMS/wms" base="/ncWMS/wms" ncWmsDynamicServiceId="lds" />
</WebServiceHandler>
<WebServiceHandler className="opendap.viewers.GodivaWebService" serviceId="godiva">
<applicationName>Godiva WMS GUI</applicationName>
<NcWmsService href="http://localhost:8080/ncWMS/wms" base="/ncWMS/wms" ncWmsDynamicServiceId="lds"/>
<Godiva href="/ncWMS/godiva2.html" base="/ncWMS/godiva2.html"/>
</WebServiceHandler>
</ViewersConfig>4.2.5. Logging
For information about logging, see the Hyrax Logging Configuration Documentation.
4.2.6. Authentication and Authorization
The following subsections detail authentication and authorization.
Apache Web Server (httpd)
If your organization desires secure access and authentication layers for Hyrax, the recommended method is to use Hyrax in conjunction the Apache Web Server (httpd).
Most organizations that use secure access and authentication for their web presence are already doing so via Apache Web Server, and Hyrax can be integrated nicely with this existing infrastructure.
More about integrating Hyrax with Apache Web Server can be found at these pages:
Tomcat
Hyrax may be used with the security features implemented by Tomcat for authentication and authorization services. We recommend that you read carefully and understand the Tomcat security documentation.
For Tomcat 7.x see:
For Tomcat 8.5.x see:
We also recommend that you read chapter 12 of the Java Servlet Specification 2.4 that decribes how to configure security constraints at the web-application-level.
Tomcat security requires fairly extensive additions to the web.xml
file located here: ${CATALINA_HOME}/webapps/opendap/WEB-INF/web.xml
Altering the <servlet> definitions may render your Hyrax
server inoperable.
|
Examples of security content for the web.xml file can be found in the
persistent content directory of the Hyrax server, which by default is
located here $CATALINA_HOME/webapps/opendap/WEB-INF/conf/TomcatSecurityExample.xml
Limitations
Tomcat security officially supports context-level authentication. This means that you can restrict access to the collection of servlets running in a single web application (i.e. all of the stuff that is defined in a single web.xml file). You can call out different authentication rules for different `<url-pattern>`s within the web application, but only clients that do not cache ANY security information will be able to easily access the different areas.
For example, in your web.xml file you might have the following:
<security-constraint>
<web-resource-collection>
<web-resource-name>fnoc1</web-resource-name>
<url-pattern>/hyrax/nc/fnoc1.txt</url-pattern>
</web-resource-collection>
<auth-constraint>
<role-name>fn1</role-name>
</auth-constraint>
</security-constraint>
<security-constraint>
<web-resource-collection>
<web-resource-name>fnoc2</web-resource-name>
<url-pattern>/hyrax/nc/fnoc2.txt</url-pattern>
</web-resource-collection>
<auth-constraint>
<role-name>fn2</role-name>
</auth-constraint>
</security-constraint>
<login-config>
<auth-method>BASIC</auth-method>
<realm-name>MyApplicationRealm</realm-name>
</login-config>Where the security roles fn1 and fn2 (defined in the tomcat-users.xml file) have no common members.
The complete URI’s would be…
http://localhost:8080/mycontext/hyrax/nc/fnoc1.txt http://localhost:8080/mycontext/hyrax/nc/fnoc2.txt
This works for clients that do not cache anything; however, if you access
these URLs with a typical internet browser, authenticating one URI
would lock you out of the other URI until you "reset" the browser by
purging all caches.
This happens, because, in the exchange between Tomcat and the
client, Tomcat sends the header
WWW-Authenticate: Basic realm="MyApplicationRealm",
and the client authenticates.
When you access the second URI, Tomcat sends the same authentication challenge
with the same WWW-Authenticate header. The client, having recently authenticated to
this realm-name (defined in the <login-config> element in the
web.xml file - see above), resends the authentication information, and,
since it is not valid for that url pattern, the request is denied.
Persistence
Be sure to back up your modified web.xml file to a location outside of the $CATALINA_HOME/webapps/opendap directory, as newly-installed versions of Hyrax will overwrite it.
You could, for example, use an XML ENTITY and an entity reference in the web.xml.
This will cause a local file containing the security configuration to be included in the
web.xml. For example…
-
Add the ENTITY
[<!ENTITY securityConfig SYSTEM "file:/fully/qualified/path/to/your/security/config.xml">]to the !DOCTYPE declaration at the top of the web.xml.
-
Add an entity reference (securityConfig, as above) to the content of the web-app element. This would cause your externally held security configuration to be included in the web.xml file.
. The following is an example ENTITY configuration:
<?xml version="1.0" encoding="ISO-8859-1"?>
<!DOCTYPE web-app
PUBLIC "-//Sun Microsystems, Inc.//DTD Web Application 2.2//EN"
"http://java.sun.com/j2ee/dtds/web-app_2_2.dtd"
[<!ENTITY securityConfig SYSTEM "file:/fully/qualified/path/to/your/security/config.xml">]
>
<web-app>
<!--
Loads a persistent security configuration from the content directory.
This configuration may be empty, in which case no security constraints will be
applied by Tomcat.
-->
&securityConfig;
.
.
.
</web-app>This will not prevent you from losing your web.xml file when a new version of Hyrax is installed, but adding the ENTITY to the new web.xml file is easier than remembering an extensive security configuration.
4.2.7. Compressed Responses and Tomcat
Many OPeNDAP clients accept compressed responses. This can greatly increase the efficiency of the client/server interaction by diminishing the number of bytes actually transmitted over "the wire." Tomcat provides native compression support for the GZIP compression mechanism; however, it is NOT turned on by default.
The following example is based on Tomcat 7.0.76. We recommend that you carefully read the Tomcat documentation related to this topic before proceeding:
-
Tomcat 7.x documentation for the HTTP Connector (see Standard Implementation section)
-
Tomcat 8.5.x documentation for the HTTP/1.1 Connector(see Standard Implementation section)
Details
To enable compression, you will need to edit the $CATALINA_HOME/conf/server.xml file.
Locate the <Connector> element associated with your server. It is typically
the only <Connector> element whose port attribute is set equal to 8080.
You will need to add or change several of its attributes to enable compression.
With our Tomcat 7.0.76 distribution, we found this default <Connector>
element definition in our server.xml file:
<Connector
port="8080"
protocol="HTTP/1.1"
connectionTimeout="20000"
redirectPort="8443"
/>You will need to add four attributes:
compression="force"
compressionMinSize="2048"
compressableMimeType="text/html,text/xml,text/plain,text/css,text/javascript,application/javascript,application/octet-stream,application/vnd.opendap.dap4.dataset-services+xml,application/vnd.opendap.dap4.dataset-metadata+xml,application/vnd.opendap.dap4.data,application/vnd.opendap.dap4.error+xml,application/json,application/prs.coverage+json,application/rdf+xml,application/x-netcdf;ver=4,application/x-netcdf,image/tiff;application=geotiff"The list of compressible MIME types includes all known response types for Hyrax.
The compression attribute may have the following values:
-
compression="no": Nothing is compressed (default if not provided). -
compression="yes": Only the compressible MIME types are compressed. -
compression="force": Everything gets compressed (assuming the client accepts gzip and the response is bigger than compressionMinSize).You must set compression="force"for compression to work with the OPeNDAP data transport.
When you are finished, your <Connector> element should look like the following:
<Connector
port="8080"
protocol="HTTP/1.1"
connectionTimeout="20000"
redirectPort="8443"
compression="force"
compressionMinSize="2048"
compressableMimeType="text/html,text/xml,text/plain,text/css,text/javascript,application/javascript,application/octet-stream,application/vnd.opendap.dap4.dataset-services+xml,application/vnd.opendap.dap4.dataset-metadata+xml,application/vnd.opendap.dap4.data,application/vnd.opendap.dap4.error+xml,application/json,application/prs.coverage+json,application/rdf+xml,application/x-netcdf;ver=4,application/x-netcdf,image/tiff;application=geotiff"
/>Restart Tomcat for these changes to take effect.
You can verify the change by using curl as follows:
curl -H "Accept-Encoding: gzip" -I http://localhost:8080/opendap/data/nc/fnoc1.nc.ascii
| The above URL is for Hyrax running on your local system and accessing a dataset that ships with the server. |
You’ll know that compression is enabled if the response to the curl command contains:
Content-Encoding: gzip
| If you are using Tomcat in conjunction with the Apache Web Server (our friend httpd) via AJP, you will need to also configure Apache to deliver compressed responses Tomcat will not compress content sent over the AJP connection. |
4.2.8. Pitfalls with CentOS-7.x and/or SELinux
SELinux (bundled by default with CentOS-7) will create some new challenges for those not familiar with the changes it brings to the system environment. For one, Tomcat runs as a confined user. Here we’ll examine how these changes affect the OLFS.
Localizing the OLFS Configuration under SELinux
When using a yum-installed Tomcat on CentOS-7.x (or any other Linux
environment that is essentially an SELinux variant), neither the /etc/olfs
or the /usr/share/olfs configuration locations will work without taking extra steps.
You must alter the SELinux access policies to give the Tomcat user
permission to read and write to one of these directories.
The following code block will configures the /usr/share/olfs directory for reading
and writing by the Tomcat user:
#!/bin/sh # You must be the super user to do this stuff... sudo -s # Create the location for the local configuration mkdir -p /usr/share/olfs # Change the group ownership to the tomcat group. # (SELinux will not allow you make the owner tomcat.) chgrp tomcat /usr/share/olfs # Make it writable by the tomcat group sudo chmod g+w /usr/share/olfs # Use semanage to change the context of the target # directory and any (future) child dirs semanage fcontext -a -t tomcat_var_lib_t "/usr/share/olfs(/.*)?" # Use restorecon to commit/do the labeling. restorecon -rv /usr/share/olfs
For further reading about SELinux and its permissions issues, see the following:
Tomcat Logs
In SELinux the yum-installed Tomcat does not produce a catalina.out file;
rather, the output is sent to the journal and can be viewed with the
following command:
journalctl -u tomcat
4.2.9. Deploying Robots for Hyrax
Deploying a robots.txt file for Hyrax is synonymous with deploying it for Tomcat. This means that your robots.txt file must be accessible here:
http://you.host:port/robots.txt
For example:
http://www.opendap.org/robots.txt
Note: Placing robots.txt lower in the URL path does not seem to work
In order to get Tomcat to serve the file from that location you must place it in $CATALINA_HOME/webapps/ROOT.
If you find that you system is still burdened with robot traffic then you might want to try the BotBlocker handler for the OLFS.
4.3. Configuring The OLFS To Work With Multiple BES’s
Configuring Hyrax to use multiple BES backends is straight forward. It will require that you edit the olfs.xml file and possible the catalog.xml file.
4.3.1. Top Level (root) BES
Every installation of Hyrax requires a top level (or root level) BES. This BES has a prefix of "/" (the forward slash character). The prefix is a URL token between the server address/port and catalog root used to designate a particular BES instance in the case that multiple Back-End-Servers are available to a single OLFS. The default (for a single BES) is no additional tag, designated by "/". The prefix is used to provide a mapping for each BES connected to the OLFS to URI space serviced by the OLFS.
In a single BES deployment this BES would contain all of the data resources to be made visible in Hyrax. In the THREDDS catalog.xml file each top level directory/collection would have it’s own <datasetScan> element.
Note: The word root here has absolutely nothing to do with the login account called root associated with the super user or system administrator.
4.3.2. Single BES Example (Default)
Here is the <Handler> element in an olfs.xml that defines the opendap.bes.BESManager file that configures the OLFS to use a single BES, the default configuration arrangement for Hyrax:
<Handler className="opendap.bes.BESManager">
<BES>
<prefix>/</prefix>
<host>localhost</host>
<port>10022</port>
<ClientPool maximum="10" />
</BES>
</Handler>
The BES is running on the same system as the OLFS, and it’s prefix is correctly set to "/". This BES will handle all data requests directed at the OLFS and will expose it’s top level directory/collection/catalog in the URI space of the OLFS here:
http://localhost:8080/opendap/
The THREDDS catalog.xml file for this should contain a <datasetScan> element for each of the top level directories | collections | catalogs that the BES exposes at the above URI.
*Remember*: There must be one (but only one) BES configured with the <prefix> set to "/" in your olf.xml file.
4.3.3. Multiple BES examples
Here is a BESManager <Handler> element that defines two BES’s:
<Handler className="opendap.bes.BESManager">
<BES>
<prefix>/</prefix>
<host>localhost</host>
<port>10022</port>
<ClientPool maximum="10" />
</BES>
<BES>
<prefix>/sst</prefix>
<host>comet.test.org</host>
<port>10022</port>
<ClientPool maximum="10" />
</BES>
</Handler>
The first one is running on the same system as the OLFS, the second on comet. test.org. The second BES is mapped to the prefix /sst. So the URL:
http://localhost:8080/opendap/
Will return the directory view at the top level of the first BES, running on the same system as the OLFS. The URL:
http://localhost:8080/opendap/sst
Will return the directory view at the top level of the second BES, running on comet.test.org.
You can repeat this pattern to add more BES’s to the configuration. This next example shows a configuration with 4 BES’s: The root BES, and 3 others:
<Handler className="opendap.bes.BESManager">
<BES>
<prefix>/</prefix>
<host>server0.test.org</host>
<port>10022</port>
<ClientPool maximum="10" />
</BES>
<BES>
<prefix>/sst</prefix>
<host>server1.test.org</host>
<port>10022</port>
<ClientPool maximum="10" />
</BES>
<BES>
<prefix>/chl-a</prefix>
<host>server2.test.org</host>
<port>10022</port>
<ClientPool maximum="10" />
</BES>
<BES>
<prefix>/salinity</prefix>
<host>server3.test.org</host>
<port>10022</port>
<ClientPool maximum="10" />
</BES>
</Handler>
Note that in this example:
-
The root BES is not necessarily running on the same host as the OLFS.
-
Every BES has a different prefix.
-
The OLFS would direct requests so that requests to:
-
http://localhost:8080/opendap/sst/* are handled by the BES at server1.test.org
-
http://localhost:8080/opendap/chl-a/* are handled by the BES at server2.test.org
-
http://localhost:8080/opendap/salinity/* are handled by the BES at server3.test.org
-
The BES at server0.test.org would handle everything else.
-
4.3.4. Mount Points
In a multiple BES installation each additional BES must have a mount point within the exposed hierarchy of collections for it to be visible in Hyrax.
Consider, if you have this configuration:
<Handler className="opendap.bes.BESManager">
<BES>
<prefix>/</prefix>
<host>server0.test.org</host>
<port>10022</port>
<ClientPool maximum="10" />
</BES>
</Handler>
And the top level directory for the root BES looks like this:
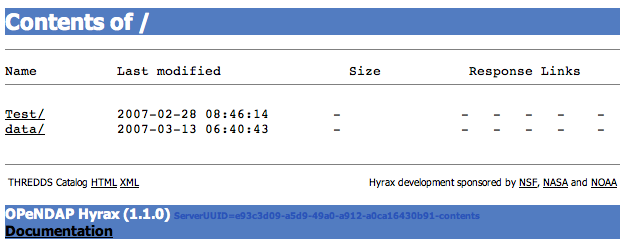
If you add another BES, like this:
<Handler className="opendap.bes.BESManager">
<BES>
<prefix>/</prefix>
<host>server0.test.org</host>
<port>10022</port>
<ClientPool maximum="10" />
</BES>
<BES>
<prefix>/sst</prefix>
<host>server5.test.org</host>
<port>10022</port>
<ClientPool maximum="10" />
</BES>
</Handler>
It will not appear in the top level directory unless you create a mount point. This simply means that on the file system served by the root BES you would need to create a directory called "sst" in the top of the directory tree that the root BES is exposing. In other words, simply create a directory called "sst" in the same directory that contains the "Test" and "data" directories on server0.test.org. After you did that your top level directory would look like this:
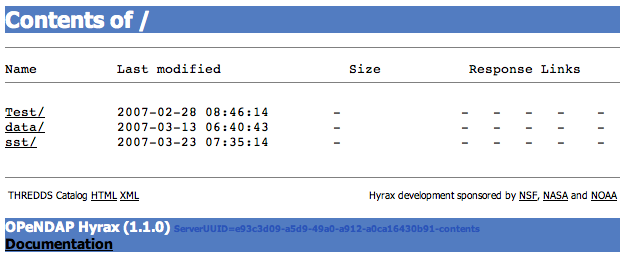
This holds true for any arrangement of BESs that you make. The location of the mount point will depend on your configuration, and how you organize things. Here is a more complex example.
Consider this configuration:
<Handler className="opendap.bes.BESManager">
<BES>
<prefix>/</prefix>
<host>server0.test.org</host>
<port>10022</port>
<ClientPool maximum="10" />
</BES>
<BES>
<prefix>/GlobalTemperature </prefix>
<host>server1.test.org</host>
<port>10022</port>
<ClientPool maximum="10" />
</BES>
<BES>
<prefix>/GlobalTemperature/NorthAmerica</prefix>
<host>server2.test.org</host>
<port>10022</port>
<ClientPool maximum="10" />
</BES>
<BES>
<prefix>/GlobalTemperature/NorthAmerica/Canada </prefix>
<host>server3.test.org</host>
<port>10022</port>
<ClientPool maximum="10" />
</BES>
<BES>
<prefix>/GlobalTemperature/NorthAmerica/USA </prefix>
<host>server4.test.org</host>
<port>10022</port>
<ClientPool maximum="10" />
</BES>
<BES>
<prefix>/GlobalTemperature/Europe/France </prefix>
<host>server4.test.org</host>
<port>10022</port>
<ClientPool maximum="10" />
</BES>
</Handler>
-
The mount point "GlobalTemperature" must be in the top of the directory tree that the root BES on server0.test.org is exposing.
-
The mount point "NorthAmerica" must be in the top of the directory tree that the BES on server1.test.org is exposing.
-
The mount point "Canada" must be in the top of the directory tree that the BES on server2.test.org is exposing.
-
The mount point "USA" must be in the top of the directory tree that the BES on server2.test.org is exposing.
-
The mount point "France" must be located at "GlobalTemperature/Europe/France" relative to the top of the directory tree that the BES on server0.test.org is exposing.
4.3.5. Complete olfs.xml with multiple BES installations example
<?xml version="1.0" encoding="UTF-8"?>
<OLFSConfig>
<DispatchHandlers>
<HttpGetHandlers>
<Handler className="opendap.bes.BESManager">
<BES>
<prefix>/</prefix>
<host>server0.test.org</host>
<port>10022</port>
<ClientPool maximum="10" />
</BES>
<BES>
<prefix>/GlobalTemperature </prefix>
<host>server1.test.org</host>
<port>10022</port>
<ClientPool maximum="10" />
</BES>
<BES>
<prefix>/GlobalTemperature/NorthAmerica</prefix>
<host>server2.test.org</host>
<port>10022</port>
<ClientPool maximum="10" />
</BES>
<BES>
<prefix>/GlobalTemperature/NorthAmerica/Canada </prefix>
<host>server3.test.org</host>
<port>10022</port>
<ClientPool maximum="10" />
</BES>
<BES>
<prefix>/GlobalTemperature/NorthAmerica/USA </prefix>
<host>server4.test.org</host>
<port>10022</port>
<ClientPool maximum="10" />
</BES>
<BES>
<prefix>/GlobalTemperature/Europe/France </prefix>
<host>server4.test.org</host>
<port>10022</port>
<ClientPool maximum="10" />
</BES>
</Handler>
<Handler className="opendap.coreServlet.SpecialRequestDispatchHandler" />
<Handler className="opendap.bes.VersionDispatchHandler" />
<Handler className="opendap.bes.DirectoryDispatchHandler">
<DefaultDirectoryView>OPeNDAP</DefaultDirectoryView>
</Handler>
<Handler className="opendap.bes.DapDispatchHandler" />
<Handler className="opendap.bes.FileDispatchHandler" >
<!-- <AllowDirectDataSourceAccess /> -->
</Handler>
<Handler className="opendap.bes.ThreddsDispatchHandler" />
</HttpGetHandlers>
<HttpPostHandlers>
<Handler className="opendap.coreServlet.SOAPRequestDispatcher" >
<OpendapSoapDispatchHandler>opendap.bes.SoapDispatchHandler</OpendapSoapDispatchHandler>
</Handler>
</HttpPostHandlers>
</DispatchHandlers>
</OLFSConfig>4.4. Logging Configuration Introduction
We see logging activities falling into two categories:
-
Access Logging - Is used to monitor server usage, server performance, and to see which resources are receiving the most attention. Tomcat has a very nice built-in Access Logging mechanism; all you have to do is turn it on.
-
Informational and debug logging - Most developers (myself included) rely on a collection of imbedded "instrumentation" that allows them to monitor their code and see what parts are being executed. Typically we like to design this instrumentation so that it can be enabled or disabled at runtime. Hyrax has this type of debugging instrumentation and ships with it disabled, but you could enable it. If you were to encounter an internal problem with Hyrax, you should enable different aspects of the instrumentation at you site, so that we can review the output to determine the issue.
4.4.1. Access Logging
Many people will want to record access logs for their Hyrax server. We want you to keep access logs for your Hyrax server. The easiest way to get a simple access log for Hyrax is to utilize the Tomcat/Catalina Valve Component.
AccessLogValve
Since Hyrax’s public facade is provided by the OLFS running inside of the Tomcat servlet container, you may utilize Tomcat’s handy access logging which relies on the org.apache.catalina.valves.AccessLogValve class class. By default Tomcat comes with this turned off.
To turn it on,
-
Locate the file $CATALINA_HOME/conf/servlet.html.
-
Find the commented out section for the access log inside the <Host> element. The server.xml file contains a good deal of comments, both for instruction and containing code examples. The part you are looking for is nested inside of the <Service> and the <Engine> elements. Typically it will look like:
<Service ...>
.
.
.
<Engine...>
.
.
.
<Host name="localhost" appBase="webapps"
unpackWARs="true" autoDeploy="true"
xmlValidation="false" xmlNamespaceAware="false">
.
.
.
<!-- Access log processes all requests for this virtual host.
By default, log files are created in the "logs"
directory relative to $CATALINA_HOME. If you wish, you can
specify a different directory with the "directory"
attribute. Specify either a relative (to $CATALINA_HOME)
or absolute path to the desired directory. -->
<!--
<Valve className="org.apache.catalina.valves.AccessLogValve"
directory="logs" prefix="localhost_access_log." suffix=".txt"
pattern="common" resolveHosts="false"/>
--/>
.
.
.
</Host>
.
.
.
</Engine>
.
.
.
</Service>
You can uncomment the <Valve> element to enable it, and you can change the values of the various attributes to suite your localization. For example:
<Valve className="org.apache.catalina.valves.AccessLogValve"
directory="logs"
prefix="access_log."
suffix=".log"
pattern="%h %l %u %t "%r" %s %b %D"
resolveHosts="false"/>
-
Save the file.
-
Restart Tomcat.
-
Read your log files.
Note that the pattern atribute allows you to customize the content of the access log entries. It is documented in the javadocs for Tomcat/Catalina as part of the org.apache.catalina.valves.AccessLogValve class and here in the Server Configuration Reference. The pattern shown above will provide log output that looks like the example below:
69.59.200.52 - - [05/Mar/2007:16:29:14 -0800] "GET /opendap/data/nc/contents.html HTTP/1.1" 200 13014 234
69.59.200.52 - - [05/Mar/2007:16:29:14 -0800] "GET /opendap/docs/images/logo.gif HTTP/1.1" 200 8114 2
69.59.200.52 - - [05/Mar/2007:16:29:51 -0800] "GET /opendap/data/nc/TestPatDbl.nc.html HTTP/1.1" 200 11565 137
69.59.200.52 - - [05/Mar/2007:16:29:56 -0800] "GET /opendap/data/nc/data.nc.ddx HTTP/1.1" 200 2167 121
The last column is the time in milliseconds it took to service the request and the next to the last column is the number of bytes returned.
4.4.2. Informational and Debug Logging (Using the Logback implementation of Log4j)
In general you shouldn’t have to modify the default logging configuration for Hyrax. It may become necessary if you encounter problems, but otherwise we suggest you leave it be.
Having said that, Hyrax uses the Logback logging package to provide an easily configurable and flexible logging environment. All "console" output is routed through the Logback package and can be controlled using the Logback configuration file.
There are several logging levels available:
-
TRACE
-
DEBUG
-
INFO
-
WARN
-
ERROR
-
FATAL
Hyrax ships with a default logging level of ERROR.
Additionally, Hyrax maintains its own access log using Logback.
| We strongly recommend that you take the time to read about Logback and Log4j before you attempt to manipulate the Logback configuration. |
Configuration File Location
Logback gets its configuration from an XML file. Hyrax locates this file in the following manner:
-
Checks the <init-parameter> list for the hyrax servlet (in the web.xml) for a an <init-parameter> called "logbackConfig". If found, the value of this parameter is assumed to be a fully qualified path name for the file. This can be used to specify alternate Logback config files.
Note: This configuration will not be persistent across new installations of Hyrax. We do not recommend setting this parameter, as doing so is not persistent—it will be overridden the next time the Web ARchive file is deployed. -
Failing 1: Hyrax then checks in the persistent content directory (set by either the OLFS_CONFIG_DIR environment variable or in /etc/olfs) for the file "logback-test.xml". If this file is present then it will be used to configure logging, and new installations of Hyrax will detect and use this logging configuration automatically.
-
Failing 2: Hyrax then checks in the persistent content directory (set by either the OLFS_CONFIG_DIR environment variable or in /etc/olfs) for the file "logback.xml". If this file is present then it will be used to configure logging, and new installations of Hyrax will detect and use this logging configuration automatically.
-
Failing 3: Hyrax falls back to the logback.xml file shipped with the distribution which is located in the $CATALINA_HOME/webapps/opendap/WEB-INF directory. Changes made to this file will be lost when a new version of Hyrax is installed or the opendap.war Web ARchive file is redeployed.
So - if you want to customize your Hyrax logging and have it be persistent, do it by copying the distributed logback.xml file ($CATALINA_HOME/webapps/opendap/WEB-INF/logback.xml) to the persistent content directory (set by either the OLFS_CONFIG_DIR environment variable or in /etc/olfs) and editing that copy.
Configuration
Did you read about LogBack and Log4j? Great!
There are a number of Appenders defined in the Hyrax log4j.xml file:
-
stdout - Loggers using this Appender will send everything to the console/stdout - which in a Tomcat environment will get shunted into the file $TOMCAT_HOME/logs/catalina.out.
-
devNull - Loggers using this Appender will not log. All messages will be discarded. This is the Log4j equivalent of piping your output into /dev/null in a UNIX environment.
-
ErrorLog - Loggers using this Appender will have their log output placed in the error log file in the persistent content directory: $TOMCAT_HOME/content/opendap/logs/error.log.
-
HyraxAccessLog - Loggers using this Appender will have their log output placed in the access log file in the persistent content directory: $TOMCAT_HOME/content/opendap/logs/HyraxAccess.log
The default configuration pushes ERROR level (and higher) messages into the ErrorLog, and logs accesses using HyraxAccessLog. You can turn on debugging level logging by changing the log level to DEBUG for the software components you are interested in. All of the OPeNDAP code is in the "opendap" package. The following configuration will cause all log messages of ERROR level or higher to be sent to the error log:
<logger name="opendap" level="error"/>
<appender-ref ref="ErrorLog"/>
</logger>
The following configuration will cause all messages of level INFO' or higher to be sent to stdout, which (in Tomcat) means that they will get stuck in the file $TOMCAT_HOME/logs/catalina.out.
<logger name="opendap" level="info"/>
<appender-ref ref="stdout"/>
</logger>
Be sure to get in touch if you have further questions about the logging configuration.
4.5. THREDDS Configuration Overview
Hyrax now uses its own implementation of the THREDDS catalog services and supports most of the THREDDS catalog service stack. The implementation relies on two DispatchHandlers in the OLFS and utilizes XSLT to provide HTML versions (presentation views) for human consumption.
-
Dynamic THREDDS catalogs for holdings provided by the BES are provided by the opendap.bes.BESThreddsDispatchHandler.
-
Static THREDDS catalogs are provided by the opendap.threddsHandler.StaticCatalogDispatch. The static catalogs allow catalog "graphs" to be decoupled from the filesystem "graph" of the data holdings, thus allowing data providers the ability to present and organize data collections independently of how they are organized in the underlying filesystem.
Static THREDDS catalogs are "rooted" in a master catalog file, catalog.xml, located in the (persistent) content directory for the OLFS (Typically $CATALINA_HOME/content/opendap). The default catalog.xml that comes with Hyrax contains a simple catalogRef element that points to the dynamic THREDDS catalogs generated from the BES holdings. The default catalog example also contains a (commented out) datasetScan element that provides (if enabled) a simple demonstration of the datasetScan capabilities. Additional catalog components may be added to the catalog.xml file to build (potentially large) static catalogs.
| THREDDS datasetScan elements are now fully supported and can be used as a tool for altering the catalog presentation of any part of the BES catalog. These alterations include (but are not limited too) renaming, auto proxy generation, filtering, and metadata injection. |
4.5.1. THREDDS Catalogs using XSLT
Prior to Hyrax 1.5 THREDDS catalog functionality in Hyrax was provided using an imported implementation of THREDDS. This was a large and complex dependancy for Hyrax, and the implementation had significant scalability problems for large catalogs. (Catalogs with 20k or more entries would consume all available memory.)
In response to this, we have written new code for Hyrax. We have replaced the imported code with 2 OLFS handlers.
BES THREDDS Handler
The opendap.bes.BESThreddsDispatchHandler provides THREDDS catalogs for all data served from a BES. It requires no configuration. Simply adding it to the OLFS configuration file: $CATALINA_HOME/content/opendap/olfs.xml will provide THREDDS catalogs for data served from the BES.
This handler uses XSL transforms to convert the BES <showCatalog> response into a THREDDS catalog.
Default Configuration
<Handler className="opendap.bes.BESThreddsDispatchHandler" />THREDDS Dispatch Handler
The opendap.threddsHandler.Dispatch handler provides THREDDS catalog functionality for static THREDDS catalogs located on the system with the OLFS. The handler uses XSL transforms to provide HTML presentation views of both the catalogs and individual datasets within the catalog. Much like the TDS, data access links are available on the dataset pages (if the catalog contains the information for the access links).
Memory Caching
The implementation can be configured to use memory caching of THREDDS catalogs to improve speed and reduce disk thrashing.
When memory caching is enabled, the handler will traverse the local THREDDS catalogs at startup. Each catalog file will be read into a memory buffer and cached. The memory buffer is parsed to verify that the catalog represents valid XML, but the resulting document is not saved. When a thredds:catalogRef element is encountered during the traversal, its href is evaluated:
-
If the href is a relative URL (does not begin with a "/" or "http://__") then the catalog is traversed and cached.
-
If the href begins with a "/" character, it is assumed that the catalog is being provided by another service on the same system, and it is not traversed or cached.
-
If the href begins with a "http://", it is assumed to be a remotely hosted catalog provided by another service on a different system, and it is not traversed or cached.
When a client asks for an XML catalog response, the entire cached buffer for the catalog is dumped to the client in a single write command. Since an already existing byte buffer it written to the response stream, this should be very fast.
If the client asks for an HTML view of the catalog, the buffer is parsed and passed through an XSL transform to generate the HTML page. The thinking behind this is as follows: machines traversing the XML files require fast response times. Humans will be traversing the HTML views of the catalog. We figure that the latency generated by parsing and performing transforms will be acceptable to most users.
If memory caching is disabled, then the startup remains the same, except no data is cached. Subsequent client requests for THREDDS products are handled in the same manner as before, only the catalog content is read from disk each time. While this means that the XML responses will be much slower, it will scale to handle much larger static catalog collections.
Each time a catalog request is processed, the source file’s last modified date is checked. If the catalog in memory was cached prior to the last modified date, it and all of its descendants in the catalog hierarchy are purged from the cache and reloaded.
prefix element
This handler requires a prefix element in the configuration:
<prefix>thredds</prefix>. The value of the prefix element is used by the
handler to identify requests intended for it. Basically, it will claim
any request whose path begins with the prefix.
For example, if the prefix is set to "thredds", then the request http://localhost:8080/opendap/thredds/catalog.xml will be claimed by the handler, while this request: http://localhost:8080/opendap/catalog.xml will not. (Although it would be claimed by the BES THREDDS Handler.)
Presentation View (HTML)
Supplanting the .xml at the end of a catalog’s name with .html will cause the opendap.threddsHandler.Dispatch to return an HTML presentation view of the catalog. This is accomplished by parsing the catalog.xml document (either from memory if cached or from disk if not) and running the resulting document through an XSL transform. All the metadata for all thredds:dataset elements can be inspected in a separate HTML page that details the dataset. This page is also generated by an XSL transform applied to the catalog XML document.
Default configuration
<Handler className="opendap.threddsHandler.Dispatch">
<prefix>thredds</prefix>
<useMemoryCache>true</useMemoryCache>
</Handler>4.5.2. THREDDS Catalog Documentation
Rather than provide an exhaustive explanation of the THREDDS catalog functionality and configuration, we will appeal to the existing documents provided by our fine colleagues at UNIDATA:
-
Client Catalog Specification Describes what THREDDS catalog components should be produced by servers.
-
Server catalog specification can help you understand the rules for constructing proper datasetScan elements in your catalog.
-
datasetScan configuration (applies to Hyrax as well).
4.5.3. Configuration Instructions
-
The current default (olfs.xml) file comes with THREDDS configured correctly.
-
The THREDDS master catalog is stored in the file $CATALINA_HOME/content/opendap/catalog.xml. It can be edited to provide additional static catalog access.
4.5.4. datasetScan Support
The datasetScan element is a powerful tool that can be used to sculpt the catalog’s presentation of the BES catalog content. The Hyrax implementation has a couple of key points that need to be considered when developing an instance of the datasetScan element in your THREDDS catalog.
location attribute
The location attribute specifies the place in the BES catalog graph where the datasetScan will be rooted. This value must be expressed relative to the BES catalog root (BES.Catalog.catalog.RootDirectory) and not in terms of the underlying BES host file system.
For example, if BES.Catalog.catalog.RootDirectory=/usr/share/hyrax and the data directory to which you wish to apply the datasetScan is (in filesystem terms) located at /Users/share/hyrax/data/nc, then the associated datasetScan element’s location attribute would have a value of /data/nc:
<datasetScan name="DatasetScanExample" path="hyrax" location="/data/nc">
name attribute
The name attribute specifies the name that will be used in the presentation (HTML) view for the catalog containing the datasetScan.
path attribute
The path attribute specifies the place in the THREDDS catalog graph that the datasetScan will be rooted. It is effectively a relative URL for the service. If path begins with a "/", then it is an absolute path rooted at the server and port of the web server. The values of the path attribute should never contain "catalog.xml" or "catalog.html". The service will create these endpoints dynamically.
Relative path example
Consider a catalog accessed with the URL http://localhost:8080/opendap/thredds/v27/Landsat/catalog.xml and that contains this datasetScan element:
<datasetScan name="DatasetScanExample" path="hyrax" location="/data/nc" /> </source>
In the client catalog, the datasetScan becomes this catalogRef element:
<thredds:catalogRef
name="DatasetScanExample"
xlink:title="DatasetScanExample"
xlink:href="hyrax/catalog.xml"
xlink:type="simple"
/>
And the top of datasetScan catalog graph will be found at the URL http://localhost:8080/opendap/thredds/v27/Landsat/hyrax/catalog.xml.
Absolute path examples
Consider a catalog accessed with the URL http://localhost:8080/opendap/thredds/v27/Landsat/catalog.xml and that contains this datasetScan element:
<datasetScan name="DatasetScanExample" path="/hyrax" location="/data/nc" />
In the client catalog the datasetScan becomes this catalogRef element:
<thredds:catalogRef
name="DatasetScanExample"
xlink:title="DatasetScanExample"
xlink:href="/hyrax/catalog.xml"
xlink:type="simple"
/>
Then the top of datasetScan catalog graph will be found at the URL http://localhost:8080/hyrax/catalog.xml, which is probably not what you want! This catalogRef directs the catalog crawler away from the Hyrax THREDDS service and to an undefined (as far as Hyrax is concerned) endpoint, one that will most likely generate a 404 (Not Found) response from the Web Server.
When using absolute paths you must be sure to prefix the path with the Hyrax THREDDS service path, or you will direct the clients away from the service. In these examples the Hyrax THREDDS service path would be /opendap/thredds/ (look at the URLs in the above examples). If we change the datasetScan path attribute value to /opendap/thredds/myDatasetScan:
<datasetScan name="DatasetScanExample" path="'/opendap/thredds/myDatasetScan" location="/data/nc" />
In the client catalog the datasetScan becomes this catalogRef element:
<thredds:catalogRef
name="DatasetScanExample"
xlink:title="DatasetScanExample"
xlink:href="/opendap/thredds/myDatasetScan/catalog.xml"
xlink:type="simple"
/>
Now the top of the datasetScan catalog graph will be found at the URL http://localhost:8080/opendap/thredds/myDatasetScan/catalog.xml, which keeps the URL referencing the Hyrax THREDDS service and not some other part of the web service stack.
useHyraxServices attribute
The Hyrax version of the datasetScan element employs the extra attribute useHyraxServices. This allows the datasetScan to automatically generate Hyrax data services definitions and access links for datasets in the catalog. The datasetScan can be used to augment the list of services (when useHyraxServices is set to true) or it can be used to completely replace the Hyrax service stack (when useHyraxServices is set to false).
Keep the following in mind:
-
If no services are referenced in the datasetScan and useHyraxServices is set to true, then Hyrax will provide catalogs with service definitions and access elements for all the datasets that the BES identifies as data.
-
If no services are referenced in the datasetScan and useHyraxServices is set to false, then the catalogs generated by the datasetScan will have no service definitions or access elements.
By default useHyraxServices is set to true.
Functions
filter
A datasetScan element can specify which files and directories it will include with a filter element (also see THREDDS server catalog spec for details). The filter element allows users to specify which datasets are to be included in the generated catalogs. A filter element can contain any number of include and exclude elements. Each include or exclude element may contain either a wildcard or a regExp attribute. If the given wildcard pattern or regular expression matches a dataset name, that dataset is included or excluded as specified. By default, includes and excludes apply only to atomic datasets (regular files). You can specify that they apply to atomic and/or collection datasets (directories) by using the atomic and collection attributes.
<filter>
<exclude wildcard="*not_currently_supported" />
<include regExp="/data/h5/dir2" collection="true" />
</filter>
sort
Datasets at each collection level are listed in ascending order by name. With a sort element you can specify that they are to be sorted in reverse order:
<sort>
<lexigraphicByName increasing="false" />
</sort>
namer
If no namer element is specified, all datasets are named with the corresponding BES catalog dataset name. By adding a namer element, you can specify more human readable dataset names.
<namer>
<regExpOnName regExp="/data/he/dir1" replaceString="AVHRR" />
<regExpOnName regExp="(.*)\.h5" replaceString="$1.hdf5" />
<regExpOnName regExp="(.*)\.he5" replaceString="$1.hdf5_eos" />
<regExpOnName regExp="(.*)\.nc" replaceString="$1.netcdf" />
</namer>
addTimeCoverage
A datasetScan element may contain an addTimeCoverage element. The addTimeCoverage element indicates that a timeCoverage metadata element should be added to each dataset in the collection and describes how to determine the time coverage for each dataset in the collection.
<addTimeCoverage
datasetNameMatchPattern="([0-9]{4})([0-9]{2})([0-9]{2})([0-9]{2})_gfs_211.nc$"
startTimeSubstitutionPattern="$1-$2-$3T$4:00:00"
duration="60 hours"
/>
for the dataset named 2005071812_gfs_211.nc, results in the following timeCoverage element:
<timeCoverage>
<start>2005-07-18T12:00:00</start>
<duration>60 hours</duration>
</timeCoverage>
For real-time data you may want to have a special link that points to the "latest" data in the collection. Here, latest is simply means the last filename in a list sorted by name, so its only the latest if the time stamp is in the filename and the name sorts correctly by time.
<addProxies>
<simpleLatest name="simpleLatest" />
<latestComplete name="latestComplete" lastModifiedLimit="60.0" />
</addProxies>
4.6. Webpage Customization
Hyrax’s public "face" is the web pages that are produced by servlets running in the Tomcat servlet engine. Almost all of these pages can be completely customized by the site administrator by editing a combination of HTML, XSLT, and CSS files.
4.6.1. Where To Make the Changes
All of the default versions of the HTML, XSLT, and CSS files come bundled with Hyrax in the $CATALINA_HOME/webapps/opendap/docs directory. You can make changes there, but installing new versions of the OLFS software will overwrite your modifications.
However, if the docs directory is copied (preserving its structure) to $CATALINA_HOME/content/opendap/ (creating the directory $CATALINA_HOME/content/opendap/docs), then Hyrax will serve the files from the new location.
| Do NOT remove files from this new directory (or the old one). Each file, in its location, is required by Hyrax. You can make changes to the files but you should not rename or remove them. |
| Beacuse nothing inside the $CATALINA_HOME/content directory is (automatically) changed when installing new versions of Hyrax, changes you make to files in the content directory will persist when you upgrade Hyrax. |
The rest of these instructions are written with the assumption that a copy of the docs directory has been made as described above.
4.6.2. What to Change
HTML Files
| File | Location | Description |
|---|---|---|
index.html |
$CATALINA_HOME/content/opendap/docs |
The documentation web page for the top level of Hyrax. As shipped it contains a description of Hyrax and links to documentation and funders. The contents.html pages (aka the OPeNDAP directories) links to this document. |
error400.html |
$CATALINA_HOME/content/opendap/docs |
Contains the default error page that Hyrax will return when the client request generates a Bad Request error (Associated with an HTML status of 400) |
error403.html |
$CATALINA_HOME/content/opendap/docs |
Contains the default error page that Hyrax will return when the client request generates a Forbidden error. (Associated with an HTML status of 403) |
error404.html |
$CATALINA_HOME/content/opendap/docs |
Contains the default error page that Hyrax will return when the client request generates a Not Found error. (Associated with an HTML status of 404) |
error500.html |
$CATALINA_HOME/content/opendap/docs |
Contains the default error page that Hyrax will return when the client request generates an Internal Server Error. (Associated with an HTML status of 500) |
error501.html |
$CATALINA_HOME/content/opendap/docs |
Contains the default error page that Hyrax will return when the client request generates an Not Implemented. (Associated with an HTML status of 501) |
error502.html |
$CATALINA_HOME/content/opendap/docs |
Contains the default error page that Hyrax will return when the client request generates an Bad Gateway. (Associated with an HTML status of 502) |
CSS Files
| File | Location | Description |
|---|---|---|
contents.css |
$CATALINA_HOME/content/opendap/docs/css |
The contents.css style sheet provides the default colors and fonts used in the Hyrax site. It is referenced by all of the HTML and XSL files to coordinate the visual aspects of the site. |
thredds.css |
$CATALINA_HOME/content/opendap/docs/css |
The thredds.css style sheet provides the default colors and fonts used by the THREDDS component of Hyrax. |
There are a number of image files shipped with Hyrax. Simply replacing key image files will allow you to customize the icons and logos associated with the Hyrax server.
Image Files
| File | Location | Description |
|---|---|---|
logo.gif |
$CATALINA_HOME/content/opendap/docs/images |
Main Logo for the directory view (produced by contents.css and contents.xsl) |
favicon.ico |
$CATALINA_HOME/content/opendap/docs/images |
The cute little icon preceding the URL in the address bar of your browser. To be used, this file needs to be installed into Tomcat. |
BadDapRequest.gif, BadGateway.png, |
$CATALINA_HOME/content/opendap/docs/images |
These files are referenced by the default collection of web content files (described above) that ship with Hyrax. |
XSL Transform Files
These files are used to transform XML documents used by Hyrax. Some transforms operate on source XML from internal documents such as BES responses. Other transforms change things like THREDDS catalogs into HTML for browsers.
| All of these XSLT files are software and should be treated as such. They are intimately tied to the functions of Hyrax. The likelihood that you can change these files and not break Hyrax is fairly low. |
| File | Location | Description |
|---|---|---|
catalog.xsl |
$CATALINA_HOME/content/opendap/docs/xsl |
The catalog.xsl file contains the XSLT transformation that is used to transform BES showCatalog responses into THREDDS catalogs. |
contents.xsl |
$CATALINA_HOME/content/opendap/docs/xsl |
The contents.xsl file contains the XSLT transformation that is used to build
the OPeNDAP
Directory Response |
dataset.xsl |
$CATALINA_HOME/content/opendap/docs/xsl |
This transform is used to in conjunction with the opendap.threddsHandler code to produce HTML pages of THREDDS catalog dataset element details. |
error400.xsl |
$CATALINA_HOME/content/opendap/docs/xsl |
The error400.xsl contains the XSLT transformation that is used to build the web page that is returned when the server generates a Bad Request (400) HTTP status code. If for some reason this page cannot be generated, then the HTML version ($CATALINA_HOME/content/opendap/docs/error400.html) will be sent. |
error500.xsl |
$CATALINA_HOME/content/opendap/docs/xsl |
The error400.xsl contains the XSLT transformation that is used to build the web page that is returned when the server generates a Internal Server Error (500) HTTP status code. If for some reason this page cannot be generated then the HTML version ($CATALINA_HOME/content/opendap/docs/error500.html) will be sent. |
thredds.xsl |
$CATALINA_HOME/content/opendap/docs/xsl |
This transform is used to in conjunction with the opendap.threddsHandler code to produce HTML pages of THREDDS catalog details. |
version.xsl |
$CATALINA_HOME/content/opendap/docs/xsl |
This transform is used to provide a single location for the Hyrax version number shown in the public interface. |
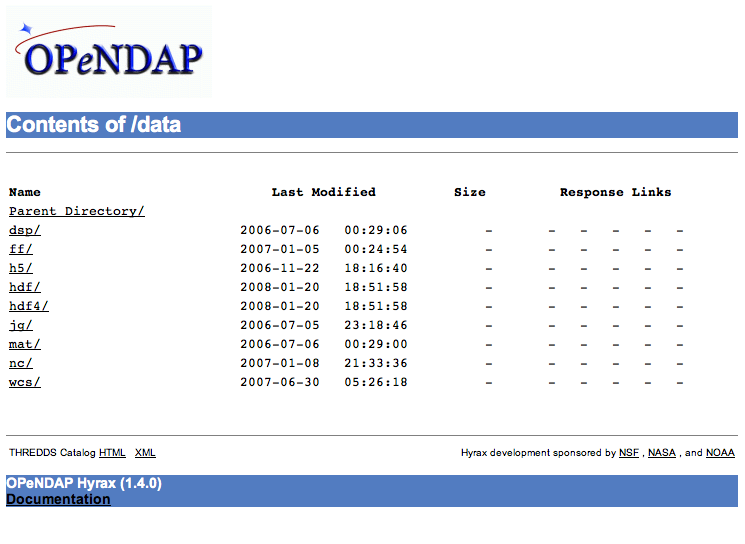
| File | Location | Description |
|---|---|---|
dapAttributePromoter.xsl |
$CATALINA_HOME/content/opendap/docs/xsl |
This XSLT file can be used to promote DAP Attributes whose names contain a namespace prefix to XML elements of the same name as the Attribute. Not currently in use. |
dapAttributesToXml.xsl |
$CATALINA_HOME/content/opendap/docs/xsl |
This XSLT file might be used to promote DAP Attributes encoded with special XML attributes to represent any XML to the XML the Attribute was encoded to represent. Not currently in use. |
dap_2.0_ddxToRdfTriples.xsl |
$CATALINA_HOME/content/opendap/docs/xsl |
This XSLT can be used to produce an RDF representation of a DAP2 DDX. Not currently in use. |
dap_3.2_ddxToRdfTriples.xsl |
$CATALINA_HOME/content/opendap/docs/xsl |
This XSLT is used to produce an RDF representation of a DAP 3.2 DDX. |
dap_3.3_ddxToRdfTriples.xsl |
$CATALINA_HOME/content/opendap/docs/xsl |
This XSLT can be used to produce an RDF representation of a DAP 3.3 DDX. Not currently in use. |
namespaceFilter.xsl |
$CATALINA_HOME/content/opendap/docs/xsl |
This XSLT can be used to filter documents so that only elements in a particular namespace are returned. Not currently in use. |
xmlToDapAttributes.xsl |
$CATALINA_HOME/content/opendap/docs/xsl |
This XSLT can be used to covert any XML content into a set of specially encoded DAP Attributes. The resulting Attribute elements have XML type attributes that are not currently recognized by any OPeNDAP software. Not currently in use. |
5. Apache Integration
The problem of linking Tomcat with Apache has been greatly reduced as of Apache 2.2. In previous incarnations of Apache & Tomcat, it was fairly complex. What follows are the instructions for Apache 2.2 and Tomcat 6.x.
5.1. Prerequisites
-
Apace 2.2 or greater
-
Tomcat 6.x or greater
-
mod_proxy_ajp installed in Apache (typically this is present in 2.2+)
5.2. Connecting Tomcat to Apache
5.2.1. Tomcat
You have to create the AJP connector in the conf/server.xml file:
<!-- Define an AJP 1.3 Connector on port 8009 -->
<Connector
port="8009"
protocol="AJP/1.3"
redirectPort="443" <!-- Redirect to the Apache Web Server secure port -->
scheme="https" <!-- Use TLS to connect -->
address="127.0.0.1" <!-- Only allow connections from this host -->
<!-- Setting tomcatAuthentication to 'false' will allow tomcat web applications
to get user session information from Apache, such as uid and other user properties. -->
tomcatAuthentication="true"
/>
This line will enable AJP connections to the 8009 port of your tomcat server (localhost for example).
5.2.2. Apache
In the example below, pay special attention to the protocol part of
the proxy URL - it uses ajp:// and not 'http://'.
Add this to Apache’s httpd.conf file:
<Proxy *>
AddDefaultCharset Off
Order deny,allow
Allow from all
</Proxy>
ProxyPass /opendap ajp://localhost:8009/opendap
ProxyPassReverse /opendap ajp://localhost:8009/opendap
NB: It’s possible to embed these in a VirtualHost directive.
5.2.3. How It Works
ProxyPass and ProxyPassReverse are classic reverse proxy directives used to forward the stream to another location. ajp://… is the AJP connector location (your tomcat’s server host/port)
A web client will connect through HTTP to http://localhost/ (supposing your apache2 server is running on localhost), the mod_proxy_ajp will forward you request transparently using the AJP protocol to the tomcat application server on localhost:8009.
5.3. Apache Compressed Responses
Many OPeNDAP clients accept compressed responses. This can greatly increase the efficiency of the client/server interaction by diminishing the number of bytes actually transmitted over "the wire". Compression can reduce the number of bytes transmitted by an order of magnitude for many datasets!
Tomcat provides native compression support for the GZIP compression mechanism, however it is NOT turned on by default. More perversely, even if you have configured Tomcat to provide compressed responses, if you are using AJP to proxy Tomcat through the Apache web server compression will not be enabled unless you configure the Apache web server to compress responses. This is because Tomcat NEVER compresses responses sent over AJP.
When you configure your Apache web server to provide compressed responses you will probably want to make sure that Apache doesn’t apply compression to images (In general images are already compressed and there is little to gain by attempting to compress them and a lot of CPU cycles to burn if you try)
5.3.1. httpd.conf
You will need to add (something like) the following to your Apache web server’s httpd.conf file:
#
# Compress everything except images.
#
<Location />
# Insert filter
SetOutputFilter DEFLATE
# Netscape 4.x has some problems...
BrowserMatch ^Mozilla/4 gzip-only-text/html
# Netscape 4.06-4.08 have some more problems
BrowserMatch ^Mozilla/4\.0[678] no-gzip
# MSIE masquerades as Netscape, but it is fine
# BrowserMatch \bMSIE !no-gzip !gzip-only-text/html
# NOTE: Due to a bug in mod_setenvif up to Apache 2.0.48
# the above regex won't work. You can use the following
# workaround to get the desired effect:
BrowserMatch \bMSI[E] !no-gzip !gzip-only-text/html
# Don't compress images
SetEnvIfNoCase Request_URI \
\.(?:gif|jpe?g|png)$ no-gzip dont-vary
# Make sure proxies don't deliver the wrong content
Header append Vary User-Agent env=!dont-vary
</Location>
5.4. Apache Authentication
Hyrax may deployed into service stacks in which httpd is expected to handle the work of authenticating users. In order for Tomcat (and thus Hyrax) to be able to receive the users login name and attributes from httpd the following things need to be done to the Tomcat configuration.
In the $CATALINA_HOME/conf/server.xml file the default definition of the AJP connector typically looks like:
<!-- Define an AJP 1.3 Connector on port 8009 -->
<Connector port="8009" protocol="AJP/1.3" redirectPort="8443" />
This line may be "commented out," with <!-- on a line before and -→ on a line after. If so, remove those lines. If you cannot find the AJP connector element, simply create it from the code above. You will need to add several attributes to the Connector element.
-
Set the
tomcatAuthenticationattribute to "false", this must be done in order to receive authentication information from Apache. -
Configure the connector to use SSL - If your Apache web server is using SSL/HTTPS (and it should be), you need to tell Tomcat about that fact so that it can construct internal URLs correctly.
-
Set the
schemeattribute to "https". -
Set the
proxyPortattribute to Apache httpd’s secure socket, typically "443" (This ensures that secure traffic gets routed through Apache httpd and and then through the AJP connector to Tomcat, allowing httpd’s authentication/authorization stack to be invoked on the request).
-
-
Restrict access to the AJP Connector. By disabling access to the connector from anywhere but the local system you prevent system probing from the greater world. To do this, set the
addressattribute to "127.0.0.1".
When you are finished making changes, your connector should look something like this:
<!-- Define an AJP 1.3 Connector on port 8009 -->
<Connector
port="8009"
protocol="AJP/1.3"
redirectPort="443"
scheme="https"
address="127.0.0.1"
tomcatAuthentication="false"
/>
Restart Tomcat to load the new configuration. Now Tomcat/Hyrax should see all of the authentication attributes from httpd.
NB: You may wish review Tomcat documentation for the AJP Connector as there many attributes/options that can be used to tune performance. Here’s a link to the Tomcat 7 AJP Connector docs
6. Operation
6.1. Starting and Stopping the BES
There are two methods of controlling the BES, besd and besctl. The besd command is part of the init.d service architecture and provides system controls for the besdaemon. while besctl is the normative commandline control for the besdaemon.
6.1.1. The besd Command
The besd command is used on Unix systems utilizing the init.d service architecture
to control the besdaemon. The controls are as follows:
-
Start BES:
service besd start -
Stop BES:
service besd stop
Starting the BES At Boot Time
In Linux, if you want Hyrax to start at boot time then you can:
-
Add the BES to the startup process:
chkconfig --add besd -
Confirm that this worked:
chkconfig --list besd
You should get something like this back:
besd 0:off 1:off 2:on 3:on 4:on 5:on 6:off -
You can turn it off like this:
chkconfig besd off -
And you can remove it from the chkconfig management like this:
chkconfig --del besd
"The service is removed from chkconfig management, and any symbolic links in /etc/rc[0-6].d which pertain to it are removed." - chkconfig manpage
6.1.2. The besctl Command
The besctl command is used to control the BES daemon. For Hyrax version 1.7 and earlier, this the only way to control the BES.
6.1.3. Most Common Uses of besctl
To start and stop the BES, use the besctl command. The besctl command has a number of options, but the most important are the start and stop arguments. To start the BES use:
besctl start
and to stop it, use:
besctl stop
The general form for the besctl command is:
besctl (help|start|stop|restart|status|pids|kill) [options]
where options are:
-i back-end server installation directory -c use back-end server configuration file CONFIG -d send debugging for CONTEXT to cerr or <filename> -h show the help information and exit -p set port to PORT -r bes.pid file stored in directory PID_DIR -s specifies a secure server using SLL authentication -u set unix socket to UNIX_SOCKET -v echos version and exit
These options are used only in special circumstances; of them all the -d option to turn on debugging is the most useful. The syntax for run-time debugging/diagnostic output is:
-d "<output sink>,<context 1>, ...,<context n>"
where a typical example would be:
-d "cerr,ascii,netcdf,besdaemon"
which would tell the daemon to send diagnostic output from the ASCII handler, the NetCDF handler and the BES daemon itself to the terminal’s standard error output.
6.1.4. About Each of the Arguments to besctl
The besctl command accepts a total of seven arguments.
help
Display help information for the besctl command. The help argument displays, among other things, all of the main centexts that can be used with the debug (-d) option.
start
Start the BES
stop
Stop the BES. This is a 'hard' stop and any active connections will be dropped.
restart
This is the same as using the stop and start commands separately.
status
This returns the master BES daemon process id number and the user id under which it is running.
pids
The BES is actually a collection of processes; use this argument to find the process id numbers for them all.
kill
Sometimes the stop or restart arguments don’t work. Use this argument to stop all the processes. The stop command works by sending the TERM signal to the master BES daemon process which then sends that signal to all of the subordinate BES daemon processes, but processes can ignore this signal in certain circumstances. Using the kill argument to besctl sends the KILL signal to all of the processes; KILL cannot be ignored by a process, so this is certain to stop the server.
6.1.5. About the Options Accepted by besctl
server installation directory
Use the -i option to force besctl to use a specific directory as the server’s root directory. This option is useful if you have several BES daemons running on one machine.
-i <directory>
server configuration file
Use the -c option to force the daemon to use a specific bes.conf file instead of the file found at server root/etc/bes/bes.conf
-c <configuration file path>
An alternative to usign this option is to use the BES_CONF environment variable to point to a configuration file. Set the value of the environment variable to the path of the configuration file. Be sure to export the environment variable. Also note that as of Hyrax 1.6, the BES reads a significant amount of configuration information from the server root/etc/bes/conf.d directory. You can disable this by editing the bes.conf file; look for the Includes directive.
debugging
Use the -d option to achieve fine-grained control over the server’s diagnostic output. The -d option takes a single double-quoted string which must contain the name of the output sink for the diagnostic information and a comma separated list of 'debug contexts'. The sink may be either an open stream (e.g., cerr) or a file while the contexts are defined by/in the BES source code. All modules define a context that matches their name and you can see this using the help argument to besctl, although most define additional contexts. The best way to find out about the contexts available is to look at the source code for the server.
-d "cerr,besdaemon"
Use the special context all to see output from all of the contexts. This will produce very verbose output.
help
The -h option prints a short online help message which lists the option switches. Note that this option doesn’t work when you supply an argument like start, stop, et c., except for help.
-h
port
Use the -p option to set the port the daemon uses for communication with the Hyrax front-end.
-p <number>
PID file
Use the -r option to tell the BES where to store the master daemon’s process id number.
-r <directory>
SLL authentication
Use the -s option to force the server to use SSL authentication. This option is not used with Hyrax. To configure Hyrax for use with SSL, see information about running ht efront-end of the server with SSL. This is typically done by securing a Tomcat or Apache server and is standard procedure used by many general web sites.
unix socket
Use the -u option to force the BES to use a Unix socket for communication with the front-end instead of the TCP socket. We rarely use this.
-u <socket>
verbose
use the -v option to see the version of the bes. The server does not start, …, et cetera.
-v
7. Hyrax Security
7.1. Secure Installation Guidelines
Security is an important and unfortunately complex issue. Any computer security expert will tell you that the best way to keep your systems secure is to never, ever, let them have network access. Obviously that’s not really what you had in mind or you wouldn’t be thinking about installing Hyrax. You can improve the security of Hyrax using a number of mechanisms, from following best practices for installation, to requiring secure authentication for the entire server.
Disclaimer: At OPeNDAP we consider security to be a top priority. However, we are not security experts. What follows is a summary of what we currently know to be the most effective methods for securing your Hyrax installation.
7.1.1. Best Practices For Secure Installation
Always use a firewall - Keep your Hyrax server behind a firewall and configure the firewall to only forward requests to the appropriate port (typically 8080 for Tomcat and 80 for Apache) on your Hyrax system. Be sure to have the firewall block direct access to the BES.
Separate the BES and the OLFS - We feel that it is better to run the BES on a second machine where only the BES port is open, and where the BES system is completely blocked by the firewall.
Restrict Log and Configuration File Access - It is an unfortunate fact that many (if not most) IT security problems arise from within an organization and not from outside attacks. Given this situation it is important to restrict access to the log files generated, and the configuration files used, by Hyrax.
-
Log Files - Logs can reveal how the code works and allow a hostile observer to interact with the server and view important details about the resulting effect.
-
Configuration Files - By default Hyrax comes with logging set up to record access and errors. This can be further reduced if one desires. However unrestricted access to the Hyrax configuration files could allow a hostile individual to turn on extensive logging in order to learn more about the system.
-
*Secure the logs, secure the configuration.*
Run Hyrax as a Restricted user. - We strongly recommend that you run Hyrax as a restricted user. Running Hyrax as root or the super user is actively discouraged, as doing so creates the potential for dire consequences. What this means is that you should create a special user for bot the BES and Tomcat. These users should have restricted privileges and should only be allowed to write to the directories required by Tomcat and the BES.
Additional articles:
-
Open Web Application Security Project (OWASP) article on how to secure Tomcat:
-
Tomcat 6 uses a different directory structure, has some logging changes, and has done away with the need for a deployment descriptor for a web app. There’s an overview in this Covalent presentation:
7.1.2. Restricting System Access
One may also choose to restrict user access to Hyrax. This can be done by configuring Tomcat to demand user authentication, and if required, TSL/SSL.
For Tomcat 5.x see:
For Tomcat 6.x see:
Requiring user authentication and using SSL doesn’t actually change Hyrax’s vulnerability to attack, but it willl increase the security of your server by:
-
Limiting the number of users to those with authentication credentials.
-
Protecting those authentication credentials by using SSL encryption.
-
Protecting data content by transmitting it in an encrypted form.
7.1.3. User Authentication
This document is intended to help those that have been asked to deploy Hyrax into an environment where authentication of users is required. In many such cases Hyrax will be integrated into an existing instance of the Apache Web server (httpd) where authentication services are already configured and in use. In other cases people will be setting up a standalone instance of Tomcat and will be needing to configure it to use one of the supported authentication services. This document means to address both situations.
Terms
- Authentication
-
This is the process of confirming the identity of the user. The end result is a User ID (uid or UID) which may be accessed by the software components via (both?) the Apache API (mod_*) and the Java ServletAPI (Tomcat servlets) used to trigger authorization policy chains or may be logged along with relevant request information.
- Identity Provider (IdP)
-
Also known as an Identity Assertion Provider, an Identity Provider (IdP) is a service that provides authentication and identity information services. An IdP is a kind of provider that creates, maintains, and manages identity information for principals and provides principal authentication to other service providers within a federation, such as with web browser profiles.
- Service Provider (SP)
-
A Service Provider (SP) is a Web Service that utilizes an IdP service to determine the identity of it’s users. Or more broadly, a role donned by a system entity where the system entity provides services to principals or other system entities.
With respect to this document Hyrax/Tomcat, and Hyrax/Tomcat/Apache each become part of an SP through the installation and configuration of software components such as mod_shib (shibboleth) .
Apache httpd Authentication Services Configuration
There are many authentication methods available for use with our friend httpd and each of the three illustrated here has a unique installation and configuration activity. There are some common changes that must be made to the Tomcat configuration regardless of the authentication method employed by Apache. We’ll cover those first and then examine LDAP, Shibboleth, and NASA URS IdP configurations for Apache httpd.
| If you are deploying Hyrax with an existing Apache service then it is likely that all you have to do is configure httpd and Tomcat to work together and define and then define a security constraint for httpd that enforces a login requirement (valid-user) for Hyrax. |
Configure Apache httpd and Tomcat to work together
In this part we configure Tomcat and Apache httpd to work together so that httpd can provide proxy and authentication services for Hyrax.
In /etc/httpd/conf.d create a file called hyrax.conf . Edit the file
and add following:
<Proxy *>
AddDefaultCharset Off
Order deny,allow
Allow from all
</Proxy>
ProxyPass /opendap ajp://localhost:8009/opendap
ProxyPassReverse /opendap ajp://localhost:8009/opendap
| The ProxyPass and ProxyPassReverse should be set to local host unless a more complex deployment issuing attempted. |
This will expose the web application "opendap" (aka Hyrax) through Apache. Make sure that the AJP URLs both point to your deployment of Hyrax.
Often when authentication is needed, it is also necessary to log who has logged in and what they have accessed. Apache has a very flexible logging system; that can tell you what users asked for, where they came from, and when they made the request - among other things. For specific authentication technologies it may also be possible to log specific information about UIDs, etc. See the sections below for information on configuring Apache’s log to record that kind of technology-specific data.
This step is not absolutely necessary, but it’s quite likely you will want to do this, particularly if you’re going to use https to access the tomcat servlet engine running the Hyrax front-end. If you use https in the AJP configuration as shown in the next section, you will need to set up Apache to support https even if users don’t access the server with that protocol (because internally, some of the server’s less performance intensive functions work by making calls to itself, and those will use https if you’ve set up tomcat to use https with AJP). However, the configuration is very simple.
First, make sure you have mod_ssl installed. For CentOS 6, use sudo yum install mod_ssl
Next make the needed certs. Here’s how to make and install a self-signed cert for CentOS 6:
# Generate private key
openssl genrsa -out ca.key 2048
# Generate CSR
openssl req -new -key ca.key -out ca.csr
# Generate Self Signed Key
openssl x509 -req -days 365 -in ca.csr -signkey ca.key -out ca.crt
# Copy the files to the correct locations
cp ca.crt /etc/pki/tls/certs
cp ca.key /etc/pki/tls/private/ca.key
cp ca.csr /etc/pki/tls/private/ca.csrConfigure httpd to use the newly installed certs and restart:
-
In the SSL configuration file:
/etc/httpd/conf.d/ssl.conf -
Locate the following key value pairs and make sure the values are correct with respect to your actions in the previous section:
SSLCertificateFile /etc/pki/tls/certs/ca.crt
and:
SSLCertificateKeyFile /etc/pki/tls/private/ca.key -
Restart the service:
sudo /usr/sbin/apachectl restart
| More complete instructions can be found here: http://wiki.centos.org/HowTos/Https. |
The primary result of the Apache authentication (the uid string) must
be correctly transmitted to Tomcat. On the Tomcat side we have to open
the way for this by configuring a AJP Connector object. This is done
by editing the file:
$CATALINA_HOME/conf/server.xml
Edit the server.xml file, and find the AJP Connector element on port 8009. It should look something like this:
<Connector port="8009" protocol="AJP/1.3" />
This line may be "commented out," with <!-- on a line before and -→ on a line after. If so, remove those lines. If you cannot find the AJP connector element, simply create it from the code above.
-
In order to receive authentication information from Apache, you must disable Tomcat’s native authentication. Set the tomcatAuthentication attribute to "false" - see below for an example.
-
If your Apache web server is using SSL/HTTPS (and it should be), you need to tell Tomcat about that fact so that it can construct internal URLs correctly. Set the scheme attribute to "https" and the proxyPort attribute to "443" - see below for an example.
-
For increased security, disable access to the connector from anywhere but the local system. Set the address attribute to "127.0.0.1" - see below for an example.
When you are finished making changes, your connector should look something like this:
<Connector
port="8009"
protocol="AJP/1.3"
redirectPort="443"
scheme="https"
address="127.0.0.1"
enableLookups="false"
tomcatAuthentication="false"
/>
- port
-
The Connector will listen on port 8009.
- protocol
-
The protocol is AJP/1.3.
- redirectPort
-
Secure redirects to port 443 which is the nominal Apache HTTPS port, rather than the default 8443 which is nominally directed to Tomcat.
- scheme
-
Ensures that the scheme is HTTPS. This is a best practice and is simple enough if the server is already configured for HTTPS. If your server is not configured to utilize HTTPS, then you’ll either need to set the value of scheme to "http" or you can undertake to configure your instance of Apache httpd to support for TLS/SSL transport.
- address
-
The loopback address (127.0.0.1) ensures that only local requests for the connection will be serviced.
- enableLookups
-
A value of true enables DNS look ups for Tomcat. This means that web applications (like Hyrax) will see the client system as a host name and not an IP address. Set this to false to improve performance.
- tomcatAuthentication
-
A value of false will allow the Tomcat engine to receive authentication information (the uid and in some cases other attributes) from Apache httpd. A value of true will cause Tomcat to ignore Apache authentication results in favor of it’s own.
Restart Tomcat to load the new configuration. Now the Tomcat web applications like Hyrax should see all of the Apache authentication attributes. (These can be retrieved programmatically in the Java sServlet API by using HttpServletRequest.getRemoteUser() or HttpServletRequest.getAttribute("ATTRIBUTE NAME"). Note that HttpServletRequest.getAttributeNames() may not list all available attributes – you must request each attribute individually by name.)
Second: Configure Apache httpd to authenticate
Once Tomcat and Apache httpd are working together all that remains is to configure a security restraint on the Hyrax web application and specify the authentication mechanism which is to used to identify the user.
While the details of the Apache security constraints differ somewhat from one IdP to the next what is consistent is that you will need to define a security constraint on Hyrax inside the chain of httpd.conf files. The most simple example, that you want all users of the Hyrax instance to be authenticated, might look something like this:
# This is a simplified generic configuration example; see the sections below for the real # examples for LDAP, Shibboleth or URS/OAuth2 <Location /opendap> AuthType YourFavoriteAuthTypeHere require valid-user </Location>
Where the require valid-user attribute requires that all accessors be
authenticated and where YourFavoriteAuthTypeHere would be something
like Basic, UrsOAuth2 or shibboleth.
Complete examples for LDAP, URS/OAuth2, and Shibboleth IdPs are presented in the following sections.
| You must first configure Apache and Tomcat (Hyrax) to work together prior to completion of this section. |
In order to get Apache httpd to use LDAP authentication you will have configure an Apache security constraint on the Hyrax web application. For this example we will configure Apache to utilize the Forum Systems public LDAP server
-
All user passwords are password.
-
Groups and Users:
-
mathematicians
-
riemann
-
gauss
-
euler
-
euclid
-
-
scientists
-
einstein
-
newton
-
galieleo
-
tesla
-
-
Create and edit the file /etc/httpd/conf.d/ldap.conf.
Add the following at the end of the file:
# You may need to uncomment these two lines... # LoadModule ldap_module modules/mod_ldap.so # LoadModule authnz_ldap_module modules/mod_authnz_ldap.so # You may want to comment out this line once you have it working. LogLevel debug <Location /opendap > Order deny,allow Deny from all AuthType Basic AuthName "Forum Systems Public LDAP Server- Login with user id" AuthBasicProvider ldap AuthzLDAPAuthoritative off AuthLDAPURL ldap://ldap.forumsys.com:389/dc=example,dc=com AuthLDAPBindDN "cn=read-only-admin,dc=example,dc=com" AuthLDAPBindPassword password AuthLDAPGroupAttributeIsDN off ErrorDocument 401 "Please use your username and password to login into this Hyrax server" Require valid-user Satisfy any </Location>
Restart Apache httpd and you should now need to authenticate to access anything in /opendap
What’s happening here? Let’s look at each of the components of the
<Location> directive:
<Location /opendap>-
The Location directive limits the scope of the enclosed directives by URL or URL-path. In our example it says that anything on the server that begins with the URL path of /opendap will be the scope of the directives contained within. Generally The
Locationdirective is applied to things outside of the filesystem used by Apache, such as a Tomcat service (Hyrax). Order deny,allow-
The Order directive, along with the Allow and Deny directives, controls a three-pass access control system. The first pass processes either all Allow or all Deny directives, as specified by the Order directive. The second pass parses the rest of the directives (Deny or Allow). The third pass applies to all requests which do not match either of the first two. In this example first, all Deny directives are evaluated; if any match, the request is denied unless it also matches an Allow directive. Any requests which do not match any Allow or Deny directives are permitted.
Deny from all-
The Deny directive allows access to the server to be restricted based on hostname, IP address, or environment variables. The arguments for the Deny directive are identical to the arguments for the Allow directive.
AuthType Basic-
The AuthType directive selects the type of user authentication for a directory. The authentication types available are Basic (implemented by mod_auth_basic) and Digest (implemented by mod_auth_digest).
AuthName "Forum Systems Public LDAP Server- Login with user id"-
The AuthName directive sets the name of the authorization realm for a directory. This realm is given to the client so that the user knows which username and password to send.
AuthBasicProvider ldap-
The AuthBasicProvider directive sets which provider is used to authenticate the users for this location. In this example we are saying that an LDAP service will be configured to provide the authentication service.
AuthzLDAPAuthoritative off-
The AuthzLDAPAuthoritative directive is used to prevent other authentication modules from authenticating the user if this one fails. Set to
off(as in this example) if this module should let other authorization modules attempt to authorize the user, should authorization with this module fail. Control is only passed on to lower modules if there is no DN or rule that matches the supplied user name (as passed by the client). AuthLDAPURL ldap://ldap.forumsys.com:389/dc=example,dc=com-
The AuthLDAPURL directive is used to define the URL specifying the LDAP search parameters. In this example the service is hosted at `ldap.forumsys.com`, on port `389`. The search will be for anyone associated with the domain components `example` and `com` (aka `example.com`).
AuthLDAPBindDN "cn=read-only-admin,dc=example,dc=com"-
The AuthLDAPBindDN directive is an optional directive used to specify a `distinguished name` (DN) when binding to the server. If not present
mod_authnz_ldapwill use an anonymous bind. Many servers will not allow an anonymous binding and will require that the Apache service bind with a particular DN. In this example the server is instructed to bind with the common name (CN) `read-only-admin` at `example.com` AuthLDAPBindPassword password-
The AuthLDAPBindPassword directove specifies the password to be used in conjunction with the
AuthLDAPBindDN. In this example the password is the word `password`. AuthLDAPGroupAttributeIsDN off-
The AuthLDAPGroupAttributeIsDN directive is a boolean valued directive that tells `mod_authnz_ldap` wether or not to use the DN of the client username when checking for group membership. In our example the value is set to
offso the clients username will be used to locate the clients group membership.
ErrorDocument 401 "Please use your username and password to login into this Hyrax server"
::
The
ErrorDocument
directive specifies what message the server will return to the client
in the event of an error. In this example we define a message to be
returned for all 401 (Unauthorized) errors to help the client
understand that they need to be authenticated to proceed.
Require valid-user ::
The Require
directive selects which authenticated users can access a resource.
Multiple instances of this directive are combined with a logical "OR",
such that a user matching any Require line is granted access. In this
case it’s effect is to say that any valid user that has authenticated
(via the LDAP server ldap://ldap.forumsys.com:389 with the
distinguished name components dc=example,dc=com) will be allowed
access.
Satisfy any ::
The Satisfy
directive defines the interaction between host-level access control
and user authentication. It may have a value of either Any or
All. The any value indicates that the client will be admitted if
they successfully authenticate using a username/password OR if they
are coming from a host address that appears in an Allow from
directive.
The Apache module
mod_authnz_ldap
provides a fairly rich set of “Require” directives which can be used
to control (authorize) access to resources serviced by Apache. In the
example above the Require directive is quite simple:
Require valid-user
Which says (since the defined authentication mechanism for the enclosing
Location directive is LDAP) that any LDAP authenticated user may be
allowed access to anything that begins with the URL-path /opendap.
While that may be adequate for some sites, many others will be required
to have more complex access control policies in place. The LDAP module
mod_authnz_ldap provides a rich collection of Require directive
assertions that allow the administrator much more finely grained access
control. Rather than provide an exhaustive discussion of these options
here we will provide a few basic examples and refer the reader to
the
comprehensive documentation for the `mod_authnz_ldap` module at the
Apache project.
Grant access to anyone in the `mathematicians` group in the organization `example.com`.
AuthLDAPURL ldap://ldap.forumsys.com:389/dc=example,dc=com
AuthLDAPGroupAttributeIsDN on
Require ldap-group ou=mathematicians,dc=example,dc=com
Grant access to anyone who has an LDAP attribute `homeDirectory` whose value is `home`.
AuthLDAPURL ldap://ldap.forumsys.com:389/dc=example,dc=com
Require ldap-attribute homeDirectory=home
Combine the previous two examples to grant access to anyone who has an LDAP attribute `homeDirectory` whose value is `home` and to anyone in the `mathematicians` group.
AuthLDAPURL ldap://ldap.forumsys.com:389/dc=example,dc=com
AuthLDAPGroupAttributeIsDN on
Require ldap-group ou=mathematicians,dc=example,dc=com
Require ldap-attribute homeDirectory=home
The possibilities are vast, but it is certainly the case that the contents of the LDAP service against which you are authenticating, and the richness of the group and attribute entries will in a large part determine the granularity of access control you will be able to provide.
| You must configure Apache and Tomcat (Hyrax) to work together prior to completion of this section. |
The Shibboleth wiki provides excellent documentation on how to get Shibboleth authentication services working with Tomcat. This is primarily an Apache httpd activity.
Basically you need to follow the instructions for a Native Java Install and as you read, remember - Hyrax does not use either Spring or Grails.
The logical starting point for this is with the Native Java SP Installation:
But as far as the organization of the work is concerned it is really the last page you need to process, as it will send you off to do a platform dependent Shibboleth Native Service Provider for Apache installation which needs to be completed, working, and configured before you’ll return to the Native Java SP Installation to enable the part where Tomcat and mod_shib pass authenticated user information into Tomcat.
The document path on the Natvie Java Install wiki page will send you off to do Shibboleth Native Service Provider installation which is platform dependent:
-
https://wiki.shibboleth.net/confluence/display/SHIB2/Installation
-
Install a Native Service Provider on your target system.
-
In the initial testing section for Linux they suggest accessing the Status page https://localhost/Shibboleth.sso/Status, but you may have to use the loopback address to be able to do so: https://127.0.0.1/Shibboleth.sso/Status
-
Return to the Native Java SP Installation and complete the instructions there.
Once the SP installation is completed go to the Native SP Configuration page:
Read that page and then follow the link to the instructions for Apache:
Follow those instructions.
-
Do not be confused by the section Making URLs Used by mod_shib Get Properly Routed. While you must add this Location directive to "reveal" the shibboleth module to the world don’t think the URL https://yourhost/Shibboleth.sso is a valid access point to the module. That URL may always return a Shibboleth error page even if mod_shib and shibd are configured and working correctly.
-
Read and understand the section Enabling the Module for Authentication
The Shibboleth instructions should have had you add something like this:
<Location /opendap> AuthType shibboleth ShibRequestSetting requireSession 1 require valid-user </Location>
to httpd.conf. This will require users to authenticate to access any
part of Hyrax which may be exactly what you want. If you want more fine
grained control you may want use multiple Location elements with
different require attributes. For example:
<Location /opendap> AuthType shibboleth ShibCompatWith24 On require shibboleth </Location> <Location /opendap/AVHRR> AuthType shibboleth ShibCompatWith24 On ShibRequestSetting requireSession 1 require valid-user </Location> </apache>
In this example the first Location establishes Shibboleth as the
authentication tool for the entire /opendap application path, and
enables the Shibboleth module over the entire Hyrax Server.
-
Since there is no
ShibRequestSetting requireSession 1line it does not require a user to be logged in order to access the path. -
The
require shibbolethcommand activates mod_shib for all of Hyrax.
The second Location states that only valid-users may have access
"/opendap/AVHRR" URL path.
-
The
require valid-usercommand requires user authentication. -
The
AuthTypecommand is set toshibbolethso mod_shib will be called upon to perform the authentication.
For more examples and better understanding see the Apache Configuration section of the Shibboleth wiki.
Earthdata Login/OAuth2 is a Single Sign On (SSO) authentication flow that utilizes HTTP redirects to guide client applications requesting an authenticated resource to a central Earthdata Login authentication point where they are authenticated, and them redirected back to their requested resource. This way user credentials, however they may be exchanged, are only ever exchanged with a single trusted service.
The Earthdata Login documentation, downloads, application registration, and application approval all require Earthdata Login credentials to access. Obtaining Earthdata Login credentials must be the very first activity for anyone wishing to retrieve, configure and deploy mod_auth_urs.
Each new instance of mod_auth_urs deployed will need to have a set of unique application credentials. These are generated by registering the new instance as an new application with the Earthdata Login system. Because each registered application is linked to a single redirectUrl, each different running instance of mod_auth_urs will need to be registered in order to successfully have the server redirect clients back from their authentication activity.
-
You must be a registered Earthdata Login user in order to perform this configuration. (First. Do this first.)
-
You need mod_auth_urs (which you will likely have to build from source; see below).
-
You must register a web application and authorize it. See Obtain Earthdata Login Application Credentials below for more information on this. Note: You can register your application with the Earthdata Login System.
-
You must complete the section Configure Apache and Tomcat (Hyrax) to work together.
-
You will need the public facing domain name or IP address of your server.
The documentation for mod_auth_urs describes how to build the module from a clone of the git repo, however we found that on CentOS 6 that process had to be modified to include linking with the ssl library. Since it is a fairly simple build, we’ll duplicate it here with the caveat that a newer version of the module might have a different build recipe, so if this doesn’t work, check the official page.
With that said, to build the module for CentOS 6:
-
Make sure you have the httpd-devel and ssl-devel packages are loaded onto your host
sudo yum install httpd-devel openssl-devel;
-
Clone the mod_auth_urs git repo from the ECC system. You need a Earthdata Login for this, but you need a Earthdata Login for several other steps in this configuration process as well.
git clone https://<username>@git.earthdata.nasa.gov/scm/aam/apache-urs-authentication-module.git urs;
-
Build it using the apache extension build tool apxs in the urs directory just made by the git clone command. Note that for CentOS 6 you need to include the ssl library and that you’ll need to be root as it installs libraries into apache.
cd urs; apxs -i -c -n mod_auth_urs mod_auth_urs.c mod_auth_urs_cfg.c mod_auth_urs_session.c mod_auth_urs_ssl.c mod_auth_urs_http.c mod_auth_urs_json.c mod_auth_urs_crypto.c;
-
In your browser, navigate to your Earthdata login profile page, which will be either
uat.urs.earthdata.nasa.gov/profileorurs.earthdata.nasa.gov/profile, depending on whether you are using the production or the test service. -
In the menubar, click on the Applications dropdown and select My Applications from the list of options:
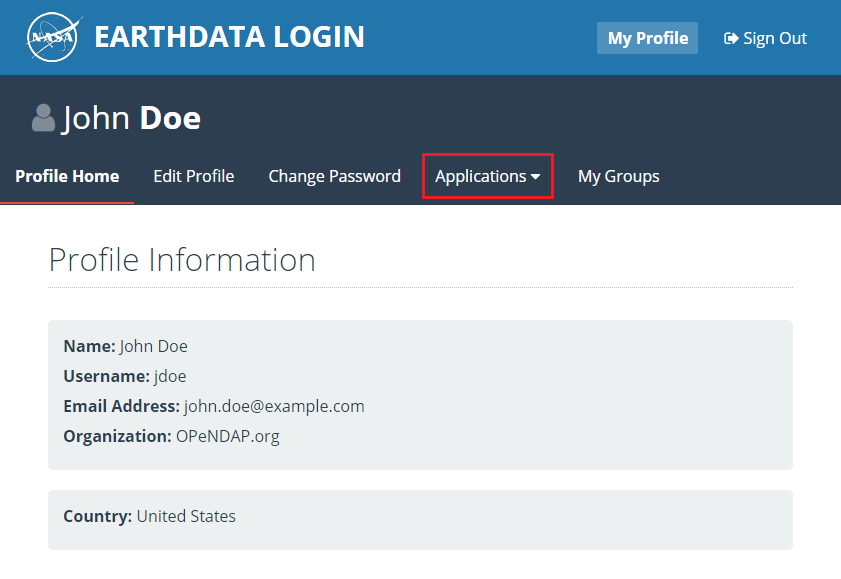
If you don’t see the My Applications option, then you need to contact your Earthdata Login administrator to request Application Creator permission on their system. -
On the My Applications page, click the CREATE A NEW APPLICATION button:
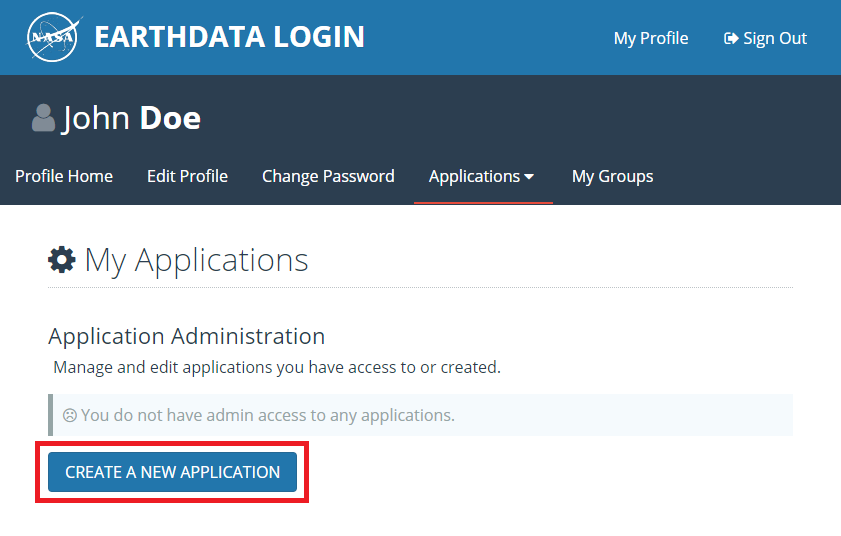
-
Fill out and submit the form:
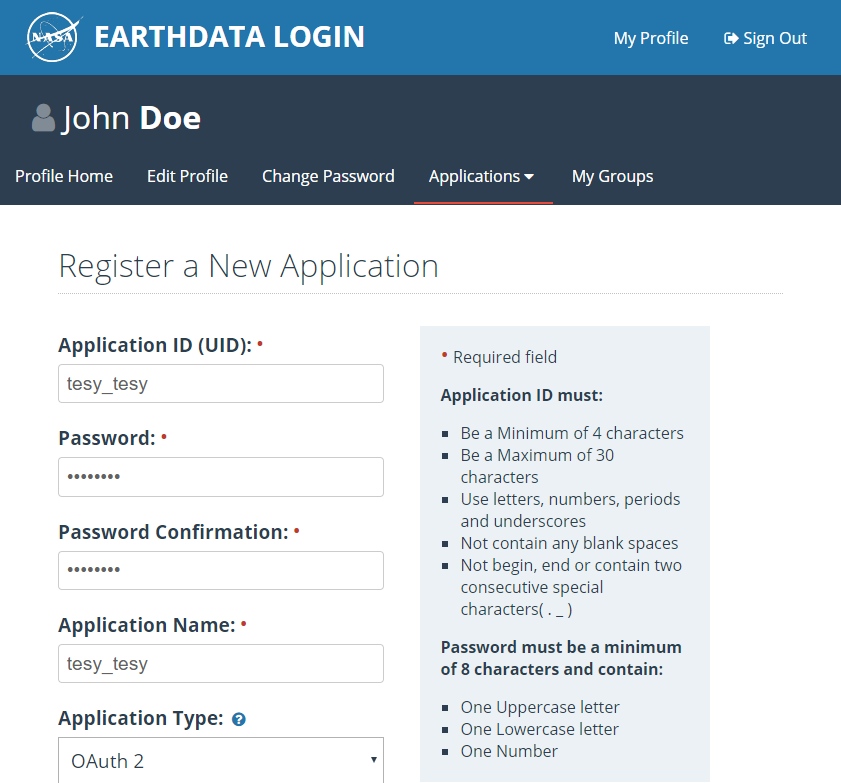
-
Return to the My Applications Page to view the application that you just created:
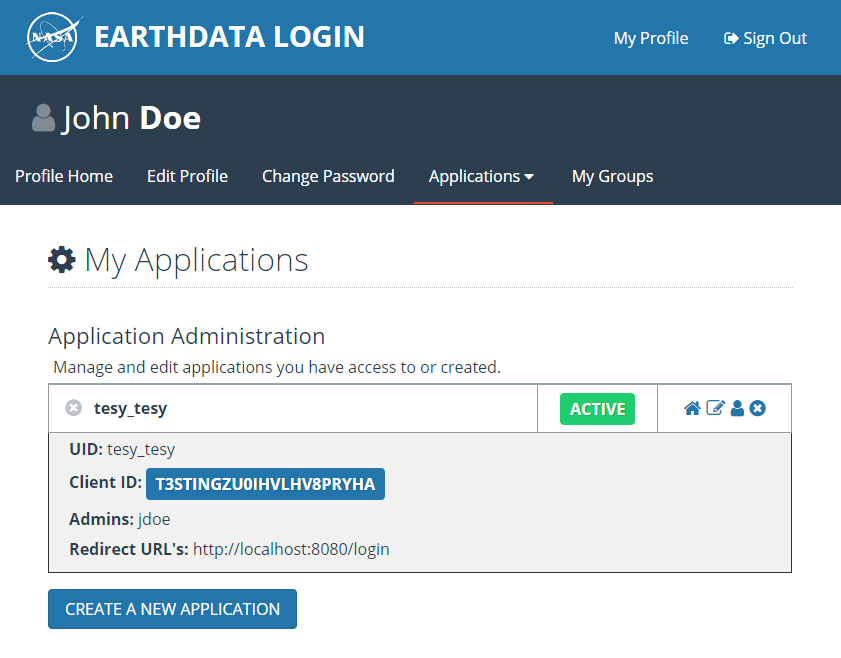
The application may show as Pending, or it may immediately become Active; regardless, once your application registration request passes through the approval process, its status will be changed to Active. You should get two emails, one acknowledging your application registration and another indicating that your application has been activated. (In the past, it has taken about twenty minutes to receive the activation notification.)
Once your application is marked as Active, you will need to approve it so that the Earthdata Login system knows that you are okay with the application having access to your Earthdata Login user profile information (not your password).
| Every single Earthdata Login user that is going to access your new server will need to do this too. |
-
In the menubar, click on the Applications dropdown and select Authorized Apps from the list of options.
-
Click the APPROVE MORE APPLICATIONS button:
-
On the following page (titled Approve Applications), enter the name of the application you previously created, and click the SEARCH button:
-
When you have located the application you would like to approve, click the APPROVE button to its right:
You will be returned to the Approved Applications page, where you should see a green confirmation banner at the top of the page and your newly-approved application in the list of approved apps.
Compute the Authorization Code (<URSClientAuthCode>)
Before configuring mod_auth_urs, you must compute the authorization code for your freshly registered application. There are three methods for computing the URS client authorization code:
-
Shell Script:
echo -n "<cid>:<pw>" | base64
-
Perl Script:
perl -e 'use MIME::Base64; print encode_base64("<cid>:<pw>");' -
PHP Script:
php -r 'echo base64_encode("<cid>:<pw>");'
In the above examples, <cid> is the Client ID (found on your application’s
Application Administration page), and <pw> is your application’s password.
Configuration
The instructions for configuring the Apache module mod_auth_urs can be found here:
Notes:
-
The instructions are clear and complete but you have to be a registered Earthdata Login user with permissions to access that page in order to read it.
-
Also note that the apxs tool used to build an apache module is part of the httpd-devel package and won’t be available if you don’t have that package installed.
Once I had it installed all that was needed was to create the file /etc/httpd/conf.d/urs.conf and add the configuration content to the file. The configuration file you’ll find below is annotated and you will need to review and possibly edit the values of the following fields:
-
UrsAuthServer
-
AuthName
And you MUST edit and provide your application credential information in these fields:
-
UrsAuthGroup
-
UrsClientId
-
UrsAuthCode
-
UrsRedirectUrl
And you should review and possibly edit this value to point to an appropriate page on your server for failed authentication:
-
UrsAccessErrorUrl
# Load the URS module
LoadModule auth_urs_module modules/mod_auth_urs.so
#
# Enable Debugging
# LogLevel debug
#
# START - URS module configuration
# The directory where session data will be stored
# NB: This directory MUST be readable and writable
# by the Apache httpd user!!!
#
UrsSessionStorePath /var/tmp/urs/session
#
# The address of the authentication server
# Where you registered your application/server.
#
UrsAuthServer https://uat.urs.earthdata.nasa.gov
#
# The authentication endpoint
#
UrsAuthPath /oauth/authorize?app_type=401
#
# The token exchange endpoint
#
UrsTokenPath /oauth/token
#
#
# END - URS module configuration
# Place a URS security constraint on the Hyrax service
<Location /opendap >
# Tells Apache to use URS/OAuth2 authentication in mod_auth_urs
AuthType UrsOAuth2
# This is a localization field and I think it shows up in
# browser and GUI client generated authentication dialog boxes.
AuthName "URS_AuthTest"
# To access, a user must login.
Require valid-user
##########################################################
# UrsAuthGroup This defines a name for a group of protected resources.
# All resources with the same group will share authentication state. i.e. If a
# user attempts to access one resource in a group and authenticates, then
# the authentication will be valid for all other resources in the group (be
# aware that the group name is also used as a cookie name).
UrsAuthGroup HyraxDataServer
##########################################################
# UrsClientId The ClientID that the URS application registration process
# assigned to your application
UrsClientId ******
##########################################################
# UrsAuthCode You compute this from the Client ID and application password
UrsAuthCode ******
##########################################################
# UrsRedirectUrl This is the redirection URL that was specified when
# registering the application. This should include the scheme (http/https),
# the outward facing domain (host)name (or IP address) of your server,
# the port (if non-standard for the scheme), and path. Note
# that the path does not need to refer to a real resource, since the module
# will intercept it and redirect the user before Apache tries to find a
# matching resource.
UrsRedirectUrl https://localhost/opendap/login
##########################################################
# UrsAccessErrorUrl If the users authentication at the URS service fails,
# this is the page on your server to which they will redirected. If it does not
# exist they'll get a 404 error instead of the 403.
UrsAccessErrorUrl /urs403.html
UrsIdleTimeout 600
UrsActiveTimeout 36000
UrsIPCheckOctets 2
UrsUserProfileEnv uid URS_USER
UrsUserProfileEnv email_address URS_EMAIL
UrsUserProfileEnv first_name URS_FIRST
UrsUserProfileEnv last_name URS_LAST
</Location>
Assuming that you have also:
-
Completed configuring AJP proxy for Tomcat
-
Authorized your server (aka Application) to access your Earthdata Login profile.
Simply restart Apache and Hyrax is ready to be accessed with your Earthdata Login credentials.
Standalone Earthdata Login without Apache webserver
If you do not need Apache webserver but would still like to take advantage of NASA’s OAuth2 Earthdata login services, also known as the User Registration System (URS), Hyrax offers a standalone implementation of the Earthdata Login Client that can deployed using only Tomcat or a preferred servlet engine.
If you require a robust security solution that has undergone thorough testing, you should implement mod_auth_urs.
| To take advantage of this feature, you must create an Earthdata Login Application. If you have not yet done this, see the Nasa’s Earthdata Login - OAuth2 (mod_auth_urs) section of this manual. |
Enabling Hyrax’s Standalone Earthdata Login Client Implementation
To enable Hyrax’s standalone implementation of the Earthdata login,
you need to first modify a few lines of code in web.xml.
If you installed Tomcat using the instructions in this manual (via YUM),
you can locate web.xml at the following location:
/usr/share/tomcat/webapps/opendap/WEB-INF/.
| You should generally avoid editing web.xml, since the file is overwritten whenever you upgrade to a new version of Hyrax; however, in the software’s current iteration, the only way to enable Hyrax’s standalone implementation of the Earthdata login client is by modifying web.xml. |
After navigating to /usr/share/tomcat/webapps/opendap/WEB-INF/…
-
Open web.xml.
-
Scroll down until you locate the Identity Provider (IdP) filter and the Policy Enforcement Point (PEP) filter, both of which are commented.
-
Remove the comments around these filters:
<!-- Uncomment These two filters to enable access control. <filter> <filter-name>IdP</filter-name> <filter-class>opendap.auth.IdFilter</filter-class> </filter> <filter-mapping> <filter-name>IdP</filter-name> <url-pattern>/*</url-pattern> </filter-mapping> <filter> <filter-name>PEP</filter-name> <filter-class>opendap.auth.PEPFilter</filter-class> </filter> <filter-mapping> <filter-name>PEP</filter-name> <url-pattern>/*</url-pattern> </filter-mapping> -->
| The IdP filter is responsible for figuring out who users are, and the PEP filter determines what users can or cannot do. |
Configuring the Identification Provider
After uncommenting the IdP and PEP filters in web.xml,
you must link your server to your Earthdata Login Application
by configuring the identification provider.
You must first modify a few lines of code in user-access.xml. If you installed Tomcat via YUM, user-access.xml can be found in one of the following locations:
-
/etc/olfs
-
/usr/share/olfs
If neither of these directories exist, see the Localizing the OLFS Configuration section of this manual
After accessing the file, scroll down until you locate the
IdProvider element:
<IdProvider class="opendap.auth.UrsIdP">
<authContext>urs</authContext>
<isDefault />
<UrsClientId>iPlEjZjMvrdwLUlnbaKxWQ</UrsClientId>
<UrsClientAuthCode>aVBsRWpaak12cmR3TFVsbmJhS3hXUTpKSEdqa2hmZzY3OA==</UrsClientAuthCode>
<UrsUrl>https://uat.urs.earthdata.nasa.gov</UrsUrl>
</IdProvider>
Configure your identification provider by updating the following child elements:
-
authContex: Determines whether you are using the production (urs) or test (uat) service. Only NASA-authorized applications can use the production service. -
UrsClientID: The Client ID can be located on your application’s Application Administration page. -
UrsClientAuthCode: You must generate the authorization code using your Earthdata Login Application’s Client ID and password. See the following section for more information. -
UrsUrl: Depending on the authContext, should be one of the following:-
https://uat.urs.earthdata.nasa.gov
-
https://urs.earthdata.nasa.gov
-
Compute <URSClientAuthCode>
You can compute the URS client authorization code with one of the following methods:
-
Shell Script:
echo -n "<cid>:<pw>" | base64
-
Perl Script:
perl -e 'use MIME::Base64; print encode_base64("<cid>:<pw>");' -
PHP Script:
php -r 'echo base64_encode("<cid>:<pw>");'
In the above examples, <cid> is the Client ID (found on your application’s
Application Administration page), and <pw> is your application’s password.
7.1.4. Logging Earthdata Login information
It is possible to get the Apache module to pull user profile information into the request environment using the UrsUserProfileEnv configuration directive:
UrsUserProfileEnv email_address URS_EMAIL UrsUserProfileEnv user_type URS_TYPE
This can be added to a custom log format by including:
LogFormat ... %{URS_EMAIL}e ... \"%{URS_TYPE}e\" ...'''
Where we show the URS_TYPE environment variable in double quotes because their values often contain spaces. Thanks to Peter Smith for this information.
See the full Apache LogFormat documentation for more information.
7.2. Common Problems
7.2.1. Clients keep getting Internal Server Error
- Problem
-
Everything seems to work fine but when the browser client is redirected back to the originally requested resource it receives an Internal Server Error from Apache httpd. In /var/log/httpd/ssl_error.log you see this type of thing:
[Sun Mar 22 20:05:47 2015] [notice] [client 71.56.150.130] UrsAuth: Redirecting to URS for authentication, referer: https://52.1.74.222/opendap/data/contents.html [Sun Mar 22 20:05:47 2015] [error] [client 71.56.150.130] UrsAuth: Redirection URL: https://uat.urs.earthdata.nasa.gov/oauth/authorize?app_type=401&client_id=tNxluRHmczrTN1iSjXCMiA&response_type=code&redirect_uri=https%3A%2F%2F52.1.74.222%2FOPeNDAP%2Flogin&state=aHR0cHM6Ly81Mi4xLjc0LjIyMi9vcGVuZGFwL2RhdGEvaGRmNC9jb250ZW50cy5odG1s, referer: https://52.1.74.222/opendap/data/contents.html [Sun Mar 22 20:05:53 2015] [error] [client 71.56.150.130] UrsAuth: Failed to create new cookie, referer: https://uat.urs.earthdata.nasa.gov/oauth/authorize?app_type=401&client_id=tNxluRHmczrTN1iSjXCMiA&response_type=code&redirect_uri=https%3A%2F%2F52.1.74.222%2FOPeNDAP%2Flogin&state=aHR0cHM6Ly81Mi4xLjc0LjIyMi9vcGVuZGFwL2RhdGEvaGRmNC9jb250ZW50cy5odG1s
This is often caused by the Apache httpd user not having read/write permission on the directory specified by UrsSessionStorePath in the httpd configuration:
UrsSessionStorePath /var/tmp/urs/session
- Solution
-
Check and repair the permissions of the directory specified by UrsSessionStorePath as needed.
8. Tomcat Authentication Services Configuration
Tomcat provides a number of authentication Realm implementations including the JNDIRealm which provides LDAP SP services for Tomcat. There is currently no Shibboleth realm implementation for Tomcat, and it’s an open question for the author if there could be one for Shibboleth or OAuth2 given the way that these protocols utilize 302 redirects away from the origin service.
8.1. LDAP
The instructions for configuring Tomcat to perform LDAP authentication are located here. It is clearly a benefit if you understand a fair bit about LDAP before you undertake this.
Here is an example of how to configure Tomcat to use LDAP authentication.
In this example we configure a Tomcat JNDI realm to use the public LDAP service provided by ForumSys.
In the server.xml file we added a JNDI Realm element:
<Realm
className="org.apache.catalina.realm.JNDIRealm"
connectionURL="ldap://ldap.forumsys.com:389"
connectionName="cn=read-only-admin,dc=example,dc=com"
connectionPassword="password"
userPattern="uid={0},dc=example,dc=com"
roleBase="dc=example,dc=com"
roleName="ou"
roleSearch="(uniqueMember={0})"
/>
Configured to work with the Forum Systems test LDAP server.
Then in the opendap web application we added the following security constraint to the WEB-INF/web.xml file:
<security-constraint>
<web-resource-collection>
<web-resource-name>Hyrax Server</web-resource-name>
<url-pattern>/*</url-pattern>
</web-resource-collection>
<auth-constraint>
<role-name>user</role-name>
</auth-constraint>
<user-data-constraint>
<!-- this ensures that all efforts to access the admin interface nd resources must use HTTPS -->
<transport-guarantee>CONFIDENTIAL</transport-guarantee>
</user-data-constraint>
</security-constraint>
No changes were made to the _$CATALINA_HOME/conf/tomcat_users.xml_ file.
8.2. Shibboleth
There is no actual Shibboleth integration with Tomcat beyond what is provided by running the Apache httpd module mod_shib and connecting Tomcat to httpd using AJP as described in the Apache/Shibboleth section on this page.
8.3. Earthdata Login OAuth2
There is no actual Earthdata Login integration with Tomcat beyond what is provided by running the Apache httpd module mod_auth_urs and connecting Tomcat to httpd using AJP as described in the Apache/URS section on this page.
9. Hyrax Troubleshooting
2026-03-06
9.1. Hyrax - Running bescmdln - OPeNDAP Documentation
9.1.1. Running bescmdln - Basic Commands
First we will issue some simple commands to make sure that the client is talking to the server. First, start the command-line client:
% bescmdln -h localhost -p 10022
The -h option specifies the machine on which the BES is running. In this case, it’s your local machine. The -p option specifies the port the BES is running on. The default, set in the BES configuration file, is 10022. If you changed this, or if you started the server with the -p option, then you need to use that port number here.
If you just use these options then you will start using the command line version of the client. There are other options, but we’ll start here. From here you should get a prompt. Let’s try a simple command (remember to terminate each command with a semicolon):
BESClient> show status;
You should get a response showing the status of the server:
Listener boot time: MDT Thu Jun 9 14:12:22 2005
Try another one:
BESClient > show help;
This one should show both the BES core commands, DAP commands, and your help information.
If you have installed a data handler, let’s take a look at your data. By executing this request you should see the root node of your data directory.
BESClient > show catalog;
If you can’t see your data, then make sure that the RootDirectory parameters in the BES Configuration file are correct.
BESClient > exit
This one will exit out of interactive mode.
9.1.2. Commands for Hyrax Testing
Poke around in the RootDirectory to see what’s actually visible to the BES
Show the Root Catalog
show catalog;
…will show the contents of "pathname"
For example, show catalog for "/data/nc"; will show all the stuff in the /data/nc directory.
show catalog for "pathname";
Get the BES to return a DAP response object
You need three commands to do this:
Bind the dataset to a container in a catalog
set container in catalog values c,/data/nc/feb.nc;
Make a definition so you can access that container
define d as c;
Request a particular response
get ddx for d;
9.1.3. Command line options
Other command line options available to the bescmdln program:
-u specifies the name of a Unix socket for connecting to the server. -h specifies the name of a host for TCP/IP connection -p specifies the port where the server is listening for TCP/IP connection. -x makes the client execute a command and exit. This flag requires the -f flag. -f sets the target file name for the return stream from the server. -i sets the target file name for a sequence of input commands. -t sets the timeout in seconds and is optional. -d "cerr|<filename>,<context>" sets the client session for debugging and is optional. -v forces the client to show the version and exit
Connection Flags: -u or -p -h are required to connect to a server and specify either a Unix socket or a TCP/IP socket.
Input/Output Flags: you can specify that the input is from the command line with the -x flag or that the input must be read from a file with the -i flag. If you specify either -x or -i you must specify the name of a file for the output stream of the server with the -f flag. If neither the -x nor the -i flags are specified then the client goes into interactive mode. To exit out of interactive mode just type 'exit' (without the quotes) at the BESClient> prompt.
For debugging information either specify cerr to have debugging information dump to standard error, or the name of a file. The context option is a comma separated list of debugging context (component debugging). Specify all to get debugging from all components. = How to Debug the BES - OPeNDAP Documentation
9.1.4. Tricks
-
Set the beslistener to run in single, not multiprocess, mode. Do this in the bes.conf file (use the BES.ProcessManagerMethod parameter).
-
Build the bes using developer mode (so it won’t need to be root, among other things). Do this with ./configure --enable-developer
9.1.5. Use the BESDEBUG Macro
Use the macro BESDEBUG defined in BESDebug.h.
Set the macro’s 'context' as "bes" (nominally, or you can make up whatever you want) and then use the "cerr << "text: " << var << endl" style output except that you should leave off the initial "cerr <<" and start with the first argument of the stuff to be output - the marco will take care of getting the output sink and using the output operator.
Example:
#include <BESDebug.h> ... BESDEBUG( "h4", "File Id:" << _file_id << endl);
Notes:
-
You’ll need to include the BES_DAP_LIBS when you link an executable or a libtool library and you’ll need BES_CPPFLAGS when you compile (for libdap code)
-
The trailing semicolon is not needed but including it makes automatic code indent software (eclipse, emacs, …) much happier.
9.1.6. Start the BES with Debuging on
Use the -d option to besctl and give -d one argument, a string, with two parts: "<output sink>,<context>". For example,
besctl start -d "cerr,bes"
would start up beslistener with the bes debug context active and write all the debugging info to cerr, which is standard error. You can provide several contexts. For example, you could say
besctl start -d "./bes.dbg,bes,nc"
This will send debug statements to the file ./bes.dbg for the context bes and nc (netcdf_handler). You can also specify the context all, that will send debugging statements for all context.
The BES has debug statements for bes, ppt and server. Each of the modules that you install will also have debug context. And, you can create your own context when writing your own module. In your Module class you would register your context, so as to be available with the help command, by using the following code:
BESDebug::Register( "<context>" ) ;
Where context is the string that will be used for your module’s debug context. For example, nc for the netcdf_handler.
To see what debug context is available, when you start the BES using besctl, use the help option:
besctl help
BES install directory: /Users/westp/opendap/opendap BES configuration file: /Users/westp/opendap/opendap/etc/bes/bes.conf Developer Mode: not testing if BES is run by root /Users/westp/opendap/opendap/bin/beslistener: -i <INSTALL_DIR> -c <CONFIG> -d <STREAM> -h -p <PORT> -s -u <UNIX_SOCKET> -v -i back-end server installation directory -c use back-end server configuration file CONFIG -d set debugging to cerr or <filename> -h show this help screen and exit -p set port to PORT -s specifies a secure server using SLL authentication -u set unix socket to UNIX_SOCKET -v echos version and exit Debug help: Set on the command line with -d "file_name|cerr,[-]context1,[-]context2,...,[-]contextn" context with dash (-) in front will be turned off Possible context: ascii: off bes: off dap: off ff: off h4: off h5: off nc: off ppt: off server: off usage: off www: off USAGE: besctl (help|start|stop|restart|status) [options] where [options] are passed to besdaemon; see besdaemon -h
9.1.7. Send Commands to the BES
Now run some commands using bescmdln. You should see debugging being output to either cerr, or the file you specified when you started the BES. Here’s an example:
BESClient> set context dap_format to dap2;
BESClient> set container in catalog values c,/data/nc/fnoc1.nc;
BESClient> define d as c;
BESClient> get das for d;
Attributes {
u {
String units "meter per second";
String long_name "Vector wind eastward component";
9.2. BES Client Commands - Introduction
These are the commands that the BES supports. Documented here are the XML versions of the commands that are typed into the bescmdln client. All of these have a non-XML version as well that might be easier to type as the command line. However, if you’re making command files, these are often the easiest to use because the SQL-like syntax of the 'text' commands can be confusing.
If you want to find documentation on the XML document that the BES expects to receive, look at the BES XML Commands documentation. There you’ll see that the commands listed here are generally sent as given to the bescmdln client but embedded in other XML that provides the BES with information such as a request ID and other bookkeeping information.
9.2.1. Current Core Commands Available With BES
NB: The BES supports both XML and a SQL-like syntax. Here we attempt to document both.
-
<showHelp /> or show help;
-
shows this help
-
<showVersion /> or show version;
-
shows the version of OPeNDAP and each data type served by this server
-
<showProcess /> or show process;
-
shows the process number of this application. This command is only available in developer mode.
-
<showConfig /> or show config;
-
shows all key/value pairs defined in the bes configuration file. This command is only available in developer mode.
-
<showStatus /> or show status;
-
shows the status of the server
-
<showContainers /> or show containers;
-
shows all containers currently defined
-
<showDefinitions /> or show definitions;
-
shows all definitions currently defined
-
<showContext /> or show context;
-
shows all context name/value pairs set in the BES
-
<setContainer name="container_name" space="store_name" type="data_type">real_name</setContainer> or set container in catalog values c,/data/nc/fnoc1.nc;
-
defines a symbolic name representing a data container, usually a file, to be used by definitions, described below
-
the space property is the name of the container storage and is optional. Defaults to default volatile storage. Examples might include database storage, volatile storage based on catalog information.
-
real_name is the full qualified location of the data container, for example the full path to a data file.
-
data_type is the type of data that is in the dataset. For netcdf files it is nc. For some container storage the data type is optional, determined by the container storage.
-
<setContext name="context_name">context_value</setContext>
-
set the given context with the given value. No default context are used in the BES
-
<define …>
<define name="definition_name" space="store_name">
<container name="container_name">
<constraint>legal_constraint</constraint>
<attributes>attribute_list</attributes>
</container>
<aggregate handler="someHandler" cmd="someCommand" />
</define>
-
creates a definition using one or more containers, constraints for each of the containers, attributes to be retrieved from each container, and an aggregation. Constraints, attributes, and aggregation are all optional.
-
There can be more than one container element
-
space is the name of the definition storage. Defaults to volatile storage. Examples might include database storage.
-
<deleteContainer name="container_name" space="store_name" />
-
deletes the specified container from the specified container storage (defaults to volatile storage).
-
<deleteContainers space="store_name" />
-
deletes all of the currently defined containers from the specified container storage (defaults to volatile storage).
-
<deleteDefinition name="definition_name" space="store_name" />
-
deletes the specified definition from the specified container storage (defaults to volatile storage).
-
<deleteDefinitions space="store_name" />
-
deletes all of the currently defined definitions from the specified container storage (defaults to volatile storage).
9.2.2. Added commands for dap enabled servers
If you are serving up OPeNDAP data responses (DAS, DDS, DataDDS) then you will have loaded the dap commands in your configuration file. Here are the available commands in the dap module.
-
<showCatalog node="node_name" /> or show catalog; or show catalog for [node_name];
-
Shows catalog information, including contents if a container. If node is not specified then the root node information is returned. If node is specified then that nodes information is returned.
-
<showInfo node="node_name" />
-
Shows catalog information for just that node, the root node if no node is specified. If the node is a container the contents are not displayed.
-
<get type="das | dds | dods | ddx | dataddx | ascii" definition="def_name" returnAs="returnAs" />
-
dds: request the data descriptor structure. Returned as text.
-
das: request the data attributes. Returned as text.
-
dods: request for the data stream, this output is an octet binary stream made up of two parts and similar to a multipart MIME document (but not a real MPM doc). The first part is the DDS that describes the contents of this response; the separator is the text Data:; and the data make up the third part. The data are represented using XDR-encoded binary values. There is a a one-to-one mapping between variables, name and types in the first part and the binary values in the second part. A library such as libdap can easily decode this response.
-
ddx: request the data attributes and data descriptor structure returned as an xml document
-
dataddx: This is the 'DAP4' counterpart to the dods response, just as the ddx is the DAP4 counterpart to the das and dds responses from DAP2. The dataddx response is a true multipart MIME document with the first part a text/xml section that holds the ddx that describes the data in the response and the second part an application/octet-stream section that holds the matching XDR-encoded values.
-
ascii: request the data stream (i.e., dods) and then pass that through a formatter to generate an ASCII representation of the data and return it in a text/plain MIME document.
-
<setContext name="errors">dap2 | xml | html | txt</setContext>
-
set the context 'errors' to dap2 in order to have all exceptions and errors formatted as dap2 error messages in the response.
-
<setContext name="dap_format">dap2</setContext>
-
set the context 'dap_format' to dap2 in order to suppress the addition of an additional structure to the DDS/DDX whose elements are the containers named in the setContainer element.
9.2.3. Using the bescmdln client to test the BES
Here are some tricks/command sequences that are useful when you need to test the BES without using a web browser. This section assumes that the DAP commands have been loaded into the BES. In this section, the examples use the older syntax because it’s a bit more amenable to a command line environment. With the XML syntax, multiple commands cab be grouped together and sent to the BES in one shot.
- Find the versions of all the installed and running modules
-
show version;
- Show the status os the BES
-
show status; Poke around in the RootDirectory to see what’s actually visible to the
- BES
-
show catalog; will show you the root catalog; show catalog for "pathname"; will show the contents of "pathname" (e.g., show catalog for "/data/nc"; will show all the stuff in the /data/nc directory).
- Get the BES to return a DAP response object
-
You need three commands to do this:
- bind the dataset to a container in a catalog
-
set container in catalog values c,/data/nc/feb.nc;
- make a definition so you can access that container
-
define d as c;
- a definition with a constraint
-
define d as c with c.constraint="lat";
- request a particular response
-
get ddx for d;
**Note that there is a set container command but that does not use the default catalog while the command here explicitly binds the dataset to a container in the default catalog (which is called catalog). This pathname is rooted in the directory set using the BES.Catalog.catalog.RootDirectory configuration parameter in the bes.conf file. The 'plain' set container … command uses pathnames rooted in the directory name by the BES.Data.RootDirectory parameter, which is often null for Hyrax installations.
10. Hyrax Appendix
Appendix A: Hyrax WMS Service
Using the Dynamic Services feature in the ncWMS2 WMS Server from Reading e-Science Centre, Hyrax can provide WMS services for all of it’s appropriate holdings.
10.A.1. Theory of Operation
In an instance of the ncWMS2 WMS server, a Dynamic Service is configured that points to a Hyrax server. This allows the ncWMS2 instance to access all of the holdings of the DAP server. However, the ncWMS2 does not "crawl" or "discover" or in any other way catalog or inventory the DAP server. Instead, the user configures the Hyrax server to add the WMS service to its catalogs and services content. Hyrax then directs WMS traffic to the ncWMS2 instance. The ncWMS2 in turn retrieves the data directly from Hyrax and services the request.
The ncWMS2 instance may be hosted anywhere, however for a significant performance improvement we suggest you host your own ncWMS2 running in the same Tomcat instance as Hyrax’s OLFS. With such a configuration, the WMS response performance for datasets, backed by the DAP service, is nearly as fast as the ncWMS2 response performance using direct file access.
10.A.2. Evaluating Candidate Datasets
In order for ncWMS2 to recognize your dataset as valid for service, your data must meet the following requirements:
-
Contain gridded data (as DAP Grid objects or DAP Array objects utilizing shared dimensional coordinate arrays) as described by the Unidata Common Data Model.
-
The NetCDF-Java library (which is what provides data access services for ncWMS2) utilizes the Common Data Model and must be able to identify the coordinates system used. You can test this by using the Unidata ToolsUI application (which is also based on the NetCDF-Java library). Open your dataset with ToolsUI, and in the Feature Types → Grid Panel there should be one or more variables shown with some kind of coordinate system.
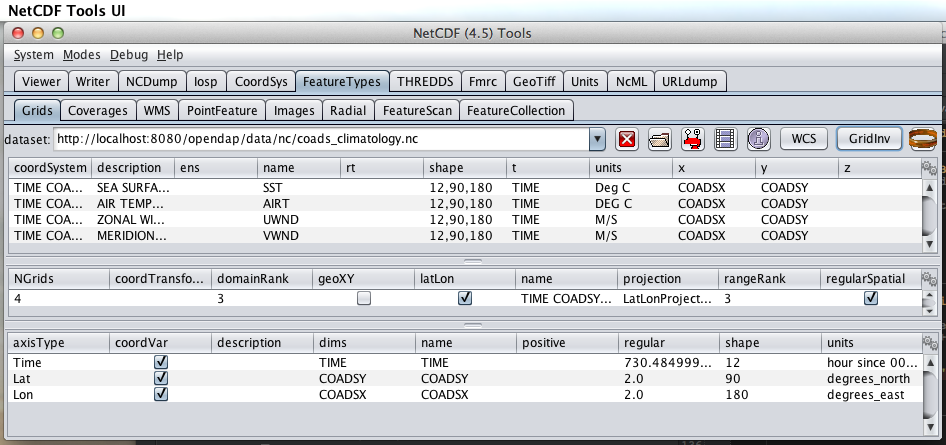
ToolsUI Grid View
| ToolsUI supports opening both local files and remote (http accessible) datasets. |
10.A.3. WMS Installation (suggested)
The ncWMS2 web application is easy to install.
Simply…
-
Retrieve the latest stable release from https://github.com/Reading-eScience-Centre/edal-java/releases
-
Copy the WAR files ncWMS2.war and opendap.war into the $CATALINA_HOME/webapps directory
-
Restart Tomcat
10.A.4. Hyrax Installation
As of the release of Hyrax 1.11 (and in particular OLFS 1.13.0) the support for WMS is built into the server. All that is required is a (collocated) ncWMS2 instance and then the configuration steps as detailed below. So - get the latest Hyrax (1.11.0 or later) install and configure using the normal methods and then follow the configuration steps detailed below.
Co-Configuration
The following sub sections assume that you have installed both Hyrax and the ncWMS2 on your server in a single Tomcat instance running on port 8080. If your arrangement is different, you will need to adjust accordingly.
For the following example sections we will use the following URLs:
-
Your Tomcat server: http://servername.org:8080/
-
Top level of DAP server: http://servername.org:8080/opendap
-
Top Level of ncWMS2: http://servername.org:8080/ncWMS2
-
WMS Service: http://servername.org:8080/ncWMS2/wms
ncWMS2 configuration
Authenticate as the Administrator
In order to access the ncWMS2 administration page (which you must do in oder to configure the server), you will need to configure authentication and access control for the page, or you will need to temporarily disable access control for the page in order to configure the server. (We strongly recommend the former).
The default security configuration for ncWMS2 can be located (after initial launch) in the file…
$CATALINA_HOME/webapps/ncWMS2/WEB-INF/web.xml
-
Use Apache httpd to provide authentication services for your installation.
-
Comment out the
security-constraintin theweb.xmlfile for ncWMS2. -
Correctly integrate Tomcat and Apache using the AJP connector.
-
Configure an Apache httpd
<Location>directive for thencWMS2/adminpage. -
Write the directive to restrict access to specific users.
-
-
Use Tomcat authentication.
-
Leave the
security-constraintin place. -
Correctly configure Tomcat to use some type authentication (e.g., MemoryRealm).
-
Modify the
security-constraintto reflect your authentication configuration. (Different role? HTTPS? etc.)
-
-
Temporarily Disable the
security-constraint.-
Comment out the
security-constraintin theweb.xmlfile for ncWMS2. -
Finish the configuration steps below.
-
At the end, when it’s working, go back and un-comment the
security-constraintin the web.xml file for ncWMS2. -
Restart Tomcat.
-
Now that you can get to it, go to the ncWMS2 administration page: http://servername.org:8080/ncWMS2/admin/
Any changes you make to the web.xml are volatile!
Installing/Upgrading/Reinstalling the web archive (.war) file will
overwrite web.xml file. Make a back-up copy of the web.xml in a
different, more durable location.
|
Configure a Dynamic Service
Once you have authenticated and can view the ncWMS2 admin page, scroll down to the Dynamic Services section:
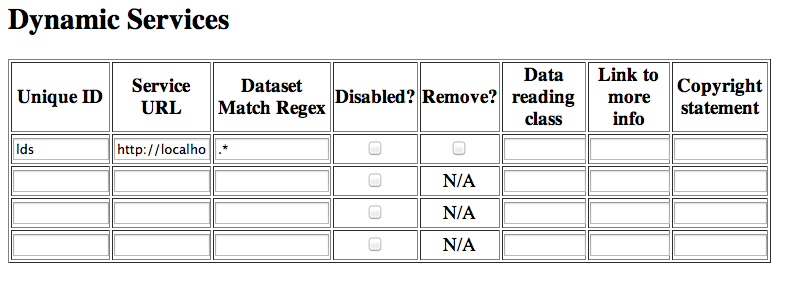
Create a new Dynamic Service for Hyrax:
-
Choose and enter a unique ID. (Using 'lds' will save you the trouble of having to edit the olfs configuration viewers.xml file to adjust that value.) Write down the string/name you use because you’ll need it later.
-
The value of the Service URL field will be the URL for the top level of the Hyrax server.
-
If the Hyrax server and the ncWMS2 server are running together in a single Tomcat instance then this URL should be expressed as: http://localhost:8080/opendap
-
If the Hyrax server and the ncWMS2 server are running on separate systems this URL must be a DAP server top level URL, and not a localhost URL.
-
Best WMS response performance will be achieved by running ncWMS2 and Hyrax on the same server and providing the localhost URL here.
-
-
The Dataset Match Regex should be a regex that matches of all of the data files you have for which WMS can prove services. If that’s too cumbersome then just use '.*' (as in the example) which matches everything.
-
Scroll to the bottom of the page and save the configuration.
| Unique ID | Service URL | Dataset Match Regex | Disabled? | Remove | Data Reading Class | Link to more info | Copyright Statement |
|---|---|---|---|---|---|---|---|
lds |
.* |
Hyrax Configuration
The Hyrax WMS configuration is contained in the file
$OLFS_CONFIG_DIR/viewers.xml. This file identifies data viewers and
Web Services that Hyrax can provide for datasets. There are two relevant
sections, the first defines Hyrax’s view of the WMS service and the
second enables Hyrax to provide access to the Godiva service that is
part of ncWMS.
Edit the file $OLFS_CONFIG_DIR/viewers.xml
Uncomment the following sections:
<!--
<WebServiceHandler className="opendap.viewers.NcWmsService" serviceId="ncWms" >
<applicationName>Web Mapping Service</applicationName>
<NcWmsService href="/ncWMS2/wms" base="/ncWMS2/wms" ncWmsDynamicServiceId="lds" />
</WebServiceHandler>
<WebServiceHandler className="opendap.viewers.GodivaWebService" serviceId="godiva" >
<applicationName>Godiva WMS GUI</applicationName>
<NcWmsService href="http://YourServersNameHere:8080/ncWMS2/wms" base="/ncWMS2/wms" ncWmsDynamicServiceId="lds"/>
<Godiva href="/ncWMS2/Godiva3.html" base="/ncWMS2/Godiva3.html"/>
</WebServiceHandler>
-->NcWmsServce
In the first section…
<WebServiceHandler className="opendap.viewers.NcWmsService" serviceId="ncWms" >
<applicationName>Web Mapping Service</applicationName>
<NcWmsService href="/ncWMS2/wms" base="/ncWMS2/wms" ncWmsDynamicServiceId="lds" />
</WebServiceHandler>Edit the NcWmsService element so that…
-
The value of the ncWmsDynamicServiceId matches the Unique ID of the Dynamic Service you defined in ncWMS.
| The href and base attributes both use relative URL paths to locate the ncWMS service. If the ncWMS instance is NOT running on the same host as Hyrax, the values of the href and base attributes must be converted to fully qualified URLs. |
GodivaWebService
In the second section…
<WebServiceHandler className="opendap.viewers.GodivaWebService" serviceId="godiva" >
<applicationName>Godiva WMS GUI</applicationName>
<NcWmsService href="http://yourNcWMSserver:8080/ncWMS2/wms" base="/ncWMS2/wms" ncWmsDynamicServiceId="lds"/>
<Godiva href="/ncWMS2/Godiva3.html" base="/ncWMS2/Godiva3.html"/>
</WebServiceHandler>Edit the NcWmsService element so that…
-
The value of the href attribute is the fully qualified URL for public access to your WMS service. The server name in this href should not be localhost - Godiva won’t work for users on other computers if you use localhost for the host name.
-
The value of the ncWmsDynamicServiceId matches the Unique ID of the Dynamic Service you defined in ncWMS2.
The Godiva element’s href and base attributes both use relative URL paths to locate the Godiva service. If the ncWMS2 instance is NOT running on the same host as Hyrax then the values of the href and base attributes must be converted to fully qualified URLs.
Apache Configuration
If you are running Hyrax with Apache linked to Tomcat (a fairly simple configuration described here), then add the following to the httpd.conf file:
# This is needed to configure ncWMS2 so that it will work when # users access Hyrax using Apache (port 80). Because Godiva was # configured in the olfs viewers.xml using <hostname>:8080, the # Godiva WMS service works when Hyrax is accesed over port 8080 # too. ProxyPass /ncWMS2 ajp://localhost:8009/ncWMS2
This will form the linkage needed to access the Godiva interface when people access your server using Apache. Note that by using port 8080 in yourNcWMSserver:8080 for the value of the WebServiceHandler element, people will be able to access Godiva when talking to Hyrax directly via Tomcat. This configuration covers both access options.
10.A.5. Start and Test
-
Once the configuration steps are complete, restart your Tomcat server.
-
Point your browser at the Hyrax sever and navigate to a WMS-suitable dataset.
-
Clicking the dataset’s Viewers link should return a page with both WMS and Godiva links.
-
Try 'em.
10.A.6. Issues
Known Logging Issue
-
Applies to ncWMS version 1.x
There is a small issue with deploying this configuration onto some Linux system in which everything has been installed from RPM (except maybe Tomcat and it’s components including the ncWMS and Hyrax applications)
The Symptom
The issue appears in the Tomcat log as a failure to lock files associated with the java.util.prefs.FileSystemPreferences:
Dec 12, 2014 1:17:28 PM java.util.prefs.FileSystemPreferences checkLockFile0ErrorCode WARNING: Could not lock System prefs. Unix error code 32612. Dec 12, 2014 1:17:28 PM java.util.prefs.FileSystemPreferences syncWorld WARNING: Couldn't flush system prefs: java.util.prefs.BackingStoreException: Couldn't get file lock. Dec 12, 2014 1:17:58 PM java.util.prefs.FileSystemPreferences checkLockFile0ErrorCode WARNING: Could not lock System prefs. Unix error code 32612. Dec 12, 2014 1:17:58 PM java.util.prefs.FileSystemPreferences syncWorld WARNING: Couldn't flush system prefs: java.util.prefs.BackingStoreException: Couldn't get file lock.
And is logged every 30 seconds or so. So the problem is the logs fill up with this issue and not stuff we care about. The problem is that the files/directories in question either don’t exist, or, if they do exist the Tomcat user does not have read/write permissions on them.
The Fix
We looked around and discovered that a number of people (including TDS deployers) had experienced this issue. It’s a Linux problem and involves the existence and permissions of a global system preferences directory. We think this is only an issue on Linux systems in which everything is installed via yum/rpm, which may be why we only see this problem on certain systems, but we’re not 100% confident that the issue is limited only to this type of installation.
We found and tested these two ways to solve it:
1) Create the global System Preference directory and set the owner to the Tomcat user:
sudo mkdir -P /etc/.java/.systemPrefs sudo chown -R tomcat-user /etc/.java/.systemPrefs
This could also be accomplished by changing the group ownership to the tomcat-group and setting the group read/write flags.
2) Create a java System Preference directory for the "tomcat-user" (adjust name that for your circumstance) and then set the JAVA_OPTS environment variable so that the systemRoot value is set the new directory.
Create the directory:
mkdir -P /home/tomcat-user/.java/.systemPrefs sudo chown -R tomcat-user /home/tomcat-user/.java/.systemPrefs
Then, in each shell that launches Tomcat…
export JAVA_OPTS="-Djava.util.prefs.systemRoot=/home/tomcat-user/.java" $CATALINA_HOME/bin/startup.sh
Appendix B: Hyrax Handlers
10.B.1. CSV Handler
Introduction
This handler will serve Comma-Separated Values type data. Form many kinds of files, only very modifications to the data files are needed. If you have very complex ASCII data (e.g., data with headers), take a look at the FreeForm handler, too.
Data File Configuration
Given a simple CSV data file, such as would be written out by Excel, add a single line at the start that provides a name and OpenDAP datatype for each column. Just as the data values in a given row are separated by a comma, so are the column names and types. Here is a small example data file with the added name<type> configuration row.
"Station<String>","latitude<Float32>","longitude<Float32>","temperature_K<Float32>","Notes<String>"
"CMWM",-34.7,23.7,264.3,
"BWWJ",-34.2,21.5,262.1,"Foo"
"CWQK",-32.7,22.3,268.4,
"CRLM",-33.8,22.1,270.2,"Blah"
"FOOB",-32.9,23.4,269.69,"FOOBAR"
The CSV handler supports the following DAP2 simple types: Int16, Int32, Float32, Float64, String.
The CSV handler will return represent the columns in the dataset as arrays with the named dimension record. For example, the sample data shown above will be represented in DAP2 by this handler as:
Dataset {
String Station[record = 5];
Float32 latitude[record = 5];
Float32 longitude[record = 5];
Float32 temperature_K[record = 5];
String Notes[record = 5];
} temperature.csv;
This is in contrast to the FreeForm handler that would represent these data as a Sequence with five columns.
For each column, the corresponding Array in the OpenDAP dataset has one attribute named type with a string value of Int16, …, String. However, see below for information on how to add custom attributes to a dataset.
Known Problems
There are no known problems.
Configuration Parameters
Configuring the Handler
This handler has no specific configuration parameters.
Configuring Datasets
There are two ways to add custom attributes to a dataset. First, you can use an ancillary attribute file in the same directory as the dataset. Alternatively, you can use NcML to add new attributes, variables, etc. See the NcML Handler documentation for more information on that option. Here we will describe how to set up an ancillary attribute file.
For any OpenDAP dataset, it is possible to write an ancillary attributes
file like the following. If that file has the name dataset.das
then whenever Hyrax reads dataset, it will also read those
attributes, and return them when asked.
Attributes {
Station {
String bouy_type "flashing";
Byte Age 53;
}
Global {
String DateCompiled "11/17/98";
String Conventions "CF-1.0", "CF-1.6";
}
}
The format of this file is very simple: Each variable in the dataset may have a collection of attributes, each of which consists of a type, a name and one or more values. In the above example, the variable Station will have the additional attributes bouy_type and Age with the respective types and values. Note that datasets may also define global attributes - information about the dataset as a whole - by adding a section with a name that doesn’t match the name of any variable in the dataset. In this example, I used Global for this (because it’s obvious) but I could have used foo. Also note the attribute Conventions has two values, CF-1.0 and CF-1.6
10.B.2. GeoTiff, GRIB2, JPEG2000 Handler
Introduction
This handler will serve data stored in files that can be read using the GDAL GIS library, including GeoTIFF, JPEG2000 and GRIB2.
Dataset Representation
These are all GIS datasets, so DAP2 responses will contains Grid variables with latitude and longitude maps. For DAP4, the responses will be coverages with latitude and longitude domain variables.
Known Problems
Often the data returned when using nothing but a GeoTIFF, JPEG2000, or GRIB2 file contains none of the metadata that make them useful for people not extremely familiar with the particular dataset. Thus, in most cases some extra work will have to be done either using NcML or an ancillary DAS file to add metadata to the dataset.
Configuration Parameters
None.
10.B.3. The HDF4 Handler
Introduction
This release of the server supports HDF4.2 and can read any file readable using that version of the API. It also supports reading/parsing HDF-EOS attribute information and provides some special mappings for HDF-EOS files depeding on the handler’s build options.
Mappings Between the HDF4 Data Model and DAP2 Data Types
- SDS
-
This is mapped to a DAP2 Grid (if it has a dimension scale) or Array (if it lacks a dim scale).
- Raster image
-
This is read via the HDF 4.0 General Raster interface and is mapped to Array. Each component of a raster is mapped to a new dimension labeled accordingly. For example, a 2-dimensional, 3-component raster is mapped to an m x n x 3 Array.
- Vdata
-
This is mapped to a Sequence, each element of which is a Structure. Each subfield of the Vdata is mapped to an element of the Structure. Thus a Vdata with one field of order 3 would be mapped to a Sequence of 1 Structure containing 3 base types. Note: Even though these appear as Sequences, the data handler does not support applying relational constraints to them. You can use the array notation to request a range of elements.
- Attributes
-
HDF attributes on SDS, rasters are straight-forwardly mapped to DAP attributes (HDF doesn’t yet support Vdata attributes). File attributes (both SDS, raster) are mapped as attributes of a DAP variable called "HDF_GLOBAL" (by analogy to the way DAP handles netCDF global attributes, i.e., attaching them to "NC_GLOBAL").
- Annotations
-
HDF file annotations mapped in the DAP to attribute values of type "String" attached to the fake DAP variable named "HDF_ANNOT". HDF annotations on objects are currently not read by the server.
- Vgroups
-
Vgroups are straight-forwardly mapped to Structures.
Mappings for the HDF-EOS Data Model
This needs to be documented.
Special Characters in HDF Identifiers
A number of non-alphanumeric characters (e.g., space, #, +, -) used in HDF identifiers are not allowed in the names of DAP objects, object components or in URLs. The HDF4 data handler therefore deals internally with translated versions of these identifiers. To translate the WWW convention of escaping such characters by replacing them with "%" followed by the hexadecimal value of their ASCII code is used. For example, "Raster Image #1" becomes "Raster%20Image%20%231". These translations should be transparent to users of the server (but they will be visible in the DDS, DAS and in any applications which use a client that does not translate the identifiers back to their original form).
Known Problems
Because the DAP software encodes attribute values as ASCII strings there will be a loss of accuracy for floating point attributes. This loss of accuracy is dependent on the version of the C++ I/O library used in compiling/linking the software (i.e., the amount of floating point precision preserved when outputting to ASCII is dependent on the library). Typically it is very small (e.g., at least six decimal places are preserved).
-
The server will merge the separate global attributes for the SD, GR interfaces with any file annotations into one set of global attributes. These will then be available through any of the global attribute access functions.
-
If the client opens a constrained dataset (e.g., in SDstart), any global attributes of the unconstrained dataset will not be accessible because the constraint creates a "virtual dataset" which is a subset of the original unconstrained dataset.
How to Install CF-enabled HDF4 Handler Correctly
The first step of using the HDF4 handler with CF option is to install the handler correctly because it has three different options. We’ll call them default, generic, and hdfeos2 for convenience.
-
default: This option gives the same output as the legacy handler.
-
generic: This option gives the output that meets the basic CF conventions regardless of HDF4 and HDF-EOS2 products. Some HDF4 products can meet the extra CF conventions while most HDF-EOS2 products will fail to meet the extra CF conventions.
-
hdfeos2: This option treats HDF-EOS2 products differently so that their output follows not only the basic CF conventions but also the extra CF conventions. For HDF4 products, the output is same as the generic option.
If you use Linux system that supports RPM package manager and have a super user privilege, the easiest way to install the HDF4 handler is using RPMs provided by OPeNDAP, Inc. website.
The OPeNDAP’s download website provides two RPMs --- one with HDF-EOS and one without HDF-EOS. You should pick the one with HDF-EOS if you want to take advantage of the extra CF support provided by the handler. If you pick one without HDF-EOS, please make sure that the H4.EnableCF key is set "true" in h4.conf file. See section 3.1 below for the full usage.
Here are two basic commands for deleting and adding RPMs:
-
Remove any existing RPM package using 'rpm -e <package_name>'.
-
Install a new RPM package using 'rpm -i <package_name.rpm>'.
1) Download and install the latest "libdap", "BES", and "General purpose handlers (aka dap-server)" RPMs first from
http://opendap.org/download/hyrax
3) Download and install the latest "hdf4_handler" RPM from
http://opendap.org/download/hyrax
4) (Optional) Configure the handler after reading the section 3 below.
5) (Re)start the BES server.
%/usr/bin/besctl (re)start
If you plan to build one instead of using RPMs and to support HDF-EOS2 products, please consider installing the HDF-EOS2 library first. Then, build the handler by specifying --with-hdfeos2=/path/to/hdfeos2-install-prefix during the configuration stage like below:
./configure --with-hdf4=/usr/local --with-hdfeos2=/usr/local/
Although the HDF-EOS2 library is not required to clean dataset names and attributes that CF conventions require, visualization will fail for most HDF-EOS2 products without the use of HDF-EOS2 library. Therefore, it is strongly recommended to use --with-hdfeos2 configuration option if you plan to serve NASA HDF-EOS2 data products. The --with-hdfeos2 configuration option will affect only the outputs of the HDF-EOS2 files including hybrid files, not pure HDF4 files.
As long as the H4.EnableCF key is set to be true as described in section 3.1 below, the HDF4 handler will generate outputs that conform to the basic CF conventions even though the HDF-EOS2 library is not specified with the --with-hdfeos2 configuration option. All HDF-EOS2 objects will be treated as pure HDF4 objects.
Please see the INSTALL document on step-by-step instruction on building the handler.
Configuration Parameters
Before we discuss the usage further, it’s very important to know what the CF conventions are. The CF conventions precisely define metadata that provide a description of physical, spatial, and temporal properties of the data. This enables users of data from different sources to decide which quantities are comparable, and facilitates building easy-to-use visualization tools with maps in different projections.
Here, we define the two levels of meeting the CF conventions: basic and extra.
-
Basic: CF conventions have basic (syntactic) rules in describing the metadata itself correctly. For example, dimensions should have names; certain characters are not allowed; no duplicate variable dimension names are allowed.
-
Extra: All physical, spatial, and temporal properties of the data are correctly described so that visualization tools (e.g., IDV and Panoply) can pick them up and display datasets correctly with the right physical units. A good example is the use of "units" and "coordinates" attributes.
If you look at NASA HDF4 and HDF-EOS2 products, they are very diverse in self-describing data and fail to meet CF conventions in many ways. Thus, the HDF4 handler aims to meet the conventions by correcting OPeNDAP attribute(DAS)/description(DDS)/data outputs on the fly. Although we tried our best effort to implement the "extra" level of meeting the CF conventions, some products are inherently difficult to meet such level. In those cases, we ended up meeting the basic level of meeting the CF conventions.
BES Keys in h4.conf
You can control HDF4 handler’s output behavior significantly by changing key values in a configuration file called "h4.conf".
If you used RPMs, you can find the h4.conf file in /etc/bes/modules/. If you built one, you can find the h4.conf file in {prefix}/etc/bes/modules.
The following 6 BES keys are newly added in the h4.conf file. The default configuration values are specified in the parentheses.
If this key’s value is false, the handler will behave same as the default handler. The output will not follow basic CF conventions. Object and attribute names will not be corrected to follow the CF conventions. Most NASA products cannot be visualized by visualization tools that follow the CF conventions. Such tools include IDV and Panoply.
The rest of keys below relies on this option. This key must be set to be "true" to ensure other keys to be valid. Thus, this is the most important key to be turned on.
By turning EnableMODAPSFile to be true, when HDF-EOS2 library is used, an extra HDF file handle(by calling SDstart) will be generated at the beginning of DAS,DDS and Data build. This may be useful for a server that mounts its data over the network. If you are not sure about your server settings, always leave it as false or comment out this key. By default this key is turned off.
When turning on this key, the handler will handle AIRS level 3 version 6 products and MOD08_M3-like products in a speedy way by taking advantage of the special data structures in these two products. Using this key requires the use of HDF-EOS2 library now although HDF-EOS2 library will not be called. By turning on this key, potentially HDF-EOS2 files that provide dimension scales for all dimensions may also be handled quickly. By default, this key should be set to true.
Some NASA HDF4(MODIS etc.) products don’t follow the CF rule to pack the data. To avoid the confusion for OPeNDAP’s clients , the handler may adopt the following two approaches:
-
Apply the scale and offset computation to the individual data point if the scale and offset rule doesn’t follow CF in the handler.
-
If possible, transform the scale and offset rule to CF rule.
Since approach 1) may degrade the performance of fetching large size data by heavy computation, we recommend approach 2), which is indicated by setting this key to be true. By default, this key should always be true.
By turning on this key, the handler will check if the datatype of scale_factorand offset is the same. This is required by CF. If they don’t share the same datatype, the handler will make the data type of offset be the same as that of scale_factor.
Since we haven’t found the data type inconsistencies of scale_factor and offset, in order not affect the performance,this key will be set to false by default.
If this key’s value is false, additional Vdata such as "Level 1B Swath Metadta" in LAADS MYD021KM product will not be processed and visible in the DAS/DDS output. Those additional Vdatas are added directly using HDF4 APIs and HDF-EOS2 APIs cannot access them.
Some CERES products(CER_AVG,CER_ES4,CER_SRB and CER_ZAVG, see description in the HDFSP.h) have many SDS fields and some Vdata fields. Correspondingly, the DDS and DAS page may be very long. The performance of accessing such products with visualization clients may be greatly affected. It may potentially even choke netCDF java clients.
To avoid such cases, we will not map vdata to DAP in such products by default. Users can turn on this key to check vdata information of some CERES products. This key will not affect the access of other products.
If this key’s value is false, small vdata datasets will be mapped to arrays in DDS output instead of attributes in DAS.
If this key’s value is true, vdata is mapped to attribute if there are less than or equal to 10 records.
For example, the DAS output of TRMM data 1B21 will show vdata as an attribute:
DATA_GRANULE_PR_CAL_COEF {
String hdf4_vd_desc "This is an HDF4 Vdata.";
Float32 Vdata_field_transCoef -0.5199999809;
Float32 Vdata_field_receptCoef 0.9900000095;
Float32 Vdata_field_fcifIOchar 0.000000000, 0.3790999949, 0.000000000,
-102.7460022, 0.000000000, 24.00000000, 0.000000000, 226.0000000, 0.000000000,
0.3790999949, 0.000000000, -102.7460022, 0.000000000, 24.00000000, 0.000000000,
226.0000000;
}
If this key’s value is false, the object name will be prefixed by the vgroup path and the fullpath attribute will not be printed in DAS output. This key only affects NASA CERES and MERRA products we support.
For example, the DAS output for Region_Number dataset
Region_Number {
String coordinates "Colatitude Longitude";
String fullpath "/Monthly Hourly Averages/Time And Position/Region Number";
}
becomes
Monthly_Hourly_Averages_Time_And_Position_Region_Number {
String coordinates "Monthly_Hourly_Averages_Time_And_Position_Colatitude Monthly_Hourly_Averages_Time_And_Position_Longitude";
}
in CER_AVG_Aqua-FM3-MODIS_Edition2B_007005.200510.hdf.
If this key’s value is false, the handler will check if there’s any vdata that has the same name as SDS. We haven’t found such a case in NASA products so it’s safe to disable this to improve performance.
If this key’s value is true, the handler will generate vdata’s attributes. By default, it’s turned off because most NASA hybrid products do not seem to store important information in vdata attributes. If you serve pure HDF4 files, it’s recommended to turn this value to true so that users can see all data. This key will not affect the behavior of the handler triggered by the H4.EnableVdata_to_Attr key in section 3.3 except the vdata attributes of small vdatas that are mapped to attributes in DAS instead of arrays in DDS. That is, only attributes of small vdatas will be also turned off from the DAS output if this key is turned off, not the values of vdatas. If a vdata doesn’t have any attribute or field attribute, the description
String hdf4_vd_desc "This is an HDF4 Vdata.";
will not appear in the attribute for that vdata although the key is true. The attribute container of the vdata will always appear regardless of this key’s value.
For MODIS swath data products that use the dimension map, if this key’s value is true and a MODIS geo-location product such as MOD03 is present and under the same directory as the swath product, the geolocation values will be retrieved using the geolocation fields in MOD03/MYD03 file instead of using the interpolation according to the dimension map formula.
We feel this is a more accurate approach since additional corrections may be done for geo-location values stored in those files [1] although we’ve done a case study that shows the differences between the interpolated values and the values stored in the geo-location file are very small.
For example, when the handler serves…
"MOD05_L2.A2010001.0000.005.2010005211557.hdf"
…file, it will first look for a geo-location file
"MOD03.A2010001.0000.005.2010003235220.hdf"
…first from the SAME DIRECTORY where MOD05_L2 file exists.
Please note that the "A2010001.0000" in the middle of the name is the "Acquisition Date" of the data so the geo-location file name should have exactly the same string. Handler uses this string to identify if a MODIS geo-location file exists or not.
This feature works only with HDF-EOS2 MODIS products. It will not work on the pure HDF4 MODIS product like MOD14 that requires the MOD03 geo-location product. That is, putting the MOD03 file with MOD14 in the same directory will not affect the handler’s DAS/DDS/DDX output of the MOD14 product.
The HDF4 handler used to support caching its response objects, but that feature has been removed do to problems with it and datasets where multiple SDS objects had arrays with the same names. This parameter is now ignored. Note that no error message is generated if your h4.conf file includes this, but it’s ignored by hyrax 1.7 and later.
10.B.4. The HDF5 Handler
Introduction
HDF5 handler was originally implemented to map the HDF5 to DAP by following the HDF5 data model and DAP2 protocol in 2001. In the course of the time, there was a strong interest from NASA GES DISC and other NASA Earth data centers to use the visualization clients that follow the CF conventions to access the HDF5 data via Hyrax. Funded by the NASA ACCESS program, in 2007 The HDF Group and the Hyrax team worked together to map HDF5 to DAP2 by following the CF conventions. This enables CF-friendly visualization clients to seamlessly access HDF5 data via Hyrax. This "CF behavior" of the handler has been so widely used, Hyrax source and RPM distributions have provided this "CF behavior" of the Hyrax responses since around 2008. By changing the BES key value in the configuration file hyrax service customers can still change the behavior back to the "basic behavior" implemented in 1999.
Since the time when the "CF behavior" was first added to the handler, the handler’s option to generate the "CF behavior" Hyrax responses has been called the CF option. The original way to generate the Hyrax responses has been called the default option because it provides the general mapping from HDF5 to DAP. In this document, we just follow these two historical terms to distinguish between the "CF behavior" and the non-CF "basic behavior".
In the course of time, DAP4 came out and the DAP4 support has been added to the CF option of the handler. Many NASA HDF5, HDF-EOS5 and netCDF-4 products have also been generated. These new products prompt the continuous improvement and enhancement of the CF option so that the CF-friendly visualization clients, such as Panoply, can visualize these files via Hyrax seamlessly. On the other hand, the DAP4 support has also been added to the default option. Therefore, four different DAP outputs can be generated via the HDF5 handler.
Section Highlights gives the highlights of these options. The following lists the section that provides detailed information of the four options that generate DAP outputs.
Readers need to be aware that CF conventions continue evolving and the HDF5 handler doesn’t keep updating to make it follow the latest CF conventions. For example, since version 1.8, the CF conventions adds the group component into the conventions. But the CF Option for DAP4 and CF Option for DAP2 don’t support the group hierarchy. In the course of time, as funding permits, the HDF5 handler may be updated to support newer components in the CF conventions. Currently the HDF5 handler tries to follow the CF conventions version 1.7 to enable the CF-friendly visualization clients access NASA HDF5 files seamlessly. Hereafter in this document, the CF option means the HDF5 handler tries to follow the CF conventions version 1.7 to map HDF5 to DAP2 or DAP4.
| CF option in this document means to follow CF conventions version 1.7. |
The HDF5 handler uses the BES keys for the hyrax data service customers to obtain the customized results and to achieve better performance. Section BES Keys provides the information for the most useful BES keys. Especially the Default BES Key Values used in the Hyrax source or RPM distributions are listed. Section Limitations lists the limitations of the handler at the current release. The Miscellaneous Information is provided at last.
Highlights
CF for DAP4
By definition, the CF option means the handler will follow the CF conventions to translate HDF5 to DAP. The CF option is set in the Hyrax source and RPM distribution since most NASA data centers uses the CF option. One can find that the default value of the BES key H5.EnableCF is set to true from section Default BES Key Values.
Key features for the CF option:
-
Following the CF naming conventions, only alphanumeric characters and underscore (“_”) are allowed for a variable or attribute names. For any character not allowed by CF name conventions, change that character to underscore (“_”).
-
There is no group hierarchy. HDF5 groups will be flattened. In general, a variable name for any non-HDF-EOS5 file should have its group path prefixed before it. The first “
/” of the final name will be stripped off. For the HDF-EOS5 variable name rule, check section CF Name for DAP4.An example: HDF5 variable name velocity.u under group geo-location becomes the geo_location_velocity_u in the DAP output.
-
The handler follows the CF conventions to translate the dimensions and coordinate variables for HDF-EOS5, netCDF-4 and some NASA HDF5 products.
-
HDF5 integer, floating-point and string datatypes are one-to-one mapped to DAP4. Other datatypes are elided.
-
DAP4 coverage is supported.
A DMR example can be found in section CF DMR Example for DAP4.
CF for DAP2
The name conventions and dimension/coordinate handling are the same as the DAP4 implementation. CF-friendly visualization clients such as Panoply can visualize the HDF5 data via DAP2 successfully. Screenshots of NASA HDF5 example files via Hyrax can be found at https://hdfeos.org/zoo/hdf5_handler/index.php .
However, due to the DAP2 limitation, HDF5 64-bit integer variables and attributes are elided. Signed 8-bit integer is mapped to 16-bit integer since DAP2 doesn’t support signed 8-bit integer. The handler doesn’t support DAP2 Grid. Instead, it follows the netCDF data model to use the shared dimensions for variables.
DDS and DAS examples can be found in section CF DDS and DAS Examples for DAP2.
Default for DAP4
To use this option, H5.EnableCF must be set to false in h5.conf. One should notice that Hyrax provides a way to customize the configuration with site.conf. For more information about site.conf, check the document site.conf of the hyrax user’s guide.
| To obtain DAP4 output from the default option: H5.EnableCF must be set to false in h5.conf or in site.conf. |
This option tries to map HDF5 to DAP4 in a general way. Unlike the CF option, it is not tuned to support the NASA data products. Instead of flattening the group hierarchy, the HDF5’s group hierarchy are kept by mapping HDF5 groups to DAP4 groups.
Moreover, when another BES key H5.DefaultHandleDimension is also set to true or is not present in the configuration file, the HDF5 handler seamlessly translates the dimension names of netCDF-4 or netCDF-4-like files to DAP4 although the HDF5 data model does not support netCDF-4 shared dimensions. If the original netCDF-4 or netCDF-4-like files are generated to follow the CF conventions, the DAP4 output should also follow the CF as well as keeping the HDF5’s group hierarchy.
In addition to mapping integer, string and floating-point data to DAP4, the HDF5 compound datatype, object references and regional references are also mapped to DAP4. A DMR example can be found in section Default Option: DMR Example.
Default for DAP2
To use this option, H5.EnableCF must be set to false in h5.conf. The BES key H5.DefaultHandleDimension has no effect for this option.
| To obtain DAP2 output from the default option: H5.EnableCF must be set to false in h5.conf or in site.conf. |
HDF5 signed 8-bit integer maps to signed 16-bit integer. 64-bit integer mapping is elided.
The HDF5 group hierarchy information is kept in a special DAS container HDF_ROOT_GROUP. The full path of an HDF5 variable is kept as an attribute. DDS and DAS Examples can be found in section Default Option: DDS and DAS Examples.
CF Option for DAP4
CF Name for DAP4
Other than the general name conventions described in section CF Option for DAP4, variable names of an HDF-EOS5 multi-grid/multi-swath/multi-zonal-average file have the corresponding grid/swath/zonal-average names prefixed before the field names. Variable names of an HDF-EOS5 single grid/swath/zonal-average just use the corresponding field names. The grid/swath/zonal-average names are ignored.
The original name and the full path of an HDF5 variable are preserved as DAP4 attributes. A BES key can be used to turn on/off these attributes. See section BES Keys for more information. Furthermore, For the HDF-EOS5 products, the original dimension names associated with the variable are also preserved by a DAP4 attribute. This is because the HDF-EOS5 provides the dimension names and those dimension names may be changed in DAP4 output in order to follow the CF conventions.
Although it rarely happens in NASA HDF5 products, by following the CF name conventions, it is possible that two or more DAP4 variables mapped from HDF5 may share the same name and this will cause an error. To avoid this issue, the handler implements a feature to avoid this kind of name clashing. A suffix like “_1” is added to the duplicated variable name. Since this rarely happens and keeping track of the name status may be expensive, a BES key is used for Hyrax service customers to turn on/off this feature.
CF Datatypes for DAP4
The following table lists the mapping from HDF5 to DAP4 for the CF option.
| HDF5 data type | DAP4 data name | Notes |
|---|---|---|
8-bit unsigned integer |
Byte |
|
8-bit signed integer |
Int8 |
|
16-bit unsigned integer |
UInt16 |
|
16-bit signed integer |
Int16 |
|
32-bit unsigned integer |
UInt32 |
|
32-bit signed integer |
Int32 |
|
64-bit unsigned integer |
UInt64 |
|
64-bit signed integer |
Int64 |
|
32-bit floating point |
Float32 |
|
64-bit floating point |
Float64 |
|
String |
String |
|
Other datatypes |
Not supported |
The handler elides the mapping of the following datatypes: HDF5 compound, object and region references, variable length(excluding variable length string), enum,opaque, bitfield and time. |
CF BES Keys for DAP4
The following two BES keys should be set to true to carry out the mapping of HDF5 to DAP4. In the current release, the handler is set to run these keys as true even if these two keys are not present in the configuration file. For detailed description of these two keys, check section Keys for Both CF and Default Options and section Keys for CF Option.
H5.EnableCF=true H5.EnableCFDMR=true
The following BES keys are also important either for performance or for correctly representing the coordinate variables. Hyrax service customers should carefully check the descriptions of these key values before changing them. The detailed description can be found at section Keys for Both CF and Default Options and Keys for CF Option. As software improves, some settings may get changed. So hyrax service customers are encouraged to frequently check the latest README and comments at the HDF5 handler configuration file h5.conf.in at github.
H5.EnableDropLongString=true H5.EnableAddPathAttrs=true H5.ForceFlattenNDCoorAttr=true H5.EnableCoorattrAddPath=true H5.MetaDataMemCacheEntries=1000 H5.EnableEOSGeoCacheFile=false
More BES keys and their descriptions can also be found at section Keys for CF Option.
CF DMR Example for DAP4
An h5ls header of an HDF-EOS5 grid file grid_1_2d.h5 is as follows:
/ Group
/HDFEOS Group
/HDFEOS/ADDITIONAL Group
/HDFEOS/ADDITIONAL/FILE_ATTRIBUTES Group
/HDFEOS/GRIDS Group
/HDFEOS/GRIDS/GeoGrid Group
/HDFEOS/GRIDS/GeoGrid/Data\ Fields Group
/HDFEOS/GRIDS/GeoGrid/Data\ Fields/temperature Dataset {4, 8}
Attribute: units scalar
Type: 1-byte null-terminated ASCII string
Data: "K"
/HDFEOS\ INFORMATION Group
Attribute: HDFEOSVersion scalar
Type: 32-byte null-terminated ASCII string
Data: "HDFEOS_5.1.13"
/HDFEOS\ INFORMATION/StructMetadata.0 Dataset {SCALAR}
The corresponding DMR is:
<?xml version="1.0" encoding="ISO-8859-1"?>
<Dataset xmlns="http://xml.opendap.org/ns/DAP/4.0#" dapVersion="4.0" dmrVersion="1.0" name="grid_1_2d.h5">
<Dimension name="lon" size="8"/>
<Dimension name="lat" size="4"/>
<Float32 name="lon">
<Dim name="/lon"/>
<Attribute name="units" type="String">
<Value>degrees_east</Value>
</Attribute>
</Float32>
<Float32 name="lat">
<Dim name="/lat"/>
<Attribute name="units" type="String">
<Value>degrees_north</Value>
</Attribute>
</Float32>
<Float32 name="temperature">
<Dim name="/lat"/>
<Dim name="/lon"/>
<Attribute name="units" type="String">
<Value>K</Value>
</Attribute>
<Attribute name="origname" type="String">
<Value>temperature</Value>
</Attribute>
<Attribute name="fullnamepath" type="String">
<Value>/HDFEOS/GRIDS/GeoGrid/Data Fields/temperature</Value>
</Attribute>
<Attribute name="orig_dimname_list" type="String">
<Value>YDim XDim</Value>
</Attribute>
<Map name="/lat"/>
<Map name="/lon"/>
</Float32>
<String name="StructMetadata_0">
<Attribute name="origname" type="String">
<Value>StructMetadata.0</Value>
</Attribute>
<Attribute name="fullnamepath" type="String">
<Value>/HDFEOS INFORMATION/StructMetadata.0</Value>
</Attribute>
</String>
<Attribute name="HDFEOS" type="Container"/>
<Attribute name="HDFEOS_ADDITIONAL" type="Container"/>
<Attribute name="HDFEOS_ADDITIONAL_FILE_ATTRIBUTES" type="Container"/>
<Attribute name="HDFEOS_GRIDS" type="Container"/>
<Attribute name="HDFEOS_GRIDS_GeoGrid" type="Container"/>
<Attribute name="HDFEOS_GRIDS_GeoGrid_Data_Fields" type="Container"/>
<Attribute name="HDFEOS_INFORMATION" type="Container">
<Attribute name="HDFEOSVersion" type="String">
<Value>HDFEOS_5.1.13</Value>
</Attribute>
<Attribute name="fullnamepath" type="String">
<Value>/HDFEOS INFORMATION</Value>
</Attribute>
</Attribute>
</Dataset>Note: The CF option retrieves the values of the coordinate variables and adds them to DAP4 as variable lat and variable lon. The variable name StructMetadata.0 becomes the StructMetadata_0. The group hierarchy is flattened. Since this is a single HDF-EOS5 grid, only the original variable name is kept. Also one can find
<Map name="/lat"/> <Map name="/lon"/>
under the variable temperature. This represents the DAP4 coverage. The original full path of variable temperature can be found from the attribute fullnamepath of the variable temperature as
<Attribute name="fullnamepath" type="String">
<Value>/HDFEOS/GRIDS/GeoGrid/Data Fields/temperature</Value>
</Attribute>
HDF5 group information maps to attribute containers such as:
<Attribute name="HDFEOS" type="Container"/>
CF Option for DAP2
CF Name for DAP2
The same as the CF option for DAP4. See section CF Name for DAP4.
CF Datatype for DAP2
The following table lists the mapping from HDF5 to DAP2 for the CF option.
| HDF5 data type | DAP2 data name | Notes |
|---|---|---|
8-bit unsigned integer |
Byte |
|
8-bit signed integer |
Int16 |
DAP2 does not have 8-bit signed integer type, so HDF5 8-bit signed integer maps to DAP2 16-bit signed integer. |
16-bit unsigned integer |
UInt16 |
|
16-bit signed integer |
Int16 |
|
32-bit unsigned integer |
UInt32 |
|
32-bit signed integer |
Int32 |
|
64-bit unsigned integer |
Not Supported |
DAP2 does not support 64-bit unsigned integer type. |
64-bit signed integer |
Not Supported |
DAP2 does not support 64-bit signed integer type. |
32-bit floating point |
Float32 |
|
64-bit floating point |
Float64 |
|
String |
String |
|
Other datatypes |
N/A |
The handler elides the mapping of the following datatypes: HDF5 compound, variable length(excluding variable length string), object and region reference, enum,opaque, bitfield and time. |
CF BES Keys for DAP2
Except that BES Key H5.EnableCFDMR does not have effect on the DAP2 mapping, the other BES key information is the same as the information described in section CF BES Keys for DAP4.
CF DDS and DAS Examples for DAP2
The layout of the HDF5 file is the same as the layout described in section CF DMR Example for DAP4.
The DDS is:
Dataset {
Float32 temperature[lat = 4][lon = 8];
String StructMetadata_0;
Float32 lon[lon = 8];
Float32 lat[lat = 4];
} grid_1_2d.h5;
The DAS is:
Attributes {
HDFEOS {
}
HDFEOS_ADDITIONAL {
}
HDFEOS_ADDITIONAL_FILE_ATTRIBUTES {
}
HDFEOS_GRIDS {
}
HDFEOS_GRIDS_GeoGrid {
}
HDFEOS_GRIDS_GeoGrid_Data_Fields {
}
HDFEOS_INFORMATION {
String HDFEOSVersion "HDFEOS_5.1.13";
String fullnamepath "/HDFEOS INFORMATION";
}
temperature {
String units "K";
String origname "temperature";
String fullnamepath "/HDFEOS/GRIDS/GeoGrid/Data Fields/temperature";
String orig_dimname_list "YDim XDim";
}
StructMetadata_0 {
String origname "StructMetadata.0";
String fullnamepath "/HDFEOS INFORMATION/StructMetadata.0";
}
lon {
String units "degrees_east";
}
lat {
String units "degrees_north";
}
}
The DDS and DAS shown in this example are equivalent to the DMR output in section CF DMR Example for DAP4 except that the DMR includes the DAP4 coverage information. However, if there are signed 8-bit integer or 64-bit integer variables in the HDF5 file, DAP4 DMR will show the exact datatype while DAP2 maps the signed 8-bit integer to 16-bit integer and elides the mapping of 64-bit integers.
Default Option for DAP4
Default Option: DAP4 Name
A number of non-alphanumeric characters (e.g., space, #, +, -) used in HDF5 object names are not allowed in the names of DAP objects, object components or in URLs. Libdap escapes these characters by replacing them with "%" followed by the hexadecimal value of their ASCII code. For example, "Raster Image #1" becomes "Raster%20Image%20%231". These translations should be transparent to users of the server (but they will be visible in the DMR and in any applications which use a client that does not translate the identifiers back to their original form).
Default Option: DAP4 Datatype
The following table lists the mapping from HDF5 to DAP4 for the default option.
| HDF5 data type | DAP4 data name | Notes |
|---|---|---|
8-bit unsigned integer |
Byte |
|
8-bit signed integer |
Int8 |
|
16-bit unsigned integer |
UInt16 |
|
16-bit signed integer |
Int16 |
|
32-bit unsigned integer |
UInt32 |
|
32-bit signed integer |
Int32 |
|
64-bit unsigned integer |
Int64 |
|
64-bit signed integer |
UInt64 |
|
32-bit floating point |
Float32 |
|
64-bit floating point |
Float64 |
|
String |
String |
|
Object/region reference |
URL |
|
Compound |
Structure |
HDF5 compound variable can be mapped to DAP4 under the condition that the base members (excluding object/region references) of compound can be mapped to DAP4. |
Other datatypes |
Not Supported |
The handler elides the mapping of the following datatypes: HDF5 variable length(excluding variable length string), enum,opaque, bitfield and time. |
Default Option: DAP4 BES Keys
The H5.EnableCF key must be set to false to obtain the DAP4 output for the default option and to keep the netCDF-4-like dimensions by following the netCDF data model.
H5.EnableCF=false
Default Option: DMR Example
A ncdump header of a netCDF-4 file nc4_group_atomic.h5 :
netcdf nc4_group_atomic {
dimensions:
dim1 = 2 ;
variables:
int dim1(dim1) ;
float d1(dim1) ;
group: g1 {
dimensions:
dim2 = 3 ;
variables:
int dim2(dim2) ;
float d2(dim1, dim2) ;
} // group g1
}
The corresponding DMR:
<?xml version="1.0" encoding="ISO-8859-1"?>
<Dataset xmlns="http://xml.opendap.org/ns/DAP/4.0#" dapVersion="4.0" dmrVersion="1.0" name="nc4_group_atomic.h5">
<Dimension name="dim1" size="2"/>
<Int32 name="dim1">
<Dim name="/dim1"/>
</Int32>
<Float32 name="d1">
<Dim name="/dim1"/>
</Float32>
<Group name="g1">
<Dimension name="dim2" size="3"/>
<Int32 name="dim2">
<Dim name="/g1/dim2"/>
</Int32>
<Float32 name="d2">
<Dim name="/dim1"/>
<Dim name="/g1/dim2"/>
</Float32>
</Group>
</Dataset>Note: Both the dimension names and the dimension sizes in the original netCDF-4 files are kept as well as the group hierarchy.
Default Option for DAP2
Default Option: DAP2 Name
Same as section Default Option: DAP4 Name.
Default Option: DAP2 Datatype
| HDF5 data type | DAP2 data name | Notes |
|---|---|---|
8-bit unsigned integer |
Byte |
|
8-bit signed integer |
Int16 |
DAP2 does not have 8-bit signed integer type, so it maps to 16-bit signed integer. |
16-bit unsigned integer |
UInt16 |
|
16-bit signed integer |
Int16 |
|
32-bit unsigned integer |
UInt32 |
|
32-bit signed integer |
Int32 |
|
64-bit unsigned integer |
Not Supported |
DAP2 does not support 64-bit unsigned integer type. |
64-bit signed integer |
Not Supported |
DAP2 does not support 64-bit signed integer type. |
32-bit floating point |
Float32 |
|
64-bit floating point |
Float64 |
|
String |
String |
|
Object/region reference |
URL |
|
Compound |
Structure |
HDF5 compound variable can be mapped to DAP2 under the condition that the base members (excluding object/region references) of compound can be mapped to DAP2. |
Other datatypes |
Not Supported |
The handler elides the mapping of the following datatypes: HDF5 variable length(excluding variable length string), enum,opaque, bitfield and time. |
Default Option: DAP2 BES Keys
The H5.EnableCF key value must be set to false to obtain the DAP2 output for the default option. Note netCDF-4-like dimensions will NOT be handled according to the netCDF data model.
H5.EnableCF=false
Default Option: DDS and DAS Examples
The h5ls header of the HDF5 file d_group.h5 :
/ Group /a Group /a/b Group /a/b/c Group
Since this file does not have variables so the DDS is empty. The corresponding DAS is:
Attributes {
HDF5_ROOT_GROUP {
a {
b {
c {
}
}
}
}
/a/ {
String HDF5_OBJ_FULLPATH "/a/";
}
/a/b/ {
String HDF5_OBJ_FULLPATH "/a/b/";
}
/a/b/c/ {
String HDF5_OBJ_FULLPATH "/a/b/c/";
}
}
The attribute container HDF5_ROOT_GROUP preserves the information of the group hierarchy.
Another example show an HDF5 dataset with HDF5 compound datatype. The h5dump header of the HDF5 file d_compound.h5 is:
HDF5 "d_compound.h5" {
GROUP "/" {
DATASET "compound" {
DATATYPE H5T_COMPOUND {
H5T_STD_I32BE "Serial number";
H5T_STRING {
STRSIZE H5T_VARIABLE;
STRPAD H5T_STR_NULLTERM;
CSET H5T_CSET_ASCII;
CTYPE H5T_C_S1;
} "Location";
H5T_IEEE_F64BE "Temperature (F)";
H5T_IEEE_F64BE "Pressure (inHg)";
}
DATASPACE SIMPLE { ( 4 ) / ( 4 ) }
ATTRIBUTE "value" {
DATATYPE H5T_COMPOUND {
H5T_STD_I32BE "Serial number";
H5T_STRING {
STRSIZE H5T_VARIABLE;
STRPAD H5T_STR_NULLTERM;
CSET H5T_CSET_ASCII;
CTYPE H5T_C_S1;
} "Location";
H5T_IEEE_F64BE "Temperature (F)";
H5T_IEEE_F64BE "Pressure (inHg)";
}
DATASPACE SIMPLE { ( 4 ) / ( 4 ) }
}
}
}
The corresponding DDS is:
Dataset {
Structure {
Int32 Serial%20number;
String Location;
Float64 Temperature%20%28F%29;
Float64 Pressure%20%28inHg%29;
} /compound[4];
} d_compound.h5;
Note the HDF5 compound variable array /compound maps to DAP’s array of Structure. The special characters inside the member names of the compound datatype are changed according to section Default Option: DAP4 Name.
BES Keys
In the course of supporting easy access to NASA HDF5/HDF-EOS5/netCDF4 files via Hyrax, various performance and other optimization tuning options are provided to hyrax service customers via BES keys. In this section, the descriptions for critical BES keys are provided. For the comprehensive BES key description, check the HDF5 handler configuration file h5.conf.in at github.
Keys for Both CF and Default Options
- H5.EnableCF
-
-
default=true
-
When this key is set to true or is not present in the configuration file, the handler handle the HDF5 file by following the CF conventions. The handler is especially tuned to handle NASA HDF5/netCDF4/HDF-EOS5 data products. For the tested NASA products, see [NASA Products supported and tested by the CF option of the Handler]. The key benefit of this option is to allow OPeNDAP visualization clients to display remote data seamlessly. Please visit here for details.
-
When this key is set to false, the handler handle the HDF5 file by following generic mapping from HDF5 to DAP. If the HDF5 file is a netCDF-4/HDF5 file or follows the netCDF data model and the DAP4 DMR response is requested, the handler can map the HDF5 to DAP4 by following the netCDF data model.
-
- H5.MetaDataMemCacheEntries
-
-
default=1000
-
Setting the H5.MetaDataMemCacheEntries to a value greater than zero enables caching DDS,DAS and DMR responses in memory. Our performance study shows that, by turning on this key, the DDS,DAS or DMR response time is much faster.
-
The cache uses an LRU policy for purging old entries. It starts purging its objects after the number of entries exceeds the number defined by this key.
-
One can tune its behavior by changing this value and the H5.CachePurgeLevel value below. Note that this feature is on by default. The default value is 1000.
-
- H5.CachePurgeLevel
-
-
default=0.2
-
This key determines how much of the in-memory cache is removed when it is purged. The default value is 0.2. With the default value, it configures the software to remove the oldest 20% of items from the cache.
-
Keys for CF Option
Note the following keys only take effect when H5.EnableCF is set to true. Unless specifically mentioned, these keys apply to both DAP2 and DAP4.
- H5.EnableCFDMR
-
-
default=true
-
When this key is set to true, the DAP4 DMR is generated directly rather than via DDS and DAS. With this feature on, the HDF5 signed 8-bit integer is mapped to DAP4 signed 8-bit integer and the HDF5 64-bit integer is mapped to the corresponding DAP4 integer.
-
If this key is set to false, the DMR is generated by DDS and DAS and it maps signed 8-bit integer to signed 16-bit integer.
-
Note: Starting from 1.16.5, this key is set to true by default.
-
- H5.EnableCoorattrAddPath
-
-
default=true
-
When this key is set to true, the group path contained in the "coordinates" attribute value for some general HDF5 products(ICESAT-2 ATL03 etc.) will be added and flattened. This is to make the coordinate variable names stored in the "coordinates" attribute consistent with the flattened variables in the DAP output.
-
- H5.ForceFlattenNDCoorAttr
-
-
default=true
-
If this key is set to true, the handler will try to flatten the coordinate variable path stored inside the "coordinates" attribute. Currently, this key only takes effect for the HDF5 file that follows the netCDF-4 data model when the 2-D latitude/longitude fields present.
-
- H5.EnableDropLongString
-
-
default=true
-
If this key is set to true, under the conditions described below, the long string variables or attributes will be elided.
-
We find netCDF java has a string size limit(currently 32767). If an HDF5 string dataset has an individual element of which the size is greater than this limit, visualization tools(Panoply etc.) that depend on the netCDF Java may not open the HDF5 file. So this key is set to true to skip the HDF5 string of which size is greater than 32767. Users should set this key to false if that long string information is necessary or visualization clients are not used.
-
NOTE: For the following two cases, the long string won’t be dropped since the latest netCDF Java works.
1) The size of an HDF5 string attribute exceeds 32767. 2) Even if the total size of an HDF5 string dataset exceeds 32767, but the individual string element size does not exceed 32767.
-
- H5.EnableAddPathAttrs
-
-
default=true
-
When this key is set to true, the original path of the HDF5 group or variable is kept as an attribute. Users can set this key to false if users don’t care about the absolute path of object names.
-
- H5.EnableFillValueCheck
-
-
default=true
-
When this key is set to true, the handler will check if the _FillValue attribute holds the the correct datatype and the attribute value is inside the valid data range.
-
We find that occasionally that the datatype of attribute _FillValue is different than the datatype of the corresponding variable for some NASA HDF5 products. This violates the CF conventions. So the handler corrects the FillValue datatype to make it the same as the corresponding variable datatype. However, the original value of the _fillvalue may also fall out of the range of the variable datatype. This can be illustrated by the following example.
-
The variable and the _fillvalue are present as follows:
-
variable datatype: unsigned char
-
_fillvalue attribute datatype: signed char
-
the value of the _fillvalue: -127
-
-
NOTE: the value of the _filevalue(-127) is out of the data range of the unsigned char. An unsigned char number can not be negative.
-
If such a case occurs, we believe this is a data producer’s mistake and the hyrax service should return an error. The Hyrax data service center should report this issue back to the data producer. However, this may only occur for one or two variables and the data center may not want to stop the hyrax service. So we provide this BES key so that the data center can have an option to continue the service and may use NcML to patch the wrong fillvalue until the data producer corrects the wrong _fillvalue in the new release.
-
By default, this key is set to true. If the fillvalue is out of the range of the variable type, Hyrax generates an error and the service stops.
-
To ignore the _fillvalue check, set this key to false. The service runs normally but the _Fillvalue of some variables may be wrong and it will cause issues on the client-side.
-
-
- H5.EnableDAP4Coverage
-
-
default=true
-
If this key is set to true, the handler adds the DAP4 coverage information to the DMR. This key only takes effect for DAP4 responses.
-
- H5.EnableCheckNameClashing
-
-
default=false
-
When this key is set to true, the handler will check if there exists name clashing among variables and attributes. If name clashing occurs, the handler tries to resolve the name clashing by generating unique names for the clashed ones. For NASA HDF5 and HDF-EOS5 products, we don’t see any name clashings for variables and attributes. In fact, unlike HDF4, it is very rare to have name clashing for HDF5. So to reduce performance overhead, we set this key to false by default. Users can set this key to true if it becomes necessary.
-
- H5.NoZeroSizeFullnameAttr
-
-
default=false
-
When this key is set to true, the fullnamepath attribute will NOT be added if the HDF5 variable data storage size is 0. This is necessary to generate correct HDF5 dmr++ files.
-
- H5.EscapeUTF8Attr
-
-
defalut=true
-
When this key is set to true, the attribute values that use UTF-8 character encoding are escaped in the same way as values that use the ASCII encoding. To enable UTF-8 in attribute values, set this key to false.
-
- H5.EnableDiskMetaDataCache
-
-
default=false
-
If this key is set to true, the DAS will be cached into a file. The handler will read DAS from the cached file instead of using the HDF5 library to build since the second time. Note this key only takes effect for DAP2 responses.
-
Since Hyrax 1.15, MetaData Store(MDS) has the similar feature as this key can achieve. By default, this key is set to false. Users are encouraged to check if turning this key on can improve performance before setting this key true.
-
- H5.EnableEOSGeoCacheFile
-
-
default=false
-
When this key is set to true, HDF-EOS5 Geolocation data is cached to a file.
-
The latitude and longitude of an HDF-EOS5 grid will be calculated on-the-fly according to projection parameters stored in the HDF-EOS5 file. The same latitude and longitude are calculated each time when an HDF-EOS5 grid is fetched. When the H5.EnableEOSGeoCacheFile key is set to true, the calculated latitude and longitude are cached to two flat binary files so that the same latitude and longitude will be obtained from the cached files starting from the second fetch. Several associated keys must be set correctly when this key is set to true.
-
The description of these associated keys are:
-
H5.Cache.latlon.path - This key should provide the full path of an existing directory that grants the read and write permissions for the generated latitude and longitude cached files.
-
H5.Cache.latlon.prefix - This key provides a prefix for the cache file. This is required by BES.
-
H5.Cache.latlon.size - This key provides the size of the cache in megabytes, the value must be greater than 0.
-
Example:
H5.EnableEOSGeoCacheFile=true H5.Cache.latlon.path=/tmp/latlon H5.Cache.latlon.prefix=l H5.Cache.latlon.size=2000
-
-
-
NOTE: When HDF-EOS5 level 3 Grid products are served by Hyrax, turning on this feature may greatly improve the data access performance. Hyrax service customers should take advantage of this feature if the served data products are HDF-EOS5 level 3. By default, this key is set to false since, when this feature is turned on, several BES Keys are involved, and it takes effort for service people to set the keys.
-
- H5.EnableDiskDataCache
-
-
default=false
-
If this key is set to true, the variable data will write to a binary file in the server. Data will be read in from the cached file since the second fetch. Several associated keys must be set correctly when this key is set to true. The description of these associated keys are:
-
H5.DiskCacheDataPath - This key should provide the full path of an existing directory that grants the read and write permissions for the generated variable cached files.
-
H5.DiskCacheFilePrefix - This key provides a prefix for the cache file. This is required by BES.
-
H5.DiskCacheSize - This key provides the size of the cache in megabytes, the value must be greater than 0.
-
Example:
H5.EnableDiskDataCache=true H5.DiskCacheDataPath=/tmp H5.DiskCacheSize=100000
-
-
-
- H5.DiskCacheComp
-
-
default=true and this key only takes effect when the H5.EnableDiskDataCache key is set to true.
-
This key and its associated keys provide a way for users to fine tune the data to be cached in the disk.
-
NOTE: This key will take effect only when the H5.EnableDiskDataCache key is set to true.
-
The motive for this key is that users may not want to cache all variables either because there is disk limitation or the performance gain is less optimal for some variables. This key and the following associated keys will help mitigate these issues.
-
If this key is set to true, only compressed HDF5 variables are cached. If compressed variables are cached, there is no data decompression time when retrieving the data. Therefore, performance may get improved.
-
The following keys are provided to further limit the compressed variables of which the data is cached to the disk when the H5.DiskCacheComp is set to true.
-
H5.DiskCacheFloatOnlyComp: If this key is set to true, only floating-point compressed variables are cached.
-
H5.DiskCacheCompThreshold: To take advantage of this key its value must be a floating-point number greater than 1.
-
The handler will compare the compression ratio of a variable with this number, only when the compression ratio is smaller than this number(that is: the variable is hard to compress), the variable is cached. In other words, hard compressed variable usually takes longer decompression time. So using disk cache may greatly reduce the processing time.
-
-
H5.DiskCacheCompVarSize: The value of this key represents the variable size in kilobytes. It must be a positive integer number.
-
Only if the (uncompressed) variable size that is greater than this value, that variable data is cached. For example, if this number is 100, only the size of variable that is >100K will be cached.
-
-
-
-
Keys for Default Option
- H5.DefaultHandleDimension
-
-
default=true
-
When this key is set to true, the handler follows the netCDF-4 data model to handle the HDF5 dimensions if possible.
-
Note: this key only takes effect for DAP4 responses.
-
| The BES keys listed in the Keys for CF Option will be no-op when the default option is used. |
Default BES Key Values
This is the default setting for BES keys in Hyrax 1.16.5. It means that even without setting any BES key values, the handler will generate either DAP2 or DAP4 output as if these BES key values are set. As the software improves, the default setting may change; check the HDF5 handler configuration file h5.conf.in at github.
H5.EnableCF=true H5.EnableCFDMR=true H5.ForceFlattenNDCoorAttr=true H5.EnableCoorattrAddPath=true H5.EnableDAP4Coverage=true H5.EnableAddPathAttrs=true H5.EnableDropLongString=true H5.EnableFillValueCheck=true H5.EscapeUTF8Attr = true H5.EnableCheckNameClashing=false H5.NoZeroSizeFullnameAttr=false H5.RmConventionAttrPath=true H5.KeepVarLeadingUnderscore=false H5.CheckIgnoreObj=false H5.EnablePassFileID=false H5.MetaDataMemCacheEntries=1000 H5.EnableDiskMetaDataCache=false H5.EnableDiskDataCache=false H5.DiskCacheComp=false H5.DisableStructMetaAttr=true H5.DisableECSMetaAttr=false H5.EnableEOSGeoCacheFile=false
Limitations
Unless explicitly specified, the limitations listed below apply to both DAP2 and DAP4. CF Option:
-
The mappings of the following datatypes are not supported:
-
variable length(excluding variable length string), time, enum, bitfield, opaque, compound, array, and reference types are not supported.
-
-
The HDF5 files containing cyclic groups are not supported.
-
The handler does not handle the mapping of HDF5 soft links, external links and comments.
-
For DAP2 only, the mapping of HDF5 64-bit integer objects is not supported; the HDF5 8-bit signed integer datatype is mapped to DAP2 16-bit signed integer datatype.
Default option:
-
An HDF5 object name containing a period (“.”) is not supported.
-
The mappings of the following datatypes are not supported:
-
variable length(excluding variable length string), time, enum, bitfield, and opaque datatypes are not supported.
-
-
The HDF5 files containing cyclic groups are not supported.
-
The handler supports the mapping of soft links but not external links and comments.
-
DAP4 coverage is not supported. DAP2 grid is also not supported.
-
For DAP2 only, the mapping of HDF5 64-bit integer objects is not supported; the HDF5 8-bit signed integer datatype is mapped to DAP2 16-bit signed integer datatype.
Miscellaneous Information
NASA Products Supported and Tested by the CF option of the Handler
-
HDF-EOS5 products
-
HIRDLS, MLS, TES, OMI, MOPITT, LANCE AMSR_2, VIIRS, MEaSURES GSSTF
-
-
netCDF-4/HDF5 products
-
TROP-OMI, AirMSPI, OMPS-NPP, Arctas-CAR, many MEaSURES, Ocean color,GHRSST, ICESAT-2 ATL/Mable/GLAH
-
-
HDF5 products
-
SMAP, GPM, OCO2/ACOS/GOSAT, Aquarius
-
| The HDF5 handler should support any netCDF-4/HDF5 products and HDF-EOS5 products. The above just lists the data products that the handler explicitly tests. |
Supporting netCDF-4 Products
Unless served by customized service like NASA-Compliant General Application Platform(NGAP), by default the netCDF-4 files with the file name suffix like .nc or .nc4 will be served by Hyrax’s netCDF handler. Unlike the HDF5 handler, the netCDF4 handler only supports netCDF classic data model. The group hierarchy is elided and the datatypes not supported by the netCDF classic data model are also elided.
One way to use the HDF5 handler to serve these netCDF4 files is to change the file name suffix to .h5 or to add the file name suffix .h5. For example, do the following:
change the file name of a netCDF-4 file: foo.nc -> foo.h5 Or add the file name suffix .h5 to a netCDF-4 file: foo2.nc4 -> foo2.nc4.h5
The second way is to use Hyrax’s site.conf feature to make a customized configuration file so that these netCDF-4 files can be served by the HDF5 handler. Check here on how to use site.conf.
Elided Object Check
The handler provides a way for Hyrax service customers to check and list the objects in the served HDF5 file that are not mapped to DAP2. This check is valid for the DAP2 service when the CF option is on although most of the checks are also valid for the corresponding DAP4 service. This key is useful for a hyrax data distributor to check the unsupported HDF5 objects by Hyrax before serving the data.
| This feature has not been tested much and we welcome to the feedback. |
To use this feature, make sure the following two BES keys to be set as follows:
H5.EnableCF=true H5.CheckIgnoreObj=true
Check the DAS output. It will list the elided HDF5 objects and attributes when mapping HDF5 to DAP2.
| After checking the ignored HDF5 object and attribute information, make sure to change the CheckIgnoreObj key back to false. H5.CheckIgnoreObj=false |
Variable Aggregation and Attribute Modification with NcML handler
One can modify the HDF5 attributes and aggregate HDF5 variables via the NcML handler . More information and examples on how to use the NcML handler can be found at http://hdfeos.org/examples/ncml.php and https://hdfeos.org/zoo/hdf5_handler/ncml_opendap.php.
Further Reading
-
HDF5 OPeNDAP handler web page at hdfeos.org https://hdfeos.org/software/hdf5_handler.php
The web page includes pointers to the demo page to access NASA HDF5 products as well as other older but useful documents.
10.B.5. The NetCDF Handler
Introduction
There are several versions of the netCDF software for reading and writing data and using those different versions, it’s possible to make several different kinds of data files. For the most part, netCDF strives to maintain compatibility so that any older file can be read using any newer version of the library. To ensure that the netCDF handler can read (almost) any valid netCDF data file, you should make sure to use the latest version of the netCDF library when you build or install the handler.
However, as of netCDF 4, there are some new data model components in netCDF that are hard to represent in DAP2 (hence the 'almost' in the preceding paragraph). If the handler, as of version 3.10.x, is linked with netCDF 4.1.x or later, you will be able to read any netCDF file that fits the 'classic' model of netCDF (as defined by Unidata’s documentation) which essentially means any file that uses only data types present in the netCDF 3.x API but with the addition that these files can employ both internal compression and chunking.
The new data types present in the netCDF data model present more of a challenge. However, as of version 3.10.x, the Hyrax data handler will serve most of the new cardinal types and the more commonly used 'user defined types'.
Mappings Between NetCDF Version 4 Data Model and DAP2 Data Types
All of the cardinal types in the netCDF 4 data model map directly to types in DAP2 except for the following:
- NC_BYTE
-
There is no 'signed byte' type in DAP2 so these map to an unsigned byte or signed Int16, depending on the value of the option NC.PromoteByteToShort (see below where the configuration parameters are described).
- NC_CHAR
-
There is no 'character' type in DAP2 so these map to DAP Strings of length one. Arrays of N characters in netCDF map to arrays of N-1 Strings in DAP
- NC_INT64, NC_UINT64
-
DAP2 does not support 64-bit integers (this will be added soon to the next version of the protocol).
In the netCDF documentation, types such as Compound (which is effectively C’s struct type), et c., are called User Defined types. Unlike the cardinal types, netCDF 4’S user defined types don’t always have a simple mapping to DAP2’s types. However, the most important of the user defined types, NC_COMPOUND, does map directly to DAP2’s Structure. Here’s how the user defined types are mapped by the handler as of version 3.10:
- NC_COMPOUND
-
This maps directly to a DAP2 Structure. The handler works with both compound variables and attributes. For attributes, the handler only recognizes scalar and vector (one-dimensional) compounds. For variables scalar and array compounds are supported including compounds within compounds and compounds with fields that are arrays.
- NC_VLEN
-
Not supported
- NC_ENUM
-
Supported so long as the 'base type' is not a 64-bit integer. We add extra attributes to help the downstream user. We add DAP2_OriginalNetCDFBaseType with the value NC_ENUM and DAP2_OriginalNetCDFTypeName with the name of the type from the file (Enums in netCDF are user-defined types, so they have names set y the folks who wrote the file). We also add two attributes that provide information about the integral values and they names (e.g., Clear = 0, Cumulonimbus = 1, Stratus = 2, …, Missing = 255) using two attributes: DAP2_EnumValues and DAP2_EnumNames.
- NC_OPAQUE
-
This type is mapped to an array of Bytes (so the scalar NC_OPAQUE becomes a one-dimensional array in DAP2). If a netCDf file contains an array (with M dimensions) of NC_OPAQUE vars, then the DAP response will contain a Byte array with M+1 dimensions. In addition, the handler adds an attribute DAP2_OriginalNetCDFBaseType with the value NC_OPAQUE and DAP2_OriginalNetCDFTypeName with the name of the type from the file to the Byte variable so that savvy clients can see what’s going on. Even though the DAP2 object for an NC_OPAQUE is an array, it cannot be subset (but arrays of NC_OPAQUEs can be subset with the restriction that M+1 dimensional DAP2 Byte array can only be subset in the original NC_OPAQUE’s M dimensions).
The netCDF handler currently reads only from the root group.
Configuration parameters
When the handler reads a type that it does not recognize, it will normally signal an error and stop processing. Setting this parameter to true will cause it to silently ignore the unknown type (an error message may be written to the bes log file).
Accepted values: true,yes|false,no, defaults to false.
Example:
NC.IgnoreUnknownTypes=true
Include shared dimensions as separate variables. This feature is included to support older clients based on the netCDF library. Some versions of the library depend on the shared dimensions appearing as variables at the 'top' of the file.
Clients that announce to the server that they understand newer versions of the DAP (3.2 and up) won’t need these extra variables, while older ones likely will. In the 3.10.0 version of the handler, the DAP version that clients announce they can accept will determine how the handler responses unless this parameter is set, in which case, the value set in the configuration file will override that default behavior.
Accepted values: true,yes|false,no, defaults to false.
Example:
NC.ShowSharedDimensions=false
This option first appears in Hyrax 1.8; version 3.10.0 of the netcdf_handler.
Note: Hyrax version 1.8 ships with this turned on in the netcdf handler’s configuration file, even though the default for the option is off.
Use this option to promote DAP2 Byte variables and attributes to Int16, noting that Byte is unsigned and Int16 is signed, so this is a way to preserve the sign of netCDF’s signed Byte data type.
For netcdf4 files, this option behaves the same except that NC_OPAQUE variables are externalized as DAP Bytes regardless of the option’s value; their Byte attributes, on the other hand, as promoted to Int16 when the option is true.
Backstory: In NetCDF the Byte data type is signed while in DAP2 it is unsigned. For data (i.e., variables) this often makes no real difference because byte data are often read from the network and dumped into an array where their sign is interpreted (correctly or not) by the client software - in other words byte-data is often a special case. However, this is, strictly speaking, wrong. In addition, and maybe more importantly, with attributes the values are interpreted by the server and represented in ASCII (and sent to the client as text), so the sign is interpreted by the server and and the resulting text is converted into a binary value by the client; the simple trick of letting the default C types handle the value’s sign won’t work. One way around this incompatibility is to promote Byte in DAP2 to Int16, which is a signed type.
Accepted values: true,yes|false,no, defaults to false, the server's original behavior.
Example:
NC.PromoteByteToShort=true
NetCDF to DAP Type Mappings
| netCDF type name | netCDF type description | DAP2 type name | DAP2 type description | Notes |
|---|---|---|---|---|
NC_BYTE |
8-bit signed integer |
dods_byte |
8-bit unsigned integer |
The DAP2 type is unsigned; This mapping can be changed so that netcdf Byte mapps to DAP2 Int16 (which will preserve the netCDF Byte’s sign bit (see the NC.PromoteByteToShort configuration parameter). |
NC_UBYTE |
8-bit unsigned integer |
dods_byte |
8-bit unsigned integer |
|
NC_CHAR |
8-bit unsigned integer |
dods_str |
variable length character string |
Treated as character data; arrays are treated specially (see text) |
NC_SHORT |
16-bit signed integer |
dods_int16 |
16-bit signed integer |
|
NC_USHORT |
16-bit unsigned integer |
dods_uint16 |
16-bit unsigned integer |
|
NC_INT |
32-bit signed integer |
dods_int32 |
32-bit signed integer |
|
NC_UINT |
32-bit unsigned integer |
dods_uint32 |
32-bit unsigned integer |
|
NC_INT64 |
64-bit signed integer |
None |
Not supported |
|
NC_UINT64 |
64-bit unsigned integer |
None |
Not supported |
|
NC_FLOAT |
32-bit floating point |
dods_float32 |
32-bit floating point |
|
NC_DOUBLE |
64-bit floating point |
dods_float64 |
64-bit floating point |
|
NC_STRING |
variable length character string |
dods_str |
variable length character string |
In DAP2 it’s impossible to distinguish this from an array of NC_CHAR |
NC_COMPOUND |
A user defined type similar to C’s struct |
dods_structure |
A DAP Structure; similar to C’s struct |
|
NC_OPAQUE |
A BLOB data type |
dods_byte |
an array of bytes |
The handler adds two attributes (DAP2_OriginalNetCDFBaseType with
the value NC_OPAQUE and DAP2_OriginalNetCDFTypeName with the type’s name) that provide
info for savvy clients; |
NC_ENUM |
Similar to C’s enum |
dods_byte, …, dods_uint32 |
any integral type |
The handler chooses an integral type depending on the type used in the
NetCDF file. It adds the DAP2_OriginalNetCDFBaseType and
DAP2_OriginalNetCDFTypeName attributes |
NC_VLEN |
variable length arrays |
None |
Not supported |
10.B.6. The SQL Hander
Introduction
| This handler is not included with the source or binary versions od Hyrax we distribute as our official releases. You must download the software and build it yourself at this time. |
This handler will serve data stored in a relational database if that database is configured to be accessed using ODBC. The handler has been tested using both the unixODBC and iODBC driver managers on Linux and OS/X, respectively. While our testing has been limited to the MySQL and Postgres database servers, the handler is not specific to either of those severs; it should work with any database that can be accessed using an ODBC driver.
The handler can be configured to combine information from several tables and provide access to it as a single dataset, including performing the full range of SQL operations. At the same time, the SQL database server is never exposed to the web using this handler, so the database contents are safe.
Mappings Between the ODBC Data Types and DAP2 Data Types
The SQL Handler maps the datatypes defined by SQL into types defined by DAP. In most cases the mapping is obvious. Here we document each of the supported SQL types and their corresponding DAP type. Note that any types not listed here causes a runtime fatal error. That is, if you include in the [select] part of the dataset file the name of a column with an unsupported data type, the handler will return an error saying SQL Handler: The datatype read from the Data Source is not supported. The problem type code is: <type code>.
| ODBC Type | DAP Type |
|---|---|
SQL_C_CHAR |
Str |
SQL_C_SLONG, SQL_C_LONG |
Int32 |
SQL_C_SHORT |
Int16 |
SQL_C_FLOAT |
Float32 |
SQL_C_DOUBLE |
Float64 |
SQL_C_NUMERIC |
Int32 |
SQL_C_DEFAULT |
Str |
SQL_C_DATE, SQL_C_TIME, SQL_C_TIMESTAMP, |
Str |
SQL_C_BINARY, SQL_C_BIT |
Int16 |
SQL_C_SBIGINT, SQL_C_UBIGINT |
Int32 |
SQL_C_TINYINT, SQL_C_SSHORT, SQL_C_STINYINT |
Int16 |
SQL_C_ULONG, SQL_C_USHORT |
Int32 |
SQL_C_UTINYINT |
Int32 |
SQL_C_CHAR |
Str |
SQL_C_CHAR |
Str |
| SQL Type | ODBC Type |
|---|---|
SQL_CHAR, SQL_VARCHAR, SQL_LONGVARCHAR |
|
SQL_WCHAR, SQL_WVARCHAR, SQL_WCHAR |
|
SQL_DECIMAL, SQL_NUMERIC |
Known Problems
It’s not exactly a problem, but the configuration of this handler is dependent on correctly configuring the ODBC driver and these drivers vary by operating system and implementation. This does not simplify the configuration this component of the server!
Configuration Parameters
To configure the handler the handler itself must be told which tables, or parts of tables, should be accessed and the ODBC driver must be configured. In general, ODBC drivers are pretty easy to configure and, while each driver has its idiosyncrasies, most of the setup is the same for any driver/database combination. Both unixODBC and iODBC use two configuration fills: /etc/odbcinst.ini and /etc/odbc.ini. The driver should have documentation on these files and their setup. There is one parameter you will need to know to make use of the sql handler. In the odbc.ini file, the parameter database is used to reference the actual database that is matched to particular Data Source Name (DSN). You will need to know the DSN since programs that use ODBC to access a database use the DSN and not the name of the database. In addition, there is a user and password parameter set defined for a particular DSN; the sql handler will likely need that too (NB: This might not actually be needed 9/9/12).
What the configuration files look like on OSX:
[ODBC Drivers]
MySQL ODBC 5.1 Driver = Installed
psqlODBC = Installed
[ODBC Connection Pooling]
PerfMon = 0
Retry Wait =
[psqlODBC]
Description = PostgreSQL ODBC driver
Driver = /Library/PostgreSQL/psqlODBC/lib/psqlodbcw.so
[MySQL ODBC 5.1 Driver]
Driver = /usr/local/lib/libmyodbc5.soThis file holds information about the database name and the Data Source Name (DSN). Here it’s creatively named 'test'.
[ODBC Data Sources]
data_source_name = test
[ODBC]
Trace = 0
TraceAutoStop = 0
TraceFile =
TraceLibrary =
[test]
Description = MySQL test database
Trace = Yes
TraceFile = sql.log
Driver = MySQL ODBC 5.1 Driver
Server = localhost
User = jimg
Password =
Port = 3306
DATABASE = test
Socket = /tmp/mysql.sockConfiguring the Handler
Checkpoints in the SQL handler are phases of the database access process where error conditions can be tested for and reported. If these are activated using the SQL.CheckPoint parameter and an error is found, then a message will be printed in the bes.log and an exception will be thrown. There are five checkpoints supported by the handler:
- CONNECT
-
1 (Fatal error)
- CLOSE
-
2
- QUERY
-
3
- GET_NEXT
-
4 (Recoverable error)
- NEXT_ROW
-
5
The default for the handler is to test for and report all errors:
SQL.CheckPoint=1,2,3,4,5
One aspect of the SQL handler that sets it appart from other handlers is that the datasets it serves are not files or collections of files. Instead they are values read from one or more tables in a database. The handler uses one file for each dataset it serves; we call them dataset files. Within a dataset file there are several sections that define which Data Set Name (DSN) to use (recall that the DSN is set in the odbc.ini file which maps the DSN to a particular database, user and password), which tables, how to combine them and which columns to select and if any other constraints should be applied when retrieving the values from the database server. As a data provider, you should plan on having a dataset file for each dataset you want people to access, even if those all come from the same table.
A dataset file has five sections:
- section
-
This is where the DSN and other information are given
- select
-
Here the arguments to passed to select are given. This may be * or the names of columns, just as with an SQL SELECT statement
- from
-
The names of the tables. This is just like the FROM part of an SQL SELECT statement.
- where
-
You’re probably seeing a pattern by now: SELECT … FROM … WHERE
- other
-
Driver-specific parameters
Each of the sections is denoted by starting a line in the dataset file with its name in square brackets such as:
[section]or
[select]There are six parameters that may be set in the select part of the dataset file:
- api
-
Currently this must be odbc
- server
-
The DSN.
- user, pass, dbname, port
-
Unused. These are detected by the code, however, and can be used by a new submodule that connects to a database using a scheme other than ODBC. For example, if you were to specialize the connection mechanism so that it used a database’s native API, these keywords could be used to set the database name, user, etc., in place of the ODBC DSN. In that case the value of api would need to be the base name of the new connection specialization.
Note that a dataset file may have several [section] parts, each which lists a different DSN. This provides a failover capability so that if the same information (or similar enough to be accessible using the same SQL statement) exists both locally and remotely, both sources can be given. For example, suppose that your institution maintains a database with many thousands of observations and you want to serve a subset of those. You have a copy of those data on your own computer too, but you would rather have people access the data from the institution’s high performance hardware. You can list both DSNs, knowing that the first listed will get preference.
This part lists the columns to include as you would write them in an SQL SELECT statement. Each column name has to be unique. You can use aliases (defined in the preamble of the dataset file) to define different names for two columns from different database tables that are the same. For example, you could define aliases like these:
table1.theColumn as col1
table2.theColumn as col2and then use col1,col2 in the select part of the dataset file
Each of these parts are simply substituted and passed to the database just as you would expect. Note that you do not include the actual words FROM or WHERE, just the contents of those parts of the SQL statement.
Entries in this parts should be of the form key = value, one per line. They are taken as a group and passed to the ODBC driver. Use this section to provide any parameters that are specific to a particular driver.
The dataset files also support 'variables' that can be used to define a name once and then use it repeatedly by simply using the variable name instead. Then if you decide to read from a different table, only the variable definition needs to be changed. Variables are defined as the beginning o the dataset file, before the section part. The syntax for variable is simple: define $variable$ = value, one per line (the $ characters are literal, as is the word define). To reference a variable, use $variable$ wherever you would otherwise use a literal.
[section]
# Required.
api=odbc
# This is the name of the configured DSN
server=MySQL_DSN
[select]
# The attribute list to query
# NOTE: The order used here will be kept in the results
id, wind_chill, description
[from]
# The table to use can be a complex FROM clause
wind_08_2010
[where]
# this is optional constraint which will be applied to ALL
# the requests and can be used to limit the shared data.
id<100| The following two descriptions of the File Out NetCDF code need to be combined. |
10.B.7. NetCDF file responses
Introduction
The File Out NetCDF module provides the ability to return OPeNDAP
DataDDS objects as netcdf files. The module takes an OPeNDAP DataDDS and
translates the attributes, data structure, and data into a netcdf file
and streams the resulting file back to the caller. Currently, simple
types, arrays, structures and grids are supported. Sequences are not yet
supported.
Services Handled
This module does not handle any services but adds to an existing service.
Services Provided
The module provides an additional format to the dap service’s dods
command. The format is used to specify a "returnAs" format. Typically
you will see responses of the dap2 format. This module provides the
additional format of returning the OPenDAP data object as a netcdf file.
How to Use the Module
Once installed, the fonc.conf file is installed in the BES
etc/bes/modules directory and is automatically loaded by the BES at
startup. There is a configuration option that you can change for this
module. The FONc.Tempdir parameter in the fonc.conf configuration file
tells the module where to store the netcdf files generated by the module
until the file is streamed back to the caller. The default value for
this parameter is the /tmp directory. You should change this to a
location where there is plenty of disk space/quota that is owned by the
user set to run the BES.
FONc.Tempdir=/tmp
Other BES keys that can be used to control the handler’s behavior:
FONc.UseCompression=true
Use compression when making netCDF4 files; true by default
FONc.ChunkSize=4096
The default chunk size when making netCDF4 files, in KBytes (4k by default)
FONc.ClassicModel=true
When making a netCDF4 file, use only the 'classic' netCDF data model; true by default.
The next time the BES is started it will load this module. And, once installed, the OLFS will know that it can use this module to transform your data. Next to a dataset you will see the list of data products provided for that dataset. This will include a link for File Out Netcdf.
If not using the OLFS to serve your data, for example if using the bescmdln, you would run a command file that would look something like this:
<?xml version="1.0" encoding="UTF-8"?>
<request reqID="some_unique_value" >
<setContext name="dap_format">dap2</setContext>
<setContainer name="c" space="catalog">data/nc/fnoc1.nc</setContainer>
<define name="d">
<container name="c" />
</define>
<get type="dods" definition="d" returnAs="netcdf"/>
</request>10.B.8. Background on Returning NetCDF
General Questions and Assumptions
| This appendix holds general design information that we used when first implementing the Hyrax netCDF response. The fundemental problem that needs to be solved in the software is to map the full spectrum of OPeNDAP datasets to the netCDF 3 and 4 data models. |
-
What version of netCDF will this support? Hyrax supports returing both Version 3 and 4 netCDF files.
-
Should I traverse the data structure to see if there are any sequences? Yes. An initial version should note their presence and add an attribute noting that they have been elided.
How to Flatten Hierarchical Types
For a structure such as:
Structure {
Int x;
Int y;
} Point;
…represent that as:
Point.x Point.y
Explicitly including the dot seems ugly and like a kludge and so on, but it means that the new variable name can be feed back into the server to get the data. That is, a client can look at the name of the variable and figure out how to ask for it again without knowing anything about the translation process.
Because this is hardly a lossless scheme (a variable might have a dot in its name…), we should also add an attribute that contains the original real name of the variable - information that this is the result of a flattening operation, that the parent variable was a Structure, Sequence or Grid and its name was xyz. Given that, it should be easy to sort out how to make a future request for the data in the translated variable.
This in some way obviates the need for the dot, but it’s best to use it anyway.
If the structure Point has attributes, those should be copied to both the new variables (Point.x and Point.y). It’s redundant but this way the recipient of the file gets all of the information held in the original data source 96 January 2009 (PST) Added based on email from Patrick).
The name of the attributes should be Point.name for any attributes of the structure Point, and just the name of the attribute for the variables x and y. So, if x has attributes a1 and a2 and Point has attributes a1 and a3 then the new variable Point.x will have attributes a1, a2, Point,a1 and Point.a3.
Extra Data To Be Included
For a file format like netCDF it is possible to include data about the source data using it’s original data model as expressed using DAP. We could then describe where each variable in the file came from. This would be a good thing if we can do it in a light-weight way. It would also be a good thing to add an attribute to each variable that names where in the original data it came from so that client apps & users don’t have to work too hard to sort out what has been changed to make the file.
Information About Specific Types
-
Add dimension representing the max length of the string with name varname_len.
-
For scalar there will be a dimension for the length and the value written using nc_put_vara_text with type NC_CHAR
-
For arrays add an additional dimension for the max length and the value written using nc_put_vara_text with type NC_CHAR
Yes, that’s fine and follows a loose convention for names of string-length dimensions for netCDF-3 character arrays. For netCDF-4, of course, no string-length dimension is needed, as strings are supported as a netCDF data type.
-
Flatten
-
Prepend name of structure with a dot followed by the variable name. Keep track as there might be embedded structures, grids, et cetera.
I would use a dot even though I know that dots in variable names are, in general, a bad idea. If we use underscores then it maybe hard for clients to form a name that can be used to access values from a server based on the information in the file.
-
Flatten.
-
Use the name of the grid for the array of values
-
Prepend the name of the grid plus a dot to the names of each of the map vectors.
A more sophisticated version might look at the values of two or more grids that use the same names and have the same type (e.g., Float64 lon[360]) and if they are the same, make them shared dimensions.
- More information about Grid translation
-
-
DAP 2 spec on Grids and look for naming conventions
The idea here is that each of the map vectors will become an array with one dimension, the name of the dimension the same as the name of the variable (be careful about nested maps, see flatten). Then the grid array of values uses the same dimensions as those used in the map variables.
If there are multiple grids then they either use the same map variables and dimensions or they use different variables with different dimensions. In other words, if one grid has a map called x with dimension x, and another grid has a map called x then it better be the same variable with the same dimension and values. If not, it’s an error, it should be using a map called y that gets written out as variable y with dimension y.
-
Read the dap spec on grids and see if this is the convention.
-
Read the netcdf component guide (section 2.2.1 and 2.3.1)
Dataset {
Grid {
Array:
Float32 X[TIME = 12][COADSY = 90][COADSX = 180];
Maps:
Float64 TIME[TIME = 12];
Float64 COADSY[COADSY = 90];
Float64 COADSX[COADSX = 180];
} X;
Grid {
Array:
Float32 Y[TIME = 12][COADSY = 90][COADSX = 180];
Maps:
Float64 TIME[TIME = 12];
Float64 COADSY[COADSY = 90];
Float64 COADSX[COADSX = 180];
} Y;
Grid {
Array:
Float32 Z[TIME = 14][COADSY = 75][COADSX = 75];
Maps:
Float64 TIME[TIME = 14];
Float64 COADSY[COADSY = 75];
Float64 COADSX[COADSX = 75];
} Z;
Grid {
Array:
Float32 T[TIME = 14][COADSY = 75][COADSX = 90];
Maps:
Float64 TIME[TIME = 14];
Float64 COADSY[COADSY = 75];
Float64 COADSX[COADSX = 90];
} T;
} coads_climatology.nc;
-
write_array appears to be working just fine.
-
If array of complex types?
DAP allows for the array dimensions to not have names, but NetCDF does not allow this. If the dimension name is empty then create the dimension name using the name of the variable + "_dim" + dim_num. So, for example, if array a has three dimensions, and none have names, then the names will be a_dim1, a_dim2, a_dim3.
-
For now throw an exception
-
To translate a Sequence, there are several cases to consider:
-
A Sequence of simple types only (which means a one-level sequence): translate to a set of arrays using a name-prefix flattening scheme.
-
A nested sequence (otherwise with only simple types) should first be flattened to a one level sequence and then that should be flattened.
-
A Sequence with a Structure or Grid should be flattened by recursively applying the flattening logic to the components.
-
Initial version should elide [sequences] because there are important cases where they appear as part of a dataset but not the main part. We can represent these as arrays easily in the future.
-
Global Attributes?
-
For single container DDS (no embedded structure) just write out the global attributes to the netcdf file
-
For multi-container DDS (multiple files each in an embedded Structure), take the global attributes from each of the containers and add them as global attributes to the target netcdf file. If the value already exists for the attribute then discard the value. If not then add the value to the attribute as attributes can have multiple values.
-
-
Variable Attributes
-
This is the way attributes should be stored in the DAS. In the entry class/structure there is a vector of strings. Each of these strings should contain one value for the attribute. If the attribute is a list of 10 int values then there will be 10 strings in the vector, each string representing one of the int values for the attribute.
-
What about attributes for structures? Should these attributes be created for each of the variables in the structure? So, if there is a structure Point with variables x and y then the attributes for a will be attributes for Point.x and Point.y? Or are there attributes for each of the variables in the structure? 6 January 2009 (PST) James Gallagher See above under the information about hierarchical types.
-
For multi-dimensional datasets there will be a structure for each container, and each of these containers will have global attributes.
-
Attribute containers should be treated just as structures. The attributes will be flattened with dot separation of the names. For example, if there is an attribute a that is a container of attributes with attributes b and c then we will create an attribute a.b and a.c for that variable.
-
Attributes with multiple string values will be handled like so. The individual values will be put together with a newline character at the end of each, making one single value.
-
This feature will not be added as part of [Hyrax] 1.5, but a future release.
After doing some kind of translation, whether with constraints, aggregation, file out, whatever, we need to add information to the resulting data product telling how we came about this result. Version of the software, version of the translation (file out), version of the aggregation engine, whatever. How do we do that?
The ideas might be not to have all of this information in, say, the GLOBAL attributes section of the data product, or in the attributes of the opendap data product (DDX, DataDDX, whatever) but instead a URI pointing to this information. Perhaps this information is stored at OPeNDAP, provenance information for the different software components. Perhaps the provenance information for this data product is stored locally, referenced in the data product, and this provenance information references software component provenance.
might be something referenced in the local provenance. The local provenance would keep track of…
-
containers used to generate the data product
-
constraints (server side functions, projections, etc…)
-
aggregation handler and command
-
data product requested
-
software component versions
Peter Fox mentions that we need to be careful of this sort of thing (storing provenance information locally) as this was tried with log information. Referencing this kind of information is dangerous.
Support for CF
If we can recognize and support files that contain CF-compliant information, we should strive to make sure that the resulting netCDF files built by this module from those files are also CF compliant. This will have a number of benefits, most of which are likely unknown right now because acceptance of CF is not complete. But one example is that ArcGIS understands CF, so that means that returning a netCDF file that follows CF provides a way to get information from our servers directly into this application without any modification to the app itself.
Here’s a link to information about CF.
10.B.9. Returning GeoTiff and JPEG2000
Introduction
The File Out GDAL module provides the ability to return various kinds of GIS data files as responses from Hyrax. The handler currently supports returning GeoTIFF and JPEG2000 files. Not every dataset served by Hyrax can be returned as a GIS dataset, either because it lacks latitude/longitude information or because it is not organized so that the latitude and longitude values are recognized by this module.
Most GIS data include information about their coordinate reference systems, but how that information is encoded can vary widely. This handler looks for geographical information that follows the CF-1.4 standard for [grid mappings and projections http://cfconventions.org/Data/cf-conventions/cf-conventions-1.6/build/cf-conventions.html#grid-mappings-and-projections] (note that the link is actually to the CF-1.6 standard; it seems the CF-1.4 site from LLNL is no longer available). It will recognize either the EPSG:4047 or WGS84 Geographical Coordinate systems (GCS) and provides an option to set the default GCS using a parameter (described below).
Services Handled
This module does not handle any services but adds to an existing service
Services Provided
The module provides an additional format to the dap service’s dods
command. The format is used to specify a "returnAs" format. This module
provides the additional format of returning the OPenDAP data object as a
GeoTIFF or JPEG2000 file.
How to Use the Module
Once installed, the fong.conf file is installed in the BES etc/bes/modules directory and is automatically loaded by the BES at startup. There is a configuration option that you can change for this module. The FONg.Tempdir' parameter in the fong.conf configuration file tells the module where to store the files generated by the module until the file is streamed back to the caller. The default value for this parameter is the /tmp directory. You should change this to a location where there is plenty of disk space/quota that is owned by the user set to run the BES.
FONg.Tempdir=/tmp
The next time the BES is started it will load this module. And, once installed, the OLFS will know that it can use this module to transform your data. You can get GeoTIFF or JPEG2000 responses for applicable datasets by appending the extensions .tiff or .jp2 to the dataset’s OpenDAP URL.
If not using the OLFS to serve your data, for example if using the bescmdln, you would run a command file that would look something like this:
<?xml version="1.0" encoding="UTF-8"?>
<request reqID="some_unique_value" >
<setContext name="dap_format">dap2</setContext>
<setContainer name="c" space="catalog">data/nc/coads_climatology.nc</setContainer>
<define name="d">
<container name="c" />
</define>
<get type="dods" definition="d" returnAs="tiff"/>
</request>In addition to setting the directory where the response file is initially built, you can use the FONg.default_gcs configuration parameter to set the default Geographical Coordinate System (GCS) for the handler. This GCS will be used when the dataset’s metadata provides information GCS that the handler can not recognize.
10.B.10. JSON Responses
Overview
With funding from the Australian Bureau of Meteorology we have developed prototype JSON data and metadata DAP2 responses for Hyrax. After reviewing some the existing JSON encodings for DAP content we chose to implement two prototype encodings.
| JSON responses work only with DAP2. |
The first, and most likely the most useful, is based on the w10n specification as realized by the good folks at JPL. This encoding utilizes an abstract model to capture the structure of the dataset and it’s metadata. In this model the properties of the JSON object are made of a controlled vocabulary. This means that clients utilizing these responses can always "know" what to look for in each returned object. No matter what dataset is being accessed the client has a consistent mechanism for extracting variable names and values.
The second encoding utilizes an "instance" representation model wherein the datasets variable names are used to create the properties of the returned object. This means that each dataset potentially has a different set of properties and that client software must be written to navigate each dataset. For data providers with large sets of homogeneous holdings this representation allows the quick development of targeted clients that can work with these data. However since the variable names form the dataset become JSON properties there is no promise that the JSON objects will actually be valid as variable names in DAP datasets have few content restriction and the JSON property names must be valid Javascript variable names. Because of this this second representation probably doesn’t have the required flexibility to become an official JSON representation for the DAP.
The intention is to develop this work (in particular the w10n representation) into a DAP4 extension that defines the JSON representation for the DAP4 data and metadata responses.
Details
- w10n
-
The w10n data model views the world as a directed graph of nodes and leaves. This view starts at the catalog level and continues into the structure of the datasets. +
-
Only leaves are allowed to have data.
-
Both nodes and leaves have metadata (attributes).
-
Leaf data must be transmittable as either a single value, or an N-dimensional array of values, of a simple type. +
- Simple Types
-
f - Floating point value
-
This means that only DAP arrays of simple types and instances of simple types may be represented as leaves. Everything else must be a node.
Since the DAP data model also can be seen as a directed graph the mapping is nearly complete.
-
There may be incomplete matching with type space of the simple types supported in both models.
-
Simple Types Type Map
-
DAP Type |
w10n Type |
Byte |
|
Int16 |
|
UInt16 |
|
Int32 |
|
UInt32 |
|
Float32 |
f |
Float64 |
|
String |
|
Url |
(Needed: A complete type list from w10n - In section 5.2.2 of the w10n spec. the type property for the leaf response is identified but there is no listing of the allowed values presented. We are expecting to get this information from JPL by 08/18/2014 at which point I will complete this section and update the code to reflect the mapping as stated here.)
-
The DAP allows arrays of complex types like structures and grids. No w10n representation for this if offered.
W10n defines a navigation component that allows the user to traverse the directed graph of a collection of dataset holdings on the server. This work is focused not on implementing the collection navigation aspects of the w10n standard but rather on the JSON data and metadata representations. Thus, DAP request URLs (and alternately HTTP Accepts headers received from the requesting client) are used here to solicit JSON encoded responses from the server. The use of DAP constraint expressions (i.e. query strings) in the regular DAP manner in conjunction with the DAP URL will have the typical effects on the result. Subsetting by index, selection of variables, and subsetting by value (where supported) will control what variables and what parts of variables will be returned in the response.
Let datasetUrl=http://test.opendap.org/dap/data/nc/coads_climatology.nc
- DAP2 w10n JSON Data request
-
- Entire Dataset
-
datasetUrl.json
- Just the variable named "COADSX"
-
datasetUrl.json?COADSX
- DAP2 Instance Object JSON Data request
-
- Entire Dataset
-
datasetUrl.ijsn
- Just the variable named "COADSX"
-
datasetUrl.ijsn?COADSX
DAP2 Examples
Here is the DDS for the grid dataset, our friend coads_climatology.nc:
Dataset {
Float64 COADSX[COADSX = 180];
Float64 COADSY[COADSY = 90];
Float64 TIME[TIME = 12];
Grid {
Array:
Float32 SST[TIME = 12][COADSY = 90][COADSX = 180];
Maps:
Float64 TIME[TIME = 12];
Float64 COADSY[COADSY = 90];
Float64 COADSX[COADSX = 180];
} SST;
Grid {
Array:
Float32 AIRT[TIME = 12][COADSY = 90][COADSX = 180];
Maps:
Float64 TIME[TIME = 12];
Float64 COADSY[COADSY = 90];
Float64 COADSX[COADSX = 180];
} AIRT;
Grid {
Array:
Float32 UWND[TIME = 12][COADSY = 90][COADSX = 180];
Maps:
Float64 TIME[TIME = 12];
Float64 COADSY[COADSY = 90];
Float64 COADSX[COADSX = 180];
} UWND;
Grid {
Array:
Float32 VWND[TIME = 12][COADSY = 90][COADSX = 180];
Maps:
Float64 TIME[TIME = 12];
Float64 COADSY[COADSY = 90];
Float64 COADSX[COADSX = 180];
} VWND;
} coads_climatology.nc;
Attributes {
COADSX {
String units "degrees_east";
String modulo " ";
String point_spacing "even";
}
COADSY {
String units "degrees_north";
String point_spacing "even";
}
TIME {
String units "hour since 0000-01-01 00:00:00";
String time_origin "1-JAN-0000 00:00:00";
String modulo " ";
}
SST {
Float32 missing_value -9.99999979e+33;
Float32 _FillValue -9.99999979e+33;
String long_name "SEA SURFACE TEMPERATURE";
String history "From coads_climatology";
String units "Deg C";
}
AIRT {
Float32 missing_value -9.99999979e+33;
Float32 _FillValue -9.99999979e+33;
String long_name "AIR TEMPERATURE";
String history "From coads_climatology";
String units "DEG C";
}
UWND {
Float32 missing_value -9.99999979e+33;
Float32 _FillValue -9.99999979e+33;
String long_name "ZONAL WIND";
String history "From coads_climatology";
String units "M/S";
}
VWND {
Float32 missing_value -9.99999979e+33;
Float32 _FillValue -9.99999979e+33;
String long_name "MERIDIONAL WIND";
String history "From coads_climatology";
String units "M/S";
}
NC_GLOBAL {
String history "FERRET V4.30 (debug/no GUI) 15-Aug-96";
}
DODS_EXTRA {
String Unlimited_Dimension "TIME";
}
}
<?xml version="1.0" encoding="ISO-8859-1"?>
<Dataset name="coads_climatology.nc" xmlns:xsi="http://www.w3.org/2001/XMLSchema-instance" xsi:schemaLocation="http://xml.opendap.org/ns/DAP/3.2# http://xml.opendap.org/dap/dap3.2.xsd" xmlns:grddl="http://www.w3.org/2003/g/data-view#" grddl:transformation="http://xml.opendap.org/transforms/ddxToRdfTriples.xsl" xmlns="http://xml.opendap.org/ns/DAP/3.2#" xmlns:dap="http://xml.opendap.org/ns/DAP/3.2#" dapVersion="3.2" xmlns:xml="http://www.w3.org/XML/1998/namespace" xml:base="http://54.84.172.19:8080/opendap/data/nc/coads_climatology.nc">
<Attribute name="NC_GLOBAL" type="Container">
<Attribute name="history" type="String">
<value>FERRET V4.30 (debug/no GUI) 15-Aug-96</value>
</Attribute>
</Attribute>
<Attribute name="DODS_EXTRA" type="Container">
<Attribute name="Unlimited_Dimension" type="String">
<value>TIME</value>
</Attribute>
</Attribute>
<Array name="COADSX">
<Attribute name="units" type="String">
<value>degrees_east</value>
</Attribute>
<Attribute name="modulo" type="String">
<value> </value>
</Attribute>
<Attribute name="point_spacing" type="String">
<value>even</value>
</Attribute>
<Float64/>
<dimension name="COADSX" size="180"/>
</Array>
<Array name="COADSY">
<Attribute name="units" type="String">
<value>degrees_north</value>
</Attribute>
<Attribute name="point_spacing" type="String">
<value>even</value>
</Attribute>
<Float64/>
<dimension name="COADSY" size="90"/>
</Array>
<Array name="TIME">
<Attribute name="units" type="String">
<value>hour since 0000-01-01 00:00:00</value>
</Attribute>
<Attribute name="time_origin" type="String">
<value>1-JAN-0000 00:00:00</value>
</Attribute>
<Attribute name="modulo" type="String">
<value> </value>
</Attribute>
<Float64/>
<dimension name="TIME" size="12"/>
</Array>
<Grid name="SST">
<Array name="SST">
<Attribute name="missing_value" type="Float32">
<value>-9.99999979e+33</value>
</Attribute>
<Attribute name="_FillValue" type="Float32">
<value>-9.99999979e+33</value>
</Attribute>
<Attribute name="long_name" type="String">
<value>SEA SURFACE TEMPERATURE</value>
</Attribute>
<Attribute name="history" type="String">
<value>From coads_climatology</value>
</Attribute>
<Attribute name="units" type="String">
<value>Deg C</value>
</Attribute>
<Float32/>
<dimension name="TIME" size="12"/>
<dimension name="COADSY" size="90"/>
<dimension name="COADSX" size="180"/>
</Array>
<Map name="TIME">
<Attribute name="units" type="String">
<value>hour since 0000-01-01 00:00:00</value>
</Attribute>
<Attribute name="time_origin" type="String">
<value>1-JAN-0000 00:00:00</value>
</Attribute>
<Attribute name="modulo" type="String">
<value> </value>
</Attribute>
<Float64/>
<dimension name="TIME" size="12"/>
</Map>
<Map name="COADSY">
<Attribute name="units" type="String">
<value>degrees_north</value>
</Attribute>
<Attribute name="point_spacing" type="String">
<value>even</value>
</Attribute>
<Float64/>
<dimension name="COADSY" size="90"/>
</Map>
<Map name="COADSX">
<Attribute name="units" type="String">
<value>degrees_east</value>
</Attribute>
<Attribute name="modulo" type="String">
<value> </value>
</Attribute>
<Attribute name="point_spacing" type="String">
<value>even</value>
</Attribute>
<Float64/>
<dimension name="COADSX" size="180"/>
</Map>
</Grid>
<Grid name="AIRT">
<Array name="AIRT">
<Attribute name="missing_value" type="Float32">
<value>-9.99999979e+33</value>
</Attribute>
<Attribute name="_FillValue" type="Float32">
<value>-9.99999979e+33</value>
</Attribute>
<Attribute name="long_name" type="String">
<value>AIR TEMPERATURE</value>
</Attribute>
<Attribute name="history" type="String">
<value>From coads_climatology</value>
</Attribute>
<Attribute name="units" type="String">
<value>DEG C</value>
</Attribute>
<Float32/>
<dimension name="TIME" size="12"/>
<dimension name="COADSY" size="90"/>
<dimension name="COADSX" size="180"/>
</Array>
<Map name="TIME">
<Attribute name="units" type="String">
<value>hour since 0000-01-01 00:00:00</value>
</Attribute>
<Attribute name="time_origin" type="String">
<value>1-JAN-0000 00:00:00</value>
</Attribute>
<Attribute name="modulo" type="String">
<value> </value>
</Attribute>
<Float64/>
<dimension name="TIME" size="12"/>
</Map>
<Map name="COADSY">
<Attribute name="units" type="String">
<value>degrees_north</value>
</Attribute>
<Attribute name="point_spacing" type="String">
<value>even</value>
</Attribute>
<Float64/>
<dimension name="COADSY" size="90"/>
</Map>
<Map name="COADSX">
<Attribute name="units" type="String">
<value>degrees_east</value>
</Attribute>
<Attribute name="modulo" type="String">
<value> </value>
</Attribute>
<Attribute name="point_spacing" type="String">
<value>even</value>
</Attribute>
<Float64/>
<dimension name="COADSX" size="180"/>
</Map>
</Grid>
<Grid name="UWND">
<Array name="UWND">
<Attribute name="missing_value" type="Float32">
<value>-9.99999979e+33</value>
</Attribute>
<Attribute name="_FillValue" type="Float32">
<value>-9.99999979e+33</value>
</Attribute>
<Attribute name="long_name" type="String">
<value>ZONAL WIND</value>
</Attribute>
<Attribute name="history" type="String">
<value>From coads_climatology</value>
</Attribute>
<Attribute name="units" type="String">
<value>M/S</value>
</Attribute>
<Float32/>
<dimension name="TIME" size="12"/>
<dimension name="COADSY" size="90"/>
<dimension name="COADSX" size="180"/>
</Array>
<Map name="TIME">
<Attribute name="units" type="String">
<value>hour since 0000-01-01 00:00:00</value>
</Attribute>
<Attribute name="time_origin" type="String">
<value>1-JAN-0000 00:00:00</value>
</Attribute>
<Attribute name="modulo" type="String">
<value> </value>
</Attribute>
<Float64/>
<dimension name="TIME" size="12"/>
</Map>
<Map name="COADSY">
<Attribute name="units" type="String">
<value>degrees_north</value>
</Attribute>
<Attribute name="point_spacing" type="String">
<value>even</value>
</Attribute>
<Float64/>
<dimension name="COADSY" size="90"/>
</Map>
<Map name="COADSX">
<Attribute name="units" type="String">
<value>degrees_east</value>
</Attribute>
<Attribute name="modulo" type="String">
<value> </value>
</Attribute>
<Attribute name="point_spacing" type="String">
<value>even</value>
</Attribute>
<Float64/>
<dimension name="COADSX" size="180"/>
</Map>
</Grid>
<Grid name="VWND">
<Array name="VWND">
<Attribute name="missing_value" type="Float32">
<value>-9.99999979e+33</value>
</Attribute>
<Attribute name="_FillValue" type="Float32">
<value>-9.99999979e+33</value>
</Attribute>
<Attribute name="long_name" type="String">
<value>MERIDIONAL WIND</value>
</Attribute>
<Attribute name="history" type="String">
<value>From coads_climatology</value>
</Attribute>
<Attribute name="units" type="String">
<value>M/S</value>
</Attribute>
<Float32/>
<dimension name="TIME" size="12"/>
<dimension name="COADSY" size="90"/>
<dimension name="COADSX" size="180"/>
</Array>
<Map name="TIME">
<Attribute name="units" type="String">
<value>hour since 0000-01-01 00:00:00</value>
</Attribute>
<Attribute name="time_origin" type="String">
<value>1-JAN-0000 00:00:00</value>
</Attribute>
<Attribute name="modulo" type="String">
<value> </value>
</Attribute>
<Float64/>
<dimension name="TIME" size="12"/>
</Map>
<Map name="COADSY">
<Attribute name="units" type="String">
<value>degrees_north</value>
</Attribute>
<Attribute name="point_spacing" type="String">
<value>even</value>
</Attribute>
<Float64/>
<dimension name="COADSY" size="90"/>
</Map>
<Map name="COADSX">
<Attribute name="units" type="String">
<value>degrees_east</value>
</Attribute>
<Attribute name="modulo" type="String">
<value> </value>
</Attribute>
<Attribute name="point_spacing" type="String">
<value>even</value>
</Attribute>
<Float64/>
<dimension name="COADSX" size="180"/>
</Map>
</Grid>
<blob href="cid:"/>
</Dataset>- DAP2 Request URL
-
datasetURL.json?COADSX
- Response
{
"name": "coads_climatology.nc",
"attributes": [
{
"name": "NC_GLOBAL",
"attributes": [
{"name": "history", "value": ["FERRET V4.30 (debug/no GUI) 15-Aug-96"]}
]
},
{
"name": "DODS_EXTRA",
"attributes": [
{"name": "Unlimited_Dimension", "value": ["TIME"]}
]
}
],
"leaves": [
{
"name": "COADSX",
"type": "f",
"attributes": [
{"name": "units", "value": ["degrees_east"]},
{"name": "modulo", "value": [" "]},
{"name": "point_spacing", "value": ["even"]}
],
"shape": [180],
"data": [21, 23, 25, 27, 29, 31, 33, 35, 37, 39, 41, 43, 45, 47, 49, 51, 53, 55, 57, 59, 61, 63, 65, 67, 69, 71, 73, 75, 77, 79, 81, 83, 85, 87, 89, 91, 93, 95, 97, 99, 101, 103, 105, 107, 109, 111, 113, 115, 117, 119, 121, 123, 125, 127, 129, 131, 133, 135, 137, 139, 141, 143, 145, 147, 149, 151, 153, 155, 157, 159, 161, 163, 165, 167, 169, 171, 173, 175, 177, 179, 181, 183, 185, 187, 189, 191, 193, 195, 197, 199, 201, 203, 205, 207, 209, 211, 213, 215, 217, 219, 221, 223, 225, 227, 229, 231, 233, 235, 237, 239, 241, 243, 245, 247, 249, 251, 253, 255, 257, 259, 261, 263, 265, 267, 269, 271, 273, 275, 277, 279, 281, 283, 285, 287, 289, 291, 293, 295, 297, 299, 301, 303, 305, 307, 309, 311, 313, 315, 317, 319, 321, 323, 325, 327, 329, 331, 333, 335, 337, 339, 341, 343, 345, 347, 349, 351, 353, 355, 357, 359, 361, 363, 365, 367, 369, 371, 373, 375, 377, 379]
}
],
"nodes": []
}- DAP2 Request URL
-
datasetURL.json
- Response
{
"name": "coads_climatology.nc",
"attributes": [
{
"name": "NC_GLOBAL",
"attributes": [
{"name": "history", "value": ["FERRET V4.30 (debug/no GUI) 15-Aug-96"]}
]
},
{
"name": "DODS_EXTRA",
"attributes": [
{"name": "Unlimited_Dimension", "value": ["TIME"]}
]
}
],
"leaves": [
{
"name": "COADSX",
"type": "f",
"attributes": [
{"name": "units", "value": ["degrees_east"]},
{"name": "modulo", "value": [" "]},
{"name": "point_spacing", "value": ["even"]}
],
"shape": [180],
"data": [21, 23, 25, 27, 29, 31, 33, 35, 37, 39, 41, 43, 45, 47, 49, 51, 53, 55, 57, 59, 61, 63, 65, 67, 69, 71, 73, 75, 77, 79, 81, 83, 85, 87, 89, 91, 93, 95, 97, 99, 101, 103, 105, 107, 109, 111, 113, 115, 117, 119, 121, 123, 125, 127, 129, 131, 133, 135, 137, 139, 141, 143, 145, 147, 149, 151, 153, 155, 157, 159, 161, 163, 165, 167, 169, 171, 173, 175, 177, 179, 181, 183, 185, 187, 189, 191, 193, 195, 197, 199, 201, 203, 205, 207, 209, 211, 213, 215, 217, 219, 221, 223, 225, 227, 229, 231, 233, 235, 237, 239, 241, 243, 245, 247, 249, 251, 253, 255, 257, 259, 261, 263, 265, 267, 269, 271, 273, 275, 277, 279, 281, 283, 285, 287, 289, 291, 293, 295, 297, 299, 301, 303, 305, 307, 309, 311, 313, 315, 317, 319, 321, 323, 325, 327, 329, 331, 333, 335, 337, 339, 341, 343, 345, 347, 349, 351, 353, 355, 357, 359, 361, 363, 365, 367, 369, 371, 373, 375, 377, 379]
},
{
"name": "COADSY",
"type": "f",
"attributes": [
{"name": "units", "value": ["degrees_north"]},
{"name": "point_spacing", "value": ["even"]}
],
"shape": [90],
"data": [-89, -87, -85, -83, -81, -79, -77, -75, -73, -71, -69, -67, -65, -63, -61, -59, -57, -55, -53, -51, -49, -47, -45, -43, -41, -39, -37, -35, -33, -31, -29, -27, -25, -23, -21, -19, -17, -15, -13, -11, -9, -7, -5, -3, -1, 1, 3, 5, 7, 9, 11, 13, 15, 17, 19, 21, 23, 25, 27, 29, 31, 33, 35, 37, 39, 41, 43, 45, 47, 49, 51, 53, 55, 57, 59, 61, 63, 65, 67, 69, 71, 73, 75, 77, 79, 81, 83, 85, 87, 89]
},
{
"name": "TIME",
"type": "f",
"attributes": [
{"name": "units", "value": ["hour since 0000-01-01 00:00:00"]},
{"name": "time_origin", "value": ["1-JAN-0000 00:00:00"]},
{"name": "modulo", "value": [" "]}
],
"shape": [12],
"data": [366, 1096.49, 1826.97, 2557.45, 3287.94, 4018.43, 4748.91, 5479.4, 6209.88, 6940.36, 7670.85, 8401.33]
}
],
"nodes": [
{
"name": "SST",
"attributes": [],
"leaves": [
{
"name": "SST",
"type": "f",
"attributes": [
{"name": "missing_value", "value": [-9.99999979e+33]},
{"name": "_FillValue", "value": [-9.99999979e+33]},
{"name": "long_name", "value": ["SEA SURFACE TEMPERATURE"]},
{"name": "history", "value": ["From coads_climatology"]},
{"name": "units", "value": ["Deg C"]}
],
"shape": [12,90,180],
"data": [[[-1e+34, -1e+34, -1e+34, … (many values skipped for brevity), -1e+34, -1e+34, -1e+34]]]
},
{
"name": "TIME",
"type": "f",
"attributes": [
{"name": "units", "value": ["hour since 0000-01-01 00:00:00"]},
{"name": "time_origin", "value": ["1-JAN-0000 00:00:00"]},
{"name": "modulo", "value": [" "]}
],
"shape": [12],
"data": [366, 1096.49, 1826.97, 2557.45, 3287.94, 4018.43, 4748.91, 5479.4, 6209.88, 6940.36, 7670.85, 8401.33]
},
{
"name": "COADSY",
"type": "f",
"attributes": [
{"name": "units", "value": ["degrees_north"]},
{"name": "point_spacing", "value": ["even"]}
],
"shape": [90],
"data": [-89, -87, -85, -83, -81, -79, -77, -75, -73, -71, -69, -67, -65, -63, -61, -59, -57, -55, -53, -51, -49, -47, -45, -43, -41, -39, -37, -35, -33, -31, -29, -27, -25, -23, -21, -19, -17, -15, -13, -11, -9, -7, -5, -3, -1, 1, 3, 5, 7, 9, 11, 13, 15, 17, 19, 21, 23, 25, 27, 29, 31, 33, 35, 37, 39, 41, 43, 45, 47, 49, 51, 53, 55, 57, 59, 61, 63, 65, 67, 69, 71, 73, 75, 77, 79, 81, 83, 85, 87, 89]
},
{
"name": "COADSX",
"type": "f",
"attributes": [
{"name": "units", "value": ["degrees_east"]},
{"name": "modulo", "value": [" "]},
{"name": "point_spacing", "value": ["even"]}
],
"shape": [180],
"data": [21, 23, 25, 27, 29, 31, 33, 35, 37, 39, 41, 43, 45, 47, 49, 51, 53, 55, 57, 59, 61, 63, 65, 67, 69, 71, 73, 75, 77, 79, 81, 83, 85, 87, 89, 91, 93, 95, 97, 99, 101, 103, 105, 107, 109, 111, 113, 115, 117, 119, 121, 123, 125, 127, 129, 131, 133, 135, 137, 139, 141, 143, 145, 147, 149, 151, 153, 155, 157, 159, 161, 163, 165, 167, 169, 171, 173, 175, 177, 179, 181, 183, 185, 187, 189, 191, 193, 195, 197, 199, 201, 203, 205, 207, 209, 211, 213, 215, 217, 219, 221, 223, 225, 227, 229, 231, 233, 235, 237, 239, 241, 243, 245, 247, 249, 251, 253, 255, 257, 259, 261, 263, 265, 267, 269, 271, 273, 275, 277, 279, 281, 283, 285, 287, 289, 291, 293, 295, 297, 299, 301, 303, 305, 307, 309, 311, 313, 315, 317, 319, 321, 323, 325, 327, 329, 331, 333, 335, 337, 339, 341, 343, 345, 347, 349, 351, 353, 355, 357, 359, 361, 363, 365, 367, 369, 371, 373, 375, 377, 379]
}
],
"nodes": []
}
{
"name": "AIRT",
"attributes": [],
"leaves": [
{
"name": "AIRT",
"type": "f",
"attributes": [
{"name": "missing_value", "value": [-9.99999979e+33]},
{"name": "_FillValue", "value": [-9.99999979e+33]},
{"name": "long_name", "value": ["AIR TEMPERATURE"]},
{"name": "history", "value": ["From coads_climatology"]},
{"name": "units", "value": ["DEG C"]}
],
"shape": [12,90,180],
"data": [[[-1e+34, -1e+34, -1e+34, … (many values skipped for brevity), -1e+34, -1e+34, -1e+34]]]
},
{
"name": "TIME",
"type": "f",
"attributes": [
{"name": "units", "value": ["hour since 0000-01-01 00:00:00"]},
{"name": "time_origin", "value": ["1-JAN-0000 00:00:00"]},
{"name": "modulo", "value": [" "]}
],
"shape": [12],
"data": [366, 1096.49, 1826.97, 2557.45, 3287.94, 4018.43, 4748.91, 5479.4, 6209.88, 6940.36, 7670.85, 8401.33]
},
{
"name": "COADSY",
"type": "f",
"attributes": [
{"name": "units", "value": ["degrees_north"]},
{"name": "point_spacing", "value": ["even"]}
],
"shape": [90],
"data": [-89, -87, -85, -83, -81, -79, -77, -75, -73, -71, -69, -67, -65, -63, -61, -59, -57, -55, -53, -51, -49, -47, -45, -43, -41, -39, -37, -35, -33, -31, -29, -27, -25, -23, -21, -19, -17, -15, -13, -11, -9, -7, -5, -3, -1, 1, 3, 5, 7, 9, 11, 13, 15, 17, 19, 21, 23, 25, 27, 29, 31, 33, 35, 37, 39, 41, 43, 45, 47, 49, 51, 53, 55, 57, 59, 61, 63, 65, 67, 69, 71, 73, 75, 77, 79, 81, 83, 85, 87, 89]
},
{
"name": "COADSX",
"type": "f",
"attributes": [
{"name": "units", "value": ["degrees_east"]},
{"name": "modulo", "value": [" "]},
{"name": "point_spacing", "value": ["even"]}
],
"shape": [180],
"data": [21, 23, 25, 27, 29, 31, 33, 35, 37, 39, 41, 43, 45, 47, 49, 51, 53, 55, 57, 59, 61, 63, 65, 67, 69, 71, 73, 75, 77, 79, 81, 83, 85, 87, 89, 91, 93, 95, 97, 99, 101, 103, 105, 107, 109, 111, 113, 115, 117, 119, 121, 123, 125, 127, 129, 131, 133, 135, 137, 139, 141, 143, 145, 147, 149, 151, 153, 155, 157, 159, 161, 163, 165, 167, 169, 171, 173, 175, 177, 179, 181, 183, 185, 187, 189, 191, 193, 195, 197, 199, 201, 203, 205, 207, 209, 211, 213, 215, 217, 219, 221, 223, 225, 227, 229, 231, 233, 235, 237, 239, 241, 243, 245, 247, 249, 251, 253, 255, 257, 259, 261, 263, 265, 267, 269, 271, 273, 275, 277, 279, 281, 283, 285, 287, 289, 291, 293, 295, 297, 299, 301, 303, 305, 307, 309, 311, 313, 315, 317, 319, 321, 323, 325, 327, 329, 331, 333, 335, 337, 339, 341, 343, 345, 347, 349, 351, 353, 355, 357, 359, 361, 363, 365, 367, 369, 371, 373, 375, 377, 379]
}
],
"nodes": []
}
{
"name": "UWND",
"attributes": [],
"leaves": [
{
"name": "UWND",
"type": "f",
"attributes": [
{"name": "missing_value", "value": [-9.99999979e+33]},
{"name": "_FillValue", "value": [-9.99999979e+33]},
{"name": "long_name", "value": ["ZONAL WIND"]},
{"name": "history", "value": ["From coads_climatology"]},
{"name": "units", "value": ["M/S"]}
],
"shape": [12,90,180],
"data": [[[-1e+34, -1e+34, -1e+34, … (many values skipped for brevity), -1e+34, -1e+34, -1e+34]]]
},
{
"name": "TIME",
"type": "f",
"attributes": [
{"name": "units", "value": ["hour since 0000-01-01 00:00:00"]},
{"name": "time_origin", "value": ["1-JAN-0000 00:00:00"]},
{"name": "modulo", "value": [" "]}
],
"shape": [12],
"data": [366, 1096.49, 1826.97, 2557.45, 3287.94, 4018.43, 4748.91, 5479.4, 6209.88, 6940.36, 7670.85, 8401.33]
},
{
"name": "COADSY",
"type": "f",
"attributes": [
{"name": "units", "value": ["degrees_north"]},
{"name": "point_spacing", "value": ["even"]}
],
"shape": [90],
"data": [-89, -87, -85, -83, -81, -79, -77, -75, -73, -71, -69, -67, -65, -63, -61, -59, -57, -55, -53, -51, -49, -47, -45, -43, -41, -39, -37, -35, -33, -31, -29, -27, -25, -23, -21, -19, -17, -15, -13, -11, -9, -7, -5, -3, -1, 1, 3, 5, 7, 9, 11, 13, 15, 17, 19, 21, 23, 25, 27, 29, 31, 33, 35, 37, 39, 41, 43, 45, 47, 49, 51, 53, 55, 57, 59, 61, 63, 65, 67, 69, 71, 73, 75, 77, 79, 81, 83, 85, 87, 89]
},
{
"name": "COADSX",
"type": "f",
"attributes": [
{"name": "units", "value": ["degrees_east"]},
{"name": "modulo", "value": [" "]},
{"name": "point_spacing", "value": ["even"]}
],
"shape": [180],
"data": [21, 23, 25, 27, 29, 31, 33, 35, 37, 39, 41, 43, 45, 47, 49, 51, 53, 55, 57, 59, 61, 63, 65, 67, 69, 71, 73, 75, 77, 79, 81, 83, 85, 87, 89, 91, 93, 95, 97, 99, 101, 103, 105, 107, 109, 111, 113, 115, 117, 119, 121, 123, 125, 127, 129, 131, 133, 135, 137, 139, 141, 143, 145, 147, 149, 151, 153, 155, 157, 159, 161, 163, 165, 167, 169, 171, 173, 175, 177, 179, 181, 183, 185, 187, 189, 191, 193, 195, 197, 199, 201, 203, 205, 207, 209, 211, 213, 215, 217, 219, 221, 223, 225, 227, 229, 231, 233, 235, 237, 239, 241, 243, 245, 247, 249, 251, 253, 255, 257, 259, 261, 263, 265, 267, 269, 271, 273, 275, 277, 279, 281, 283, 285, 287, 289, 291, 293, 295, 297, 299, 301, 303, 305, 307, 309, 311, 313, 315, 317, 319, 321, 323, 325, 327, 329, 331, 333, 335, 337, 339, 341, 343, 345, 347, 349, 351, 353, 355, 357, 359, 361, 363, 365, 367, 369, 371, 373, 375, 377, 379]
}
],
"nodes": []
}
{
"name": "VWND",
"attributes": [],
"leaves": [
{
"name": "VWND",
"type": "f",
"attributes": [
{"name": "missing_value", "value": [-9.99999979e+33]},
{"name": "_FillValue", "value": [-9.99999979e+33]},
{"name": "long_name", "value": ["MERIDIONAL WIND"]},
{"name": "history", "value": ["From coads_climatology"]},
{"name": "units", "value": ["M/S"]}
],
"shape": [12,90,180],
"data": [[[-1e+34, -1e+34, -1e+34, … (many values skipped for brevity), -1e+34, -1e+34, -1e+34]]]
},
{
"name": "TIME",
"type": "f",
"attributes": [
{"name": "units", "value": ["hour since 0000-01-01 00:00:00"]},
{"name": "time_origin", "value": ["1-JAN-0000 00:00:00"]},
{"name": "modulo", "value": [" "]}
],
"shape": [12],
"data": [366, 1096.49, 1826.97, 2557.45, 3287.94, 4018.43, 4748.91, 5479.4, 6209.88, 6940.36, 7670.85, 8401.33]
},
{
"name": "COADSY",
"type": "f",
"attributes": [
{"name": "units", "value": ["degrees_north"]},
{"name": "point_spacing", "value": ["even"]}
],
"shape": [90],
"data": [-89, -87, -85, -83, -81, -79, -77, -75, -73, -71, -69, -67, -65, -63, -61, -59, -57, -55, -53, -51, -49, -47, -45, -43, -41, -39, -37, -35, -33, -31, -29, -27, -25, -23, -21, -19, -17, -15, -13, -11, -9, -7, -5, -3, -1, 1, 3, 5, 7, 9, 11, 13, 15, 17, 19, 21, 23, 25, 27, 29, 31, 33, 35, 37, 39, 41, 43, 45, 47, 49, 51, 53, 55, 57, 59, 61, 63, 65, 67, 69, 71, 73, 75, 77, 79, 81, 83, 85, 87, 89]
},
{
"name": "COADSX",
"type": "f",
"attributes": [
{"name": "units", "value": ["degrees_east"]},
{"name": "modulo", "value": [" "]},
{"name": "point_spacing", "value": ["even"]}
],
"shape": [180],
"data": [21, 23, 25, 27, 29, 31, 33, 35, 37, 39, 41, 43, 45, 47, 49, 51, 53, 55, 57, 59, 61, 63, 65, 67, 69, 71, 73, 75, 77, 79, 81, 83, 85, 87, 89, 91, 93, 95, 97, 99, 101, 103, 105, 107, 109, 111, 113, 115, 117, 119, 121, 123, 125, 127, 129, 131, 133, 135, 137, 139, 141, 143, 145, 147, 149, 151, 153, 155, 157, 159, 161, 163, 165, 167, 169, 171, 173, 175, 177, 179, 181, 183, 185, 187, 189, 191, 193, 195, 197, 199, 201, 203, 205, 207, 209, 211, 213, 215, 217, 219, 221, 223, 225, 227, 229, 231, 233, 235, 237, 239, 241, 243, 245, 247, 249, 251, 253, 255, 257, 259, 261, 263, 265, 267, 269, 271, 273, 275, 277, 279, 281, 283, 285, 287, 289, 291, 293, 295, 297, 299, 301, 303, 305, 307, 309, 311, 313, 315, 317, 319, 321, 323, 325, 327, 329, 331, 333, 335, 337, 339, 341, 343, 345, 347, 349, 351, 353, 355, 357, 359, 361, 363, 365, 367, 369, 371, 373, 375, 377, 379]
}
],
"nodes": []
}
]
}Instance Model JSON
- DAP2 Request URL
-
datasetURL.ijsn?COADSX
- Response
{
"name": "coads_climatology.nc",
"COADSX": [21, 23, 25, 27, 29, 31, 33, 35, 37, 39, 41, 43, 45, 47, 49, 51, 53, 55, 57, 59, 61, 63, 65, 67, 69, 71, 73, 75, 77, 79, 81, 83, 85, 87, 89, 91, 93, 95, 97, 99, 101, 103, 105, 107, 109, 111, 113, 115, 117, 119, 121, 123, 125, 127, 129, 131, 133, 135, 137, 139, 141, 143, 145, 147, 149, 151, 153, 155, 157, 159, 161, 163, 165, 167, 169, 171, 173, 175, 177, 179, 181, 183, 185, 187, 189, 191, 193, 195, 197, 199, 201, 203, 205, 207, 209, 211, 213, 215, 217, 219, 221, 223, 225, 227, 229, 231, 233, 235, 237, 239, 241, 243, 245, 247, 249, 251, 253, 255, 257, 259, 261, 263, 265, 267, 269, 271, 273, 275, 277, 279, 281, 283, 285, 287, 289, 291, 293, 295, 297, 299, 301, 303, 305, 307, 309, 311, 313, 315, 317, 319, 321, 323, 325, 327, 329, 331, 333, 335, 337, 339, 341, 343, 345, 347, 349, 351, 353, 355, 357, 359, 361, 363, 365, 367, 369, 371, 373, 375, 377, 379]
}- DAP2 Request URL
-
datasetURL.ijsn
- Response
{
"name": "coads_climatology.nc",
"COADSX": [21, 23, 25, 27, 29, 31, 33, 35, 37, 39, 41, 43, 45, 47, 49, 51, 53, 55, 57, 59, 61, 63, 65, 67, 69, 71, 73, 75, 77, 79, 81, 83, 85, 87, 89, 91, 93, 95, 97, 99, 101, 103, 105, 107, 109, 111, 113, 115, 117, 119, 121, 123, 125, 127, 129, 131, 133, 135, 137, 139, 141, 143, 145, 147, 149, 151, 153, 155, 157, 159, 161, 163, 165, 167, 169, 171, 173, 175, 177, 179, 181, 183, 185, 187, 189, 191, 193, 195, 197, 199, 201, 203, 205, 207, 209, 211, 213, 215, 217, 219, 221, 223, 225, 227, 229, 231, 233, 235, 237, 239, 241, 243, 245, 247, 249, 251, 253, 255, 257, 259, 261, 263, 265, 267, 269, 271, 273, 275, 277, 279, 281, 283, 285, 287, 289, 291, 293, 295, 297, 299, 301, 303, 305, 307, 309, 311, 313, 315, 317, 319, 321, 323, 325, 327, 329, 331, 333, 335, 337, 339, 341, 343, 345, 347, 349, 351, 353, 355, 357, 359, 361, 363, 365, 367, 369, 371, 373, 375, 377, 379],
"COADSY": [-89, -87, -85, -83, -81, -79, -77, -75, -73, -71, -69, -67, -65, -63, -61, -59, -57, -55, -53, -51, -49, -47, -45, -43, -41, -39, -37, -35, -33, -31, -29, -27, -25, -23, -21, -19, -17, -15, -13, -11, -9, -7, -5, -3, -1, 1, 3, 5, 7, 9, 11, 13, 15, 17, 19, 21, 23, 25, 27, 29, 31, 33, 35, 37, 39, 41, 43, 45, 47, 49, 51, 53, 55, 57, 59, 61, 63, 65, 67, 69, 71, 73, 75, 77, 79, 81, 83, 85, 87, 89],
"TIME": [366, 1096.49, 1826.97, 2557.45, 3287.94, 4018.43, 4748.91, 5479.4, 6209.88, 6940.36, 7670.85, 8401.33],
"SST": {
"SST": [[[-1e+34, -1e+34, -1e+34, … (Many values omitted for brevity), -1e+34, -1e+34, -1e+34]]],
"TIME": [366, 1096.49, 1826.97, 2557.45, 3287.94, 4018.43, 4748.91, 5479.4, 6209.88, 6940.36, 7670.85, 8401.33],
"COADSY": [-89, -87, -85, -83, -81, -79, -77, -75, -73, -71, -69, -67, -65, -63, -61, -59, -57, -55, -53, -51, -49, -47, -45, -43, -41, -39, -37, -35, -33, -31, -29, -27, -25, -23, -21, -19, -17, -15, -13, -11, -9, -7, -5, -3, -1, 1, 3, 5, 7, 9, 11, 13, 15, 17, 19, 21, 23, 25, 27, 29, 31, 33, 35, 37, 39, 41, 43, 45, 47, 49, 51, 53, 55, 57, 59, 61, 63, 65, 67, 69, 71, 73, 75, 77, 79, 81, 83, 85, 87, 89],
"COADSX": [21, 23, 25, 27, 29, 31, 33, 35, 37, 39, 41, 43, 45, 47, 49, 51, 53, 55, 57, 59, 61, 63, 65, 67, 69, 71, 73, 75, 77, 79, 81, 83, 85, 87, 89, 91, 93, 95, 97, 99, 101, 103, 105, 107, 109, 111, 113, 115, 117, 119, 121, 123, 125, 127, 129, 131, 133, 135, 137, 139, 141, 143, 145, 147, 149, 151, 153, 155, 157, 159, 161, 163, 165, 167, 169, 171, 173, 175, 177, 179, 181, 183, 185, 187, 189, 191, 193, 195, 197, 199, 201, 203, 205, 207, 209, 211, 213, 215, 217, 219, 221, 223, 225, 227, 229, 231, 233, 235, 237, 239, 241, 243, 245, 247, 249, 251, 253, 255, 257, 259, 261, 263, 265, 267, 269, 271, 273, 275, 277, 279, 281, 283, 285, 287, 289, 291, 293, 295, 297, 299, 301, 303, 305, 307, 309, 311, 313, 315, 317, 319, 321, 323, 325, 327, 329, 331, 333, 335, 337, 339, 341, 343, 345, 347, 349, 351, 353, 355, 357, 359, 361, 363, 365, 367, 369, 371, 373, 375, 377, 379]
},
"AIRT": {
"AIRT": [[[-1e+34, -1e+34, -1e+34, … (Many values omitted for brevity), -1e+34, -1e+34, -1e+34]]],
"TIME": [366, 1096.49, 1826.97, 2557.45, 3287.94, 4018.43, 4748.91, 5479.4, 6209.88, 6940.36, 7670.85, 8401.33],
"COADSY": [-89, -87, -85, -83, -81, -79, -77, -75, -73, -71, -69, -67, -65, -63, -61, -59, -57, -55, -53, -51, -49, -47, -45, -43, -41, -39, -37, -35, -33, -31, -29, -27, -25, -23, -21, -19, -17, -15, -13, -11, -9, -7, -5, -3, -1, 1, 3, 5, 7, 9, 11, 13, 15, 17, 19, 21, 23, 25, 27, 29, 31, 33, 35, 37, 39, 41, 43, 45, 47, 49, 51, 53, 55, 57, 59, 61, 63, 65, 67, 69, 71, 73, 75, 77, 79, 81, 83, 85, 87, 89],
"COADSX": [21, 23, 25, 27, 29, 31, 33, 35, 37, 39, 41, 43, 45, 47, 49, 51, 53, 55, 57, 59, 61, 63, 65, 67, 69, 71, 73, 75, 77, 79, 81, 83, 85, 87, 89, 91, 93, 95, 97, 99, 101, 103, 105, 107, 109, 111, 113, 115, 117, 119, 121, 123, 125, 127, 129, 131, 133, 135, 137, 139, 141, 143, 145, 147, 149, 151, 153, 155, 157, 159, 161, 163, 165, 167, 169, 171, 173, 175, 177, 179, 181, 183, 185, 187, 189, 191, 193, 195, 197, 199, 201, 203, 205, 207, 209, 211, 213, 215, 217, 219, 221, 223, 225, 227, 229, 231, 233, 235, 237, 239, 241, 243, 245, 247, 249, 251, 253, 255, 257, 259, 261, 263, 265, 267, 269, 271, 273, 275, 277, 279, 281, 283, 285, 287, 289, 291, 293, 295, 297, 299, 301, 303, 305, 307, 309, 311, 313, 315, 317, 319, 321, 323, 325, 327, 329, 331, 333, 335, 337, 339, 341, 343, 345, 347, 349, 351, 353, 355, 357, 359, 361, 363, 365, 367, 369, 371, 373, 375, 377, 379]
},
"UWND": {
"UWND": [[[-1e+34, -1e+34, -1e+34, … (Many values omitted for brevity), -1e+34, -1e+34, -1e+34]]],
"TIME": [366, 1096.49, 1826.97, 2557.45, 3287.94, 4018.43, 4748.91, 5479.4, 6209.88, 6940.36, 7670.85, 8401.33],
"COADSY": [-89, -87, -85, -83, -81, -79, -77, -75, -73, -71, -69, -67, -65, -63, -61, -59, -57, -55, -53, -51, -49, -47, -45, -43, -41, -39, -37, -35, -33, -31, -29, -27, -25, -23, -21, -19, -17, -15, -13, -11, -9, -7, -5, -3, -1, 1, 3, 5, 7, 9, 11, 13, 15, 17, 19, 21, 23, 25, 27, 29, 31, 33, 35, 37, 39, 41, 43, 45, 47, 49, 51, 53, 55, 57, 59, 61, 63, 65, 67, 69, 71, 73, 75, 77, 79, 81, 83, 85, 87, 89],
"COADSX": [21, 23, 25, 27, 29, 31, 33, 35, 37, 39, 41, 43, 45, 47, 49, 51, 53, 55, 57, 59, 61, 63, 65, 67, 69, 71, 73, 75, 77, 79, 81, 83, 85, 87, 89, 91, 93, 95, 97, 99, 101, 103, 105, 107, 109, 111, 113, 115, 117, 119, 121, 123, 125, 127, 129, 131, 133, 135, 137, 139, 141, 143, 145, 147, 149, 151, 153, 155, 157, 159, 161, 163, 165, 167, 169, 171, 173, 175, 177, 179, 181, 183, 185, 187, 189, 191, 193, 195, 197, 199, 201, 203, 205, 207, 209, 211, 213, 215, 217, 219, 221, 223, 225, 227, 229, 231, 233, 235, 237, 239, 241, 243, 245, 247, 249, 251, 253, 255, 257, 259, 261, 263, 265, 267, 269, 271, 273, 275, 277, 279, 281, 283, 285, 287, 289, 291, 293, 295, 297, 299, 301, 303, 305, 307, 309, 311, 313, 315, 317, 319, 321, 323, 325, 327, 329, 331, 333, 335, 337, 339, 341, 343, 345, 347, 349, 351, 353, 355, 357, 359, 361, 363, 365, 367, 369, 371, 373, 375, 377, 379]
},
"VWND": {
"VWND": [[[-1e+34, -1e+34, -1e+34, … (Many values omitted for brevity), -1e+34, -1e+34, -1e+34]]],
"TIME": [366, 1096.49, 1826.97, 2557.45, 3287.94, 4018.43, 4748.91, 5479.4, 6209.88, 6940.36, 7670.85, 8401.33],
"COADSY": [-89, -87, -85, -83, -81, -79, -77, -75, -73, -71, -69, -67, -65, -63, -61, -59, -57, -55, -53, -51, -49, -47, -45, -43, -41, -39, -37, -35, -33, -31, -29, -27, -25, -23, -21, -19, -17, -15, -13, -11, -9, -7, -5, -3, -1, 1, 3, 5, 7, 9, 11, 13, 15, 17, 19, 21, 23, 25, 27, 29, 31, 33, 35, 37, 39, 41, 43, 45, 47, 49, 51, 53, 55, 57, 59, 61, 63, 65, 67, 69, 71, 73, 75, 77, 79, 81, 83, 85, 87, 89],
"COADSX": [21, 23, 25, 27, 29, 31, 33, 35, 37, 39, 41, 43, 45, 47, 49, 51, 53, 55, 57, 59, 61, 63, 65, 67, 69, 71, 73, 75, 77, 79, 81, 83, 85, 87, 89, 91, 93, 95, 97, 99, 101, 103, 105, 107, 109, 111, 113, 115, 117, 119, 121, 123, 125, 127, 129, 131, 133, 135, 137, 139, 141, 143, 145, 147, 149, 151, 153, 155, 157, 159, 161, 163, 165, 167, 169, 171, 173, 175, 177, 179, 181, 183, 185, 187, 189, 191, 193, 195, 197, 199, 201, 203, 205, 207, 209, 211, 213, 215, 217, 219, 221, 223, 225, 227, 229, 231, 233, 235, 237, 239, 241, 243, 245, 247, 249, 251, 253, 255, 257, 259, 261, 263, 265, 267, 269, 271, 273, 275, 277, 279, 281, 283, 285, 287, 289, 291, 293, 295, 297, 299, 301, 303, 305, 307, 309, 311, 313, 315, 317, 319, 321, 323, 325, 327, 329, 331, 333, 335, 337, 339, 341, 343, 345, 347, 349, 351, 353, 355, 357, 359, 361, 363, 365, 367, 369, 371, 373, 375, 377, 379]
}
}CoverageJSON
CoverageJSON uses heuristics to determine if a data set is suitable for CoverageJSON expression. You can take advantage of the CoverageJSON feature in the following ways:
Using the DAP2 Data Request Form
On the DAP2 form, this option shows as a button.
-
Click the Get as CoverageJSON button in the Data Request Form:

To get the covjson response you
-
Append
.covjsonto the URL:
DAP4
In DAP4, there is no such button, but adding the .covjson to the URL, it downloads
the data response in json form (full dataset). It is a secondary encoding of the primary
DAP4 response.
JSON-LD
This release Hyrax adds JSON-LD content to every browser-navigable catalog page (i.e. */contents.html") and to every dataset/granule OPeNDAP Data Access Form. Along with the site map generation, this feature can be used to assist search engines to catalog, index, and find the data that you want the world to access.
Theory of Operation
The JSON-LD is dynamically built from the metadata. It uses the MDS metadata if it is there; otherwise, it loads it from the file.
Configuration Instructions
The server ships with this feature enabled. By default the publisher information is set to OPeNDAP:
BES.ServerAdministrator=email:support@opendap.org
BES.ServerAdministrator+=organization:OPeNDAP Inc.
BES.ServerAdministrator+=street:165 NW Dean Knauss Dr.
BES.ServerAdministrator+=city:Narragansett
BES.ServerAdministrator+=region:RI
BES.ServerAdministrator+=postalCode:02882
BES.ServerAdministrator+=country:US
BES.ServerAdministrator+=telephone:+1.401.575.4835
BES.ServerAdministrator+=website:http://www.opendap.org
This information can and should be updated to your organization’s information.
You can update the information in /etc/bes/bes.conf;
however, you should configure the parameters in site.conf.
For more information, see the site.conf section.
| Maybe this should its own own Appendix - just like Server functions and aggregations which are really loaded in via the module system, get their own appendix |
10.B.11. The Gateway Module
Introduction
The Gateway Service provides interoperability between Hyrax and other web services. Using the Gateway module, Hyrax can be used to access and subset data served by other web services so long as those services return the data in a form Hyrax has been configured to serve. For example, if a web service returns data using HDF4 files, then Hyrax, using the gateway module, can subset and return DAP responses for those data.
Special Options Supported by the Handler
Limiting Access to Specific Hosts
Because this handler behaves like a web client there are some special options that need to be configured to make it work. When we distribute the client, it is limited to accessing only the local host. This prevents misuse (where your copy of Hyrax might be used to access all kinds of other sites). This gateway’s configuration file contains a 'whitelist' of allowed hosts. Only hosts listed on the whitelist will be accessed by the gateway.
- Gateway.Whitelist
-
provides a list of URL of the form protocol://host.domain:port that will be passed through the gateway module. If a request is made to access a web service not listed on the Whitelist, Hyrax returns an error. Note that the whitelist can be more specific than just a hostname - it could in principal limit access to a specific set of requests to a particular web service.
Example:
Gateway.Whitelist=http://test.opendap.org/opendap
Gateway.Whitelist+=http://opendap.rpi.edu/opendap
Recognizing Responses
- Gateway.MimeTypes
-
provides a list of mappings from data handler module to returned mime types. When the remote service returns a response, if that response contains one of the listed MIME types (e.g., application/x-hdf5) then the gateway will process it using the named handler (e.g., h5). Note that if the service does not include this information the gateway will try other ways to figure out how to work with the response.
These are the default types:
Gateway.MimeTypes=nc:application/x-netcdf
Gateway.MimeTypes+=h4:application/x-hdf
Gateway.MimeTypes+=h5:application/x-hdf5
Network Proxies and Performance Optimizations
There are four parameters that are used to configure a proxy server that the gateway will use. Nominally this is used as a cache, so that files do not have to be repeatedly fetched from the remote service and that’s why we consider this a 'performance' feature. We have tested the hander with Squid because it is widely used on both linux and OS/X and because in addition to it’s proxy capabilities, it is often used as a cache. This can also be used to navigate firewalls.
- Gateway.ProxyProtocol
-
Which protocol(s) does this proxy support. Nominally this should be http.
- Gateway.ProxyHost
-
On what host does the proxy server operate? Often you want to use localgost for this.
- Gateway.ProxyPort
-
What port does the proxy listen on? Squid defaults to 3218; some documentation for web accelerators
- Gateway.NoProxy
-
Provide a regular expression that describes URLs that should not be sent to the proxy. This is particularly useful for running the gateway on the hosts that stage the service accessed via the gateway. In this cases, a proxy/cache like squid may not process 'localhost' URLs unless its configuration is tweaked quite a bit (and there may be no performance advantage to having the proxy/cache store extra copies of the files given that they are on the host already). This parameter was added in version 1.1.0.
Gateway.ProxyProtocol=
Gateway.ProxyHost=
Gateway.ProxyPort=
Gateway.NoProxy=
Using Squid
Squid makes a great cache for the gateway. In our testing we have used Squid only for services running on port 80.
Squid is a powerful tool and it is worth looking at its web page.
Squid and Dynamic Content
Squid follows the HTTP/1.1 specification to determine what and how long to cache items. However, you may want to force Squid to ignore some of the information supplied by certain web services (or to different default values when the standard information is not present). If you are working with a web server that does not include caching control headers in its responses but does have 'cgi-bin' or '?' in the URL, here’s how override Squid’s default behavior (which is to never cache items returned from a 'dynamic' source (i.e., one with 'cgi-bin' or '?' in the URL). The value below will cause Squid to cache response from a dynamic source for 1440 minutes unless that response includes an Expires: header telling to cache to behave differently
In the squid configuration file, find the lines:
# refresh patterns (squid-recommended)
refresh_pattern ^ftp:       1440    20% 10080
refresh_pattern ^gopher:    1440    0%  1440
refresh_pattern -i (/cgi-bin/|\?) 0 0%  0
refresh_pattern .       0   20% 4320
And change the third refresh_pattern to read:
refresh_pattern -i (/cgi-bin/|\?) 1440 20% 10080
How can I tell if a service sends Cache Control headers?
Here are two ways to check:
-
curl -i <URL> | more and look at the headers at the top of the message.
Using Squid on OS/X
If you’re using OS/X to run Hyrax, the easiest Squid port is SquidMan. We tested version SquidMan 3.0 (Squid 3.1.1). Run the SquidMan application and under Preferences… General set the port to something like 3218, the cache size to something big (16GB) and Maximum object size to 256M. Click 'Save' and you’re almost done.
Now in the gateway.conf file, set the proxy parameters like so:
Gateway.ProxyProtocol=http
Gateway.ProxyHost=localhost
Gateway.ProxyPort=3218
Gateway.NoProxy=http://localhost.*
…assuming you’re running both Squid and Hyrax on the same host.
Restart the BES and you’re all set.
To test, make some requests using the gateway (http://localhost/opendap/gateway) and click on SquidMan’s 'Access Log' button to see the caching at work. The first access, which fetches the data, will say DIRECT/<ip number> while cache hits will be labeled NONE/-.
By default SquidMan does not cache dynamic content that lacks cache control headers in the response. To hack the squid.conf file and make the change in the refresh_pattern described above do the following:
-
Under Preferences… choose the 'Template' tab and scroll to the bottom of the text;
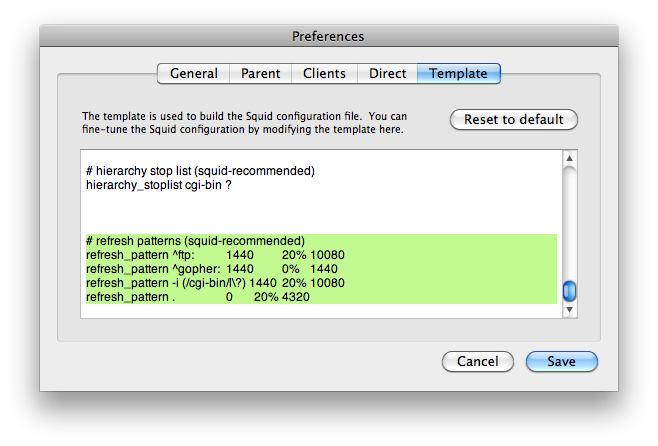
-
Edit the line, replacing "0 0% 0" with "1440 20% 10080"; and
-
'Save' and then 'Stop Squid' and 'Start Squid' (note the helpful status messages in the 'Start/Stop' window)
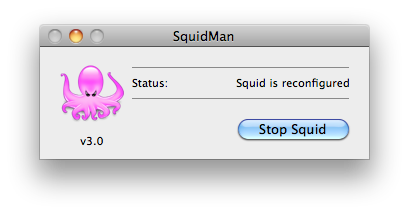
Known Problems
For version 1.0.1 of the gateway, we know about the following problems:
-
Squid does not cache requests to localhost, but our use of the proxy server does not by-pass requests to localhost. Thus, using the gateway to access data from a service running on localhost will fail when using squid since the gateway will route the request to the proxy (i.e., squid) where it will generate an error.
-
Not using a caching proxy server will result in poor performance.
| I think we should group all the 'other services' that Hyrax provides so that it’s obvious that’s what’s going on. The server provides the DAP API, but it also provides the Gateway service, Aggregation service, and WMS. All these services have their own web API. |
10.B.12. Gateway Service
Gateway Service Overview
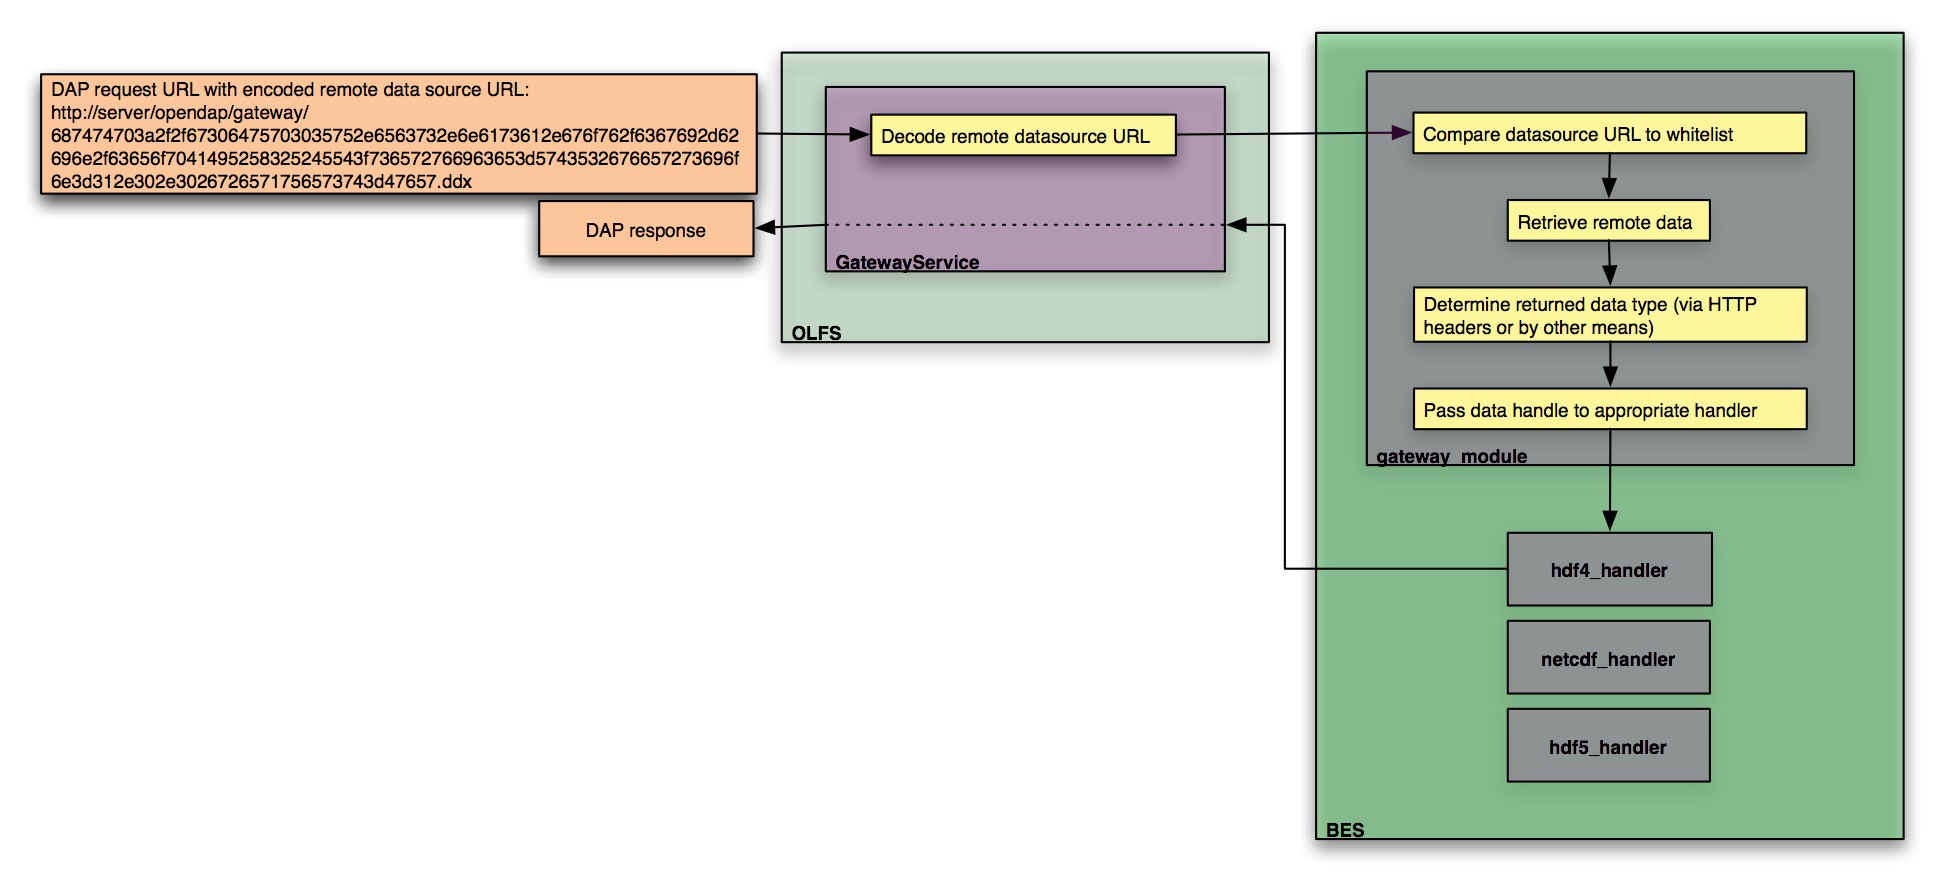
The Gateway Service provides Hyrax with the ability to apply DAP constraint expressions and server side functions to data available through any network URL. This is accomplished by encoding the data source URL into the DAP request URL supplied to the gateway_service. The Gateway Service decodes the URL and uses the BES to to retrieve the remote data resource and transmit the appropriate DAP response back to the client. The system employs a white list to control what data systems the BES will access.
| Rewrite this to explain that we are providing a kind of 'URL enveloping' scheme. If we are still actually using this. jhrg 9/19/17 |
A Data Service Portal (DSP), such as Mirador will:
-
Provide the navigation/search/discovery interface to the data source.
-
Generate the data source URLs.
-
Encode the data source URLs.
-
Build a regular DAP query as the DAP dataset ID.
-
Hand this to the client (via a link or what have you in the DSP interface)
BES Gateway Module
The Gateway Module handles the gathering of the remote data resource and the construction of the DAP response.
The Gateway Module:
-
Evaluates the data source URL against a white list to access permission
-
Retrieves remote data source
-
Determines data type by:
-
Data type information supplied by the other parts of the server
-
HTTP Content-Disposition header
-
Applying the BES.TypeMatch string to the last term in the path section of the data source URL.
-
The BES will not persist the data resources beyond the scope of each request.
OLFS Gateway Service
The Gateway Service is responsible for:
-
Decoding the incoming dataset URLs.
-
Building the request for the BES.
-
Returning the response from the BES to the client.
Encoding Data Source URLs
The data source URLs need to be encoded in the DAP data request URL that is used to access the Gateway Service.
There are many ways to encode something in this context.
As a prototype encoding we’ll use an hex ascii encoding. In this encoding each character in the data source URL is expressed as is hexadecimal value using ascii characters.
Here is hexEncoder.tgz (sig), a gzipped tar file containing a java application can perform the encoding and decoding duties from the command line. Give it a whirl - it’s a java application in a jar file. There is a bash script (hexEncode) that should launch it.
The source code for the EncodeDecode java class used by hexEncode is available here: http://scm.opendap.org/svn/trunk/olfs/src/opendap/gateway/EncodeDecode.java
stringToHex(http://www.google.com) → 687474703a2f2f7777772e676f6f676c652e636f6d
hexToString(687474703a2f2f7777772e676f6f676c652e636f6d) → http://www.google.com
10.B.13. The FreeForm Data Handler
This section of the documentation describes the OPeNDAP FreeForm ND Data Handler, which can be used with the OPeNDAP data server. It is not a complete description of the FreeForm ND software. For that, please refer to the ND manual.
This section contains much material originally written at the National Oceanic and Atmospheric Administration’s National Environmental Satellite, Data, and Information Service, which is part of the National Geophysical Data Center in Boulder, Colorado.
Using FreeForm ND with OPeNDAP, a researcher can easily make his or her data available to the wider community of OPeNDAP users without having to convert that data into another data file format. This document presents the FreeForm ND software, and shows how to use it with the OPeNDAP server.
Introduction
The OPeNDAP FreeForm ND Data Handler is an OPeNDAP data handler. OPeNDAP FreeForm ND software can serve data from files in almost any format. The FreeForm ND Data Access System is a flexible system for specifying data formats to facilitate data access, management, and use. Since DAP2 allows data to be translated over the internet and read by a client regardless of the storage format of the data, the combination can overcome several format restrictions.
The large variety of data formats is a primary obstacle in creation of flexible data management and analysis software. FreeForm ND was conceived, developed, and implemented at the National Geophysical Data Center (NGDC) to alleviate the problems that occur when one needs to use data sets with varying native formats or to write format-independent applications.
DAP2 was originally conceived as a way to move large amounts of scientific data over the internet. As a consequence of establishing a flexible data transmission format, DAP2 also allows substantial independence from the storage format of the original data. Up to now, however, DAP2 servers have been limited to data in a few widely used formats. Using the OPeNDAP FreeForm ND Data Handler, many more datasets can be made available through DAP2.
The FreeForm ND Solution
OPeNDAP FreeForm ND uses a format descriptor file to describe the format of one or more data files. This descriptor file is a simple text file that can be created with a text editor, and it describes the structure of your data files.
A traditional DAP2 server, illustrated below, receives a request for data from a DAP2 client who may be at some remote computer [2]. The data served by this server must be stored in one of the data formats supported by the OPeNDAP server (such as netCDF, HDF, or JGOFS), and the server uses specialized software to read this data from disk.
When it receives a request, the server reads the requested data from its archive, reformats the data into the DAP2 transmission format and sends the data back to the client.
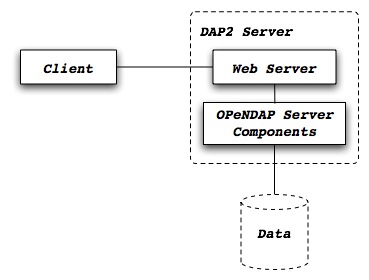
The OPeNDAP FreeForm ND Data Handler works in a similar fashion to a traditional DAP2 server, but before the server reads the data from the archive, it first reads the data format descriptor to determine how it should read the data. Only after it has absorbed the details of the data storage format does it attempt to read the data, pack it into the transmission format and send it on its way back to the client.
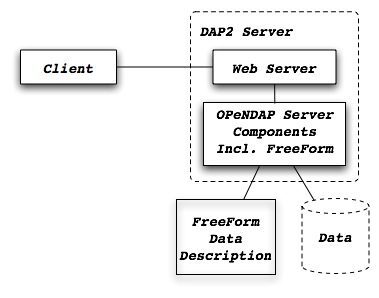
The FreeForm ND System
The OPeNDAP FreeForm ND Data Handler comprises a format description mechanism, a set of programs for manipulating data, and the server itself. The software was built using the FreeForm ND library and data objects. These are documented in The FreeForm ND User’s Guide.
The OPeNDAP FreeForm ND Data Handler includes the following programs:
The OPeNDAP FreeForm ND Data Handler distribution also includes the following OPeNDAP FreeForm ND utilities. These are quite useful to write and debug format description files.
newform: This program reformats data according to the input and output specifications in a format description file.
chkform: After writing a format description file, you can use this program to cross-check the description against a data file.
readfile: This program is useful to decode the format used by a binary file. It allows you to try different formats on pieces of a binary file, and see what works.
If the computer and operating system combination you use is not one of the ones we own, you will have to compile the OPeNDAP FreeForm ND Data Handler from its source. Go to the OPeNDAP home page (www.opendap.org) and follow the menu item to the downloads page. From there you will need the libdap, dap-server and FreeForm handler software source distributions. Get each of these and perform the following steps:
-
Expand the distribution (e.g.,
tar -xzf libdap-3.5.3.tar.gz) -
Change to the newly created directory (
cd libdap-3.5.3) -
Run the configure script (
./configure) -
Run make (
make) -
Install the software (
make installorsudo make install)
Each source distribution contains more detailed build instructions; see the README, INSTALL and NEWS files for the most up-to-date information.
Quick Tour of the OPeNDAP FreeForm ND Data Handler
This section provides you a quick introduction to the OPeNDAP FreeForm ND Data Handler, including writing format descriptions and serving test datasets.
Getting Started Serving Data
To get going with the OPeNDAP FreeForm ND Data Handler, follow these steps:
-
See Hyrax for instructions about installing the OPeNDAP data server.
-
Install the OPeNDAP FreeForm ND Data Handler.
-
Examine the structure of the data file(s) you intend to serve, and construct a OPeNDAP FreeForm ND format definition file that describes the layout of data in the files. (Refer to the Table Format for instructions about sequence data and Array Format for array data. Consult The OPeNDAP User Guide if you do not know the difference between the two data types.)
-
If you wish, you may include an output definition format within this file, to allow you to test that your input description is accurate. You can use the OPeNDAP FreeForm ND utilities, such as newform, to validate the conversion. The Format Conversion contains a detailed description of newform. This step is optional, since the OPeNDAP FreeForm ND Data Handler ignores the output definition section of the format definition file.
-
Although the OPeNDAP FreeForm ND Data Handler can generate default DDS and DAS files, you may want to write these files yourself, to override the default data descriptions, or to add attribute data. The default descriptions are based on the format of the data the the OPeNDAP FreeForm ND Data Handler receives from the OPeNDAP FreeForm ND engine.
-
Place the data files, and a corresponding format file for each data file, in a place where Hyrax can find them. See the Hyrax Configuration Instructions for information about where Hyrax looks for its files.
Your data is now available to anyone who knows about your server.
Examples
You can easily create FreeForm ND format description files that describe the formats of input and output data and headers. The OPeNDAP reeForm ND Data Handler and other OPeNDAP FreeForm ND-based programs then use these files to correctly access and manipulate data in various formats. An example format description file is shown and described below.
For complete information about writing format descriptions, see the Table Format and Array Format docs.
Here is a data file, containing a sequence of four data types. (This data file and several of the other examples in this chapter are available.)
Here is the data file, called ffsimple.dat:
Latitude and Longitude: -63.223548 54.118314  -176.161101 149.408117
-47.303545 -176.161101 11.7125 34.4634
-25.928001   -0.777265 20.7288 35.8953
-28.286662   35.591879 23.6377 35.3314
12.588231  149.408117 28.6583 34.5260
-63.223548   55.319598  0.4503 33.8830
54.118314 -136.940570 10.4085 32.0661
-38.818812   91.411330 13.9978 35.0173
-34.577065   30.172129 20.9096 35.4705
27.331551 -155.233735 23.0917 35.2694
11.624981 -113.660611 27.5036 33.7004
The file consists of a single header line, followed by a sequence of records, each of which contains a latitude, longitude, temperature, and salinity.
Here is a format file you can use to read ffsimple.dat. It is called ffsimple.fmt:
ASCII_file_header "Latitude/Longitude Limits"
minmax_title 1 24 char 0
latitude_min 25 36 double 6
latitude_max 37 46 double 6
longitude_min 47 59 double 6
longitude_max 60 70 double 6

ASCII_data "lat/lon"
latitude 1 10 double 6
longitude 12 22 double 6
temp 24 30 double 4
salt 32 38 double 4

ASCII_output_data "output"
latitude 1 10 double 3
longitude_deg 11 15 short 0
longitude_min 16 19 short 0
longitude_sec 20 23 short 0
salt 31 40 double 2
temp 41 50 double 2
The format file consists of three sections. The first shows OPeNDAP FreeForm ND how to parse the file header. The second section describes the contents of the data file. The third part describes how to write the data to another file. This part is not important for the OPeNDAP FreeForm ND Data Handler but is useful for debugging the input descriptions.
Download the ffsimple files described above and type:
> newform ffsimple.dat
You should see results like this:
Welcome to Newform release 4.2.3 -- an NGDC FreeForm ND application

(ffsimple.fmt) ASCII_input_file_header  "Latitude/Longitude Limits"
File ffsimple.dat contains 1 header record (71 bytes)
Each record contains 6 fields and is 71 characters long.

(ffsimple.fmt) ASCII_input_data "lat/lon"
File ffsimple.dat contains 10 data records (390 bytes)
Each record contains 5 fields and is 39 characters long.

(ffsimple.fmt) ASCII_output_data        "output"
Program memory contains 10 data records (510 bytes)
Each record contains 7 fields and is 51 characters long.


-47.304 -176   9  40            34.46     11.71
-25.928    0 -46  38            35.90     20.73
-28.287   35  35  31            35.33     23.64
12.588  149  24  29            34.53     28.66
-63.224   55  19  11            33.88      0.45
54.118 -136  56  26            32.07     10.41
-38.819   91  24  41            35.02     14.00
-34.577   30  10  20            35.47     20.91
27.332 -155  14   1            35.27     23.09
11.625 -113  39  38            33.70     27.50
100\
Now take both the ffsimple files and put them into a directory in your web server’s document root directory. (Refer to the The OPeNDAP User Guide for some tips on figuring out where that is.)
Here’s an example on a computer on which the web server document root is /export/home/http/htdocs:
> mkdir /export/home/http/htdocs/data
> cp ffsimple.* /export/home/http/htdocs/data
Now, using a common web browser, enter the following URL (substitute your machine name and CGI directory for the ones in the example):
http://test.opendap.org/opendap/nph-dods/data/ff/ffsimple.dat.asc
You should get something like the following in your web browser’s window:
latitude, longitude, temp, salt
-47.3035, -176.161, 11.7125, 34.4634
-25.928, -0.777265, 20.7288, 35.8953
-28.2867, 35.5919, 23.6377, 35.3314
12.5882, 149.408, 28.6583, 34.526
-63.2235, 55.3196, 0.4503, 33.883
54.1183, -136.941, 10.4085, 32.0661
-38.8188, 91.4113, 13.9978, 35.0173
-34.5771, 30.1721, 20.9096, 35.4705
27.3316, -155.234, 23.0917, 35.2694
11.625, -113.661, 27.5036, 33.7004
Try this URL:
http://test.opendap.org/opendap/nph-dods/data/ffsimple.dat.dds
This will show a description of the dataset structure (See OPeNDAP User Guide for a detailed description of the DAP2 "Dataset Description Structure," or DDS.):
 Dataset {
    Sequence {
        Float64 latitude;
        Float64 longitude;
        Float64 temp;
        Float64 salt;
    } lat/lon;
} ffsimple;
If your data more naturally comes in arrays, you can still use the OPeNDAP FreeForm ND Data Handler to serve your data. The OPeNDAP FreeForm ND format for sequence data is somewhat simpler than the format for array data, so you may find it easier to begin with the example in the previous section.
Here is a data file, called ffarr1.dat, containing four ten-element vectors:
 123456789012345678901234567
 1.00  50.00 0.1000  1.1000
 2.00  61.00 0.3162  0.0953
 3.00  72.00 0.5623 -2.3506
 4.00  83.00 0.7499  0.8547
 5.00  94.00 0.8660 -0.1570
 6.00 105.00 0.9306 -1.8513
 7.00 116.00 0.9647  0.6159
 8.00 127.00 0.9822 -0.4847
 9.00 138.00 0.9910 -0.7243
10.00 149.00 0.9955 -0.3226
Here is a format file to read this data (ffarr1.fmt):
ASCII_input_data "simple array format"
index 1 5 ARRAY["line" 1 to 10 sb 23] OF float 1
data1 6 12 ARRAY["line" 1 to 10 sb 21] OF float 1
data2 13 19 ARRAY["line" 1 to 10 sb 21] OF float 1
data3 20 27 ARRAY["line" 1 to 10 sb 20] OF float 1

ASCII_output_data "simple array output"
index 1 7 ARRAY["line" 1 to 10] OF float 0
/data1 6 12 ARRAY["line" 1 to 10 sb 21] OF float 1
/data2 13 19 ARRAY["line" 1 to 10 sb 21] OF float 4
/data3 20 27 ARRAY["line" 1 to 10 sb 20] OF float 4
The output section is not essential for the OPeNDAP FreeForm ND Data Handler but is included so you can check out the data with the newform command.
Download the files from the OPeNDAP web site, and try typing:
> newform ffarr1.dat
You should see the index array printed out. Uncomment different lines in the output section of the example file to see different data vectors.
Now look a little closer at the input section of the file:
index 1 5 ARRAY["line" 1 to 10 sb 23] OF float 1
This line says that the array in question — called "index" — starts in column one of the first line, and each element takes up five bytes. The first element starts in column one and goes into column five. The array has one dimension, "line," and is composed of floating point data. The remaining elements of this array are found by skipping the next 23 bytes (the newline counts as a character), reading the following five bytes, skipping the next 23 bytes, and so on.
Of course, the 23 bytes skipped in between the index array elements also contain data from other arrays. The second array, data1, starts in column 6 of line one, and has 21 bytes between values. The third array starts in column 13 of the first line, and the fourth starts in column 20.
Move the ffarr1.* files into your data directory:
> cp ffarr1.* /export/home/http/htdocs/data
Now you can look at this data the same way you looked at the sequence data. Request the DDS for the dataset with a URL like this one:
http://test.opendap.org/opendap/nph-dods/data/ffarr1.dat.dds
You can see that the dataset is a collection of one-dimensional vectors. You can see the individual vectors with a URL like this:
http://test.opendap.org/opendap/nph-dods/data/ffarr1.dat.asc?index
Here’s another example, with a two-dimensional array. (ffarr2.dat):
          1         2         3         4
1234567890123456789012345678901234567890
  1.00  2.00  3.00  4.00  5.00  6.00
  7.00  8.00  9.00 10.00 11.00 12.00
 13.00 14.00 15.00 16.00 17.00 18.00
 19.00 20.00 21.00 22.00 23.00 24.00
 25.00 26.00 27.00 28.00 29.00 30.00
There are no spaces between the data columns within an array row, but in order to skip reading the newline character, we have to skip one character at the end of each row. Here is a format file to read this data (ffarr2.fmt):
ASCII_input_data "one"
data 1 6 ARRAY["y" 1 to 5 sb 1]["x" 1 to 6] OF float 1

ASCII_output_data "two"
data 1 4 ARRAY["x" 1 to 6 sb 2]["y" 1 to 5] OF float 1
Again, the output section is only for using with the newform tool. Put these data files into your htdocs directory, and look at the DDS as you did with the previous example.
You can use the OPeNDAP FreeForm ND Data Handler to serve data with multi-dimensional arrays and one-dimensional vectors interspersed among one another. Here’s a file containing this kind of data (ffarr3.dat):
1         2         3         4
1234567890123456789012345678901234567890123
XXXX  1.00  2.00  3.00  4.00  5.00  6.00YY
XXXX  7.00  8.00  9.00 10.00 11.00 12.00YY
XXXX 13.00 14.00 15.00 16.00 17.00 18.00YY
XXXX 19.00 20.00 21.00 22.00 23.00 24.00YY
XXXX 25.00 26.00 27.00 28.00 29.00 30.00YY
In order to read this file successfully, we define three vectors to read the "XXXX", the "YY", and the newline. Here is a format file that does this (ffarr3.fmt):
dBASE_input_data "one"
headers 1 4 ARRAY["line" 1 to 5 sb 39] OF text 0
data 5 10 ARRAY["y" 1 to 5 sb 7]["x" 1 to 6] OF float 1
trailers 41 42 ARRAY["line" 1 to 5 sb 41] OF text 0
newline 43 43 ARRAY["line" 1 to 5 sb 42] OF text 0

ASCII_output_data "two"
data 1 4 ARRAY["x" 1 to 6 sb 2]["y" 1 to 5] OF float 0
/headers 1 6 ARRAY["line" 1 to 5] OF text 0
/trailers 1 4 ARRAY["line" 1 to 5] OF text 0
/newline 1 4 ARRAY["line" 1 to 5] OF text 0
The following chapters offer more detailed information about how exactly to create a format description file.
So far the array examples have shown how to read interleaved arrays (either vectors or higher dimensional arrays). Reading array data where one array follows another is pretty straightforward. Use the same syntax as for the interleaved array case, but set the start and stop points to be the same and to be the offset from the start of the data file. Here is a format file for a real dataset that contains a number of arrays of binary data:
BINARY_input_data "AMSR-E_Ocean_Product"
time_a 1 1 array["lat" 1 to 720]["lon" 1 to 1440] OF uint8 0
sst_a 1036801 1036801 array["lat" 1 to 720]["lon" 1 to 1440] OF uint8 0
wind_a 2073601 2073601 array["lat" 1 to 720]["lon" 1 to 1440] OF uint8 0
Note that the array time_a uses start and stop values of 1 and then the array sst_a uses start and stop values of 1 036 801 which is exactly the size of the preceding array. Note that in this dataset, each array is of an unsigned 8-bit integer. Here’s another example with different size and type arrays:
BINARY_input_data "test_data"
time_a 1 1 array["lat" 1 to 10]["lon" 1 to 10] OF uint8 0
sst_a 101 108 array["lat" 1 to 10]["lon" 1 to 20] OF float64 0
wind_a 301 302 array["lat" 1 to 10]["lon" 1 to 5] OF uint16 0
The first array starts at offset 1; the second array starts at offset 100 (10 * 10); and the third array starts at 300 (100 + (10 * 20). Note that FreeForm offsets are given in terms of elements, not bytes.
Format Descriptions for Tabular Data
Format descriptions define the formats of input and output data and headers. FreeForm ND provides an easy-to-use mechanism for describing data. FreeForm ND programs and FreeForm ND-based applications that you develop use these format descriptions to correctly access data. Any data file used by FreeForm ND programs must be described in a format description file.
This page explains how to write format descriptions for data arranged in tabular format---rows and columns---only. For data in non-tabular formats, see Array Format.
FreeForm ND Variable Types
The data sets you produce and use may contain a variety of variable types. The characteristics of the types that FreeForm ND supports are summarized in the table below, which is followed by a description of each type.
OPeNDAP FreeForm ND Data Types |
||||
Name |
Minimum Value |
Maximum Value |
Size in Bytes |
Precision |
char |
** |
|||
uchar |
0 |
255 |
1 |
|
short |
-32,767 |
32,767 |
2 |
|
ushort |
0 |
65,535 |
2 |
|
long |
-2,147,483,647 |
2,147,483,647 |
4 |
|
ulong |
0 |
4,294,967,295 |
4 |
|
float |
<math>10^{-37}</math> |
<math>10^{38}</math> |
4 |
6*** |
double |
<math>10^{-307}</math> |
<math>10^{308}</math> |
8 |
15*** |
constant |
** |
|||
initial |
record length |
|||
convert |
** |
|||
*Expressed as the number of significant digits |
||||
**User-specified |
||||
***Can vary depending on environment |
||||
| The sizes in table 3.1 are machine-dependent. Those given are for most Unix workstations. |
char: The char variable type is used for character strings. Variables of this type, including numerals, are interpreted as characters, not as numbers.
uchar: The uchar (unsigned character) variable type can be used for integers between 0 and 255 (28- 1). Variables that can be represented by the uchar type (for example: month, day, hour, minute) occur in many data sets. An advantage of using the uchar type in binary formats is that only one byte is used for each variable. Variables of this type are interpreted as numbers, not characters.
short: A short variable can hold integers between -32,767 and 32,767 (<math2^{15}- 1</math). This type can be used for signed integers with less than 5 digits, or for real numbers with a total of 4 or fewer digits on both sides of the decimal point (-99 to 99 with a precision of 2, -999 to 999 with a precision of 1, and so on).
ushort: A ushort (unsigned short) variable can hold integers between 0 and 65,535 (<math2^{16} - 1</math).
long: A long variable can hold integers between -2,147,483,647 and +2,147,483,647 (<math2^{31} - 1</math). This variable type is commonly used to represent floating point data as integers, which may be more portable. It can be used for numbers with 9 or fewer digits with up to 9 digits of precision, for example, latitude or longitude (-180.000000 to 180.000000).
ulong: The ulong (unsigned long) variable type can be used for integers between 0 and 4,294,967,295 (<math2^{32} - 1</math).
float, double: Numbers that include explicit decimal points are either float or double depending on the desired number of digits. A float has a maximum of 6 significant digits, a double has 15 maximum. The extra digits of a double are useful, for example, for precisely specifying time of day within a month as decimal days. One second of time is approximately 0.00001 day. The number specifying day (maximum = 31) can occupy up to 2 digits. A float can therefore only specify decimal days to a whole second (31.00001 occupies seven digits). A double can, however, be used to track decimal parts of a second (for example, 31.000001).
FreeForm ND File Types
FreeForm ND supports binary, ASCII, and dBASE file types. Binary data are stored in a fixed amount of space with a fixed range of values. This is a very efficient way to store data, but the files are machine-readable rather than human-readable. Binary numbers can be integers or floating point numbers.
Numbers and character strings are stored as text strings in ASCII. The amount of space used to store a string is variable, with each character occupying one byte.
The dBASE file type, used by the dBASE product, is ASCII text without end-of-line markers.
Format Description Files
Format description files accompany data files. A format description file can contain descriptions for one or more formats. You include descriptions for header, input, and output formats as appropriate. Format descriptions for more than one file may be included in a single format description file.
An example format description file is shown next. The sections that follow describe each element of a format description file.
/ This format description file is for
/ data files latlon.bin and latlon.dat.

binary_data Default binary format
latitude 1 4 long 6
longitude 5 8 long 6

ASCII_data Default ASCII format
latitude 1 10 double 6
longitude 12 22 double 6
Lines 1 and 2 are comment lines. Lines 4 and 8 give the format type and title. Lines 5, 6, 9, and 10 contain variable descriptions. Blank lines signify the end of a format description
You can include blank lines between format descriptions and comments in a format description file as necessary. Comment lines begin with a slash (/). FreeForm ND ignores comments.
Format Descriptions
A format description file comprises one or more format descriptions. A format description consists of a line specifying the format type and title followed by one or more variable descriptions, as in the following example:
binary_data Default binary format
latitude 1 4 long 6
longitude 5 8 long 6
A line specifying the format type and title begins a format description. A format descriptor, for example, binary_data, is used to indicate format type to FreeForm ND. The format title, for example, "Default binary format", briefly describes the format. It must be surrounded by quotes and follow the format descriptor on the same line. The maximum number of characters for the format title is 80 including the quotes.
Format descriptors indicate (in the order given) file type, read/write type, and file section. Possible values for each descriptor component are shown in the following table.
Format Descriptor Components:
-
File Type
-
ASCII
-
Binary
-
dBASE
-
-
Read/Write Type (Optional)
-
input
-
output
-
-
File Section
-
data
-
file_header
-
record_header
-
file_header_seperate*
-
record_header_separate*
-
*The qualifier separate indicates there is a header file separate from the data file.
The components of a format descriptor are separated by underscores (). For example, _ASCII_output_data indicates that the format description is for ASCII data in an output file. The order of descriptors in a format description should reflect the order of format types in the file. For instance, the descriptor ASCII_file_header would be listed in the format description file before ASCII_data. The format descriptors you can use in FreeForm ND are listed in the next table, where XXX stands for ASCII, binary, or dBASE. (Example: XXX_data = ASCII_data, binary_data, or dBASE_data.)
Format Descriptors:
-
Data
-
XXX_data
-
XXX_input_data
-
XXX_output_data
-
-
Header
-
XXX_file_header
-
XXX_file_header_separate
-
XXX_record_header
-
XXX_record_header_separate
-
XXX_input_file_header
-
XXX_input_file_header_separate
-
XXX_input_record_header
-
XXX_input_record_header_separate
-
XXX_output_file_header
-
XXX_output_file_header_separate
-
XXX_output_record_header
-
XXX_output_record_header_separate
-
-
Special
-
Return (lets FreeForm ND skip over end-of-line characters in the data.)
-
EOL (a constant indicating an end-of-line character should be inserted in a multi-line record.)
-
For more information about header formats, see Header Formats.
A variable description defines the name, start and end column position, type, and precision for each variable. The fields in a variable description are separated by white space. Two variable descriptions are shown below with the fields indicated. Each field is then described.
Here are two example variable descriptions. Each one consists of a name, a start position, and end position, a type, and a precision.
latitude    1  10  double  6
longitude  12  22  double  6
Name: The variable name is case-sensitive, up to 63 characters long with no blanks. The variable names in the example are latitude and longitude. If the same variable is included in more than one format description within a format description file, its name must be the same in each format description.
Start Position: The column position where the first character (ASCII) or byte (binary) of a variable value is placed. The first position is 1, not 0. In the example, the variable latitude is defined to start at position 1 and longitude at 12.
End Position: The column position where the last character (ASCII) or byte (binary) of a variable value is placed. In the example, the variable latitude is defined to end at position 10 and longitude at 22.
Type: The variable type can be a standard type such as char, float, double, or a special FreeForm ND type. The type for both variables in the example is double. See above for descriptions of supported types.
Precision: Precision defines the number of digits to the right of the decimal point. For float or double variables, precision only controls the number of digits printed or displayed to the right of the decimal point in an ASCII representation. The precision for both variables in the example is 6.
Format Descriptions for Array Data
If the tabular format discussed in Table Format doesn’t describe your data well, FreeForm ND’s array notation may prove useful. Describing a data file’s organization as a set of as n-dimensional arrays allows for much more flexibility in writing format definitions. It also enables subsetting, pixel-manipulation, and reorienting arrays of arbitrary dimension and character.
Array Descriptor Syntax
FreeForm ND allows you to describe the same fundamental FreeForm ND data types in array notation. The arrays can have any number of dimensions, any number of elements in each dimension, and either an increasing or a decreasing sequencing in each dimension. Furthermore, elements in any dimension may be separated from each other (demultiplexed) and may even be placed in separate files. However, every element of an array must be of the same type.
Array descriptors are a string of n dimension descriptions for arrays of n dimensions. FreeForm ND accepts descriptions with the most significant dimension first (i.e. row-major order for 2 dimensions, plane-major order in 3 dimensions).
Individual dimension descriptions are enclosed in brackets. Each dimension description can contain various keywords and values which specify how the dimension is set up. Some of the specifications are optional; if you do not specify them, they default to a specific value.
| You must not mix array and tabular formats within the input and output sections of the format definition file. Only one type of notation can be used within each section of the format description file, although the sections may use different forms. For example, a file’s input format could use array definitions, but the output format might be entirely tabular. |
The dimension description variables include:
dimension name (REQUIRED): A name for the dimension. This can be any ASCII string enclosed in double-quotes ("). The name for each dimension must be unique throughout the array descriptor. This example specifies that a dimension named "latitude" exists
[latitude 0 to 180]`
starting and ending indices (REQUIRED): A starting and ending index specifying a range for the dimension. The starting and ending indices are specified as integers separated by the word "to" following the dimension name. As long as both numbers are integral, there are no other restrictions on their values. This example specifies that the dimension "temperature" has indices ranging from -50 to +50:
[temperature -50 to 50]
granularity (optional): A specification for the density of elements in the indices. The number provided after the "by" keyword specifies how many index positions are to be skipped to find the next element. This example specifies that index values 0, 50, 100, 150 and 200 are the only valid index values for the dimension "height":
[height 0 to 200 by 50]
grouping (optional): A specification for splitting an array across "partitions" (files or buffers in memory). The number provided after the "gb" or "groupedby" keyword specifies how many elements of the dimension are in each partition. If no value is specified, the default is 0 (no partitioning). Each partition must have the same number of elements. Every more-significant dimension description (those to the left) must also have a grouping specified- "dangling" grouping specifications are not allowed. If a dimension is not partitioned, but is required to have a grouping specification because a less-significant dimension is partitioned, a grouping of M can be specified, where:
M = [end_index - start_index] + 1
This example specifies that the dimension "latitude" is partitioned into 9 chunks of 10 "bands" of latitude each:
[latitude 1 to 90 gb 10]
separation (optional): A specification for "unused space" in the array. The number provided after the "sb" or "separation" keyword specifies how many bytes of data following each element in the dimension should not be considered part of the array. An "element in the dimension" is considered to be everything which occurs in one index of that dimension. separation takes on a slightly different meaning if the dimension also has a specified grouping. In dimensions with a specified grouping, the separation occurs at the end of each partition, not after every element. This example specifies a 2-dimensional array with 4 bytes between the elements in the "columns" and an additional 2 bytes at the end of every row:
[lat -90 to 90 sb 2][lon -180 to 179 sb 4]
Handling Newlines
The convention of expecting a newline to follow each record of ASCII data becomes troublesome when dealing with array data, especially when expressed using format description notation that is intended for tabular data. It is the FreeForm ND convention that there is an implicit newline after the last variable of an ASCII format.
For example, these two format descriptions are equivalent:
ASCII_data broken time --- BIP
year 1 2 uint8 0
month 3 4 uint8 0
day 5 6 uint8 0
hour 7 8 uint8 0
minute 9 10 uint8 0
second 11 14 uint16 2

dBASE_data broken time --- BIP
year 1 2 uint8 0
month 3 4 uint8 0
day 5 6 uint8 0
hour 7 8 uint8 0
minute 9 10 uint8 0
second 11 14 uint16 2
EOL 15 16 constant 0
However, the EOL variable shown here assumes that newlines are two bytes long, which is true only on a PC. FreeForm ND adjusts to this by assuming that ASCII data always has native newlines, and it updates the starting and ending position of EOL variables and subsequent variables accordingly.
The EOL variable is typically used to define a record layout that spans multiple lines. However, the EOL variable in combination with the dBASE format type can completely replace the ASCII format type.We recommend using the dBASE format type when describing ASCII arrays, to ensure that separation, if specified, takes into account the length of any newlines. In this output format a newline separates each band of data, but it would be just as easy to omit the newlines entirely.
dBASE_input_data broken time --- BIP
year 1 2 array[x 1 to 10 sb 14] of uint8 0
month 3 4 array[x 1 to 10 sb 14] of uint8 0
day 5 6 array[x 1 to 10 sb 14] of uint8 0
hour 7 8 array[x 1 to 10 sb 14] of uint8 0
minute 9 10 array[x 1 to 10 sb 14] of uint8 0
second 11 14 array[x 1 to 10 sb 12] of uint16 2
EOL 15 16 array[x 1 to 10 sb 14] of constant 0

dBASE_output_data broken time - BSQ
year 1 2 array[x 1 to 10] of uint8 0
EOL 21 22 constant 0
month 23 24 array[x 1 to 10] of uint8 0
EOL 43 44 constant 0
day 45 46 array[x 1 to 10] of uint8 0
EOL 65 66 constant 0
hour 67 68 array[x 1 to 10] of uint8 0
EOL 87 89 constant 0
minute 90 91 array[x 1 to 10] of uint8 0
EOL 110 111 constant 0
second 112 115 array[x 1 to 10] of uint16 2
EOL 132 133 constant 0
| The separation size now takes into account the two-character PC newline. To use this format description with a native ASCII file on UNIX platforms, it would be necessary to change the separation sizes of 12 and 14 to 11 and 13, respectively. </blockquote> |
Examples
The following examples should be helpful in understanding the array notation.
Array notation can simply replace the tabular format description, as in these examples.
A single element can be described in tabular format:
year 1 2 uint8 0
or as an array:
year 1 2 array[x 1 to 10] of uint8 0
An image file can be described in tabular format:
binary_input_data grid data
data 1 1 uint8 0
or as an array:
binary_input_data grid data
data 1 1 array[rows 1 to 180] [cols 1 to 360] of uint8 0
Multiplexed data can be described in tabular format:
ASCII_data broken time --- tabular
year 1 2 uint8 0
month 3 4 uint8 0
day 5 6 uint8 0
hour 7 8 uint8 0
minute 9 10 uint8 0
second 11 14 uint16 2
or as an array:
ASCII_data broken time -- BIP
year 1 2 array[x 1 to 10 sb 12] of uint8 0
month 3 4 array[x 1 to 10 sb 12] of uint8 0
day 5 6 array[x 1 to 10 sb 12] of uint8 0
hour 7 8 array[x 1 to 10 sb 12] of uint8 0
minute 9 10 array[x 1 to 10 sb 12] of uint8 0
second 11 14 array[x 1 to 10 sb 10] of uint16 2
These two format descriptions communicate much the same information, but the array example also indicates that the data file is blocked into ten data values for each variable.
In this example, the data is not multiplexed:
ASCII_data broken time -- BSQ
year 1 2 array[x 1 to 10] of uint8 0
month 21 22 array[x 1 to 10] of uint8 0
day 41 42 array[x 1 to 10] of uint8 0
hour 61 62 array[x 1 to 10] of uint8 0
minute 81 82 array[x 1 to 10] of uint8 0
second 101 104 array[x 1 to 10] of uint16 2
The starting position indicates the file offset of the first element of each array, the same as with the alternative definition given for starting position in tabular data format descriptions.
Consider a 6x6 array of data with an "XXXX" header and a "YY" trailer on each line. Each data element is a space, a row ("y") index, a comma, and a column ("x") index, as shown below:
XXXX 0,0 0,1 0,2 0,3 0,4 0,5YY
XXXX 1,0 1,1 1,2 1,3 1,4 1,5YY
XXXX 2,0 2,1 2,2 2,3 2,4 2,5YY
XXXX 3,0 3,1 3,2 3,3 3,4 3,5YY
XXXX 4,0 4,1 4,2 4,3 4,4 4,5YY
XXXX 5,0 5,1 5,2 5,3 5,4 5,5YY
The goal is to produce a data file that looks like the data below. To do that, we need to strip the headers and trailers, and transpose rows and columns:
0,0 1,0 2,0 3,0 4,0 5,0
0,1 1,1 2,1 3,1 4,1 5,1
0,2 1,2 2,2 3,2 4,2 5,2
0,3 1,3 2,3 3,3 4,3 5,3
0,4 1,4 2,4 3,4 4,4 5,4
0,5 1,5 2,5 3,5 4,5 5,5
The key to writing the input format description is understanding that the input data file is composed of four interleaved arrays:
-
The "XXXX" headers
-
The data
-
The "YY" trailers
-
The newlines
The array of headers is a one-dimensional array composed of six elements (one for each line) with each element being four characters wide and separated from the next element by 28 bytes (24 + 2 + 2 --- 24 bytes for a row of data plus 2 bytes for the trailer plus two bytes for the newline).
The array of data is a two-dimensional array of six elements in each dimension with each element being four characters wide, each row is separated from the next by eight bytes (columns are adjacent and so have zero separation), and the first element begins in the fifth byte of the file (counting from one).
The array of trailers is a one-dimensional array composed of six elements with each element being two characters wide, each element is separated from the next by 30 bytes, and the first element begins in the 29th byte of the file.
The array of newlines is a one-dimensional array composed of six elements with each element being two characters wide (on a PC), each element is separated from the next by 30 bytes, and the first element begins in the 31st byte of the file.
The FreeForm ND input format description needed is:
dBASE_input_data one
headers 1 4 ARRAY[line 1 to 6 separation 28] OF text 0
data 5 8 ARRAY[y 1 to 6 separation 8][x 1 to 6] OF text 0
trailers 29 30 ARRAY[line 1 to 6 separation 30] OF text 0
PCnewline 31 32 ARRAY[line 1 to 6 separation 30] OF text 0
The output data is composed of two interleaved arrays:
-
The data
-
The newlines
The array of data now has a separation of two bytes between each row, the first element begins in the first byte of the file, and the order of the dimensions has been switched.
The array of newlines now has a separation of 24 bytes and the first element begins in the 25th byte of the file. Each array can be operated on independently. In the case of the data array we simply transposed rows and columns, but we could do other reorientations as well, such as resequencing elements within either or both dimensions.
The FreeForm ND output format description needed is:
dBASE_output_data two
data 1 4 ARRAY[x 1 to 6 separation 2][y 1 to 6] OF text 0
PCnewline 25 26 ARRAY[line 1 to 6 separation 24] OF text 0
With a wider range of descriptive possibilities, FreeForm can more easily be used for sampling and subsetting data, as in these examples.
The following array descriptor pair subsets a two-dimensional array, retrieving one quarter (the north-west quarter of the earth).
INPUT: [latitude -90 to 90] [longitude -179 to 180]
OUTPUT: [latitude 0 to 90] [longitude -179 to 0]
The following array descriptor pair flips a two-dimensional array row-wise (vertically).
INPUT: [row 0 to 100] [column 13 to 42]
OUTPUT: [row 100 to 0] [column 13 to 42]
The following array descriptor pair rotates a two-dimensional array 90 degrees (exchanging rows and columns).
INPUT: [row 0 to 10] [column 0 to 42]
OUTPUT: [column 0 to 42] [row 0 to 10]
The following array descriptor pair outputs every other plane from a three-dimensional array (essentially cutting the depth resolution in half).
INPUT: [plane 1 to 18] [row 0 to 10] [column 0 to 42]
OUTPUT: [plane 1 to 18 by 2] [row 0 to 10] [column 0 to 42]
The following array descriptor pair replicates every plane from a three-dimensional array three times (essentially tripling the depth).
INPUT: [plane 1 to 54 by 3] [row 0 to 10] [column 0 to 42]
OUTPUT: [plane 1 to 54] [row 0 to 10] [column 0 to 42]
This array descriptor pair outputs the middle 1/27 of a three dimensional array with depth and width exchanged and height halved and flipped:
INPUT: [plane 1 to 27] [row 1 to 27] [column 1 to 27]
OUTPUT: [column 10 to 18] [row 18 to 10 by 2] [plane 10 to 18]
Header Formats
Headers are one of the most commonly encountered forms of metadata-data about data. Applications need the information contained in headers for reading the data that the headers describe. To access these data, applications must be able to read the headers. Just as there are many data formats, there are numerous header formats. You can include header format descriptions, which have exactly the same form as data format descriptions, in format description files.
Header Treatment in FreeForm ND
FreeForm ND is not 100 percent backwards compatible with FreeForm in the area of header treatment.
Headers have traditionally been handled differently from data in FreeForm ND. If a header format was not specified as either input or output, it was taken as both input and output. newform did little in processing headers, and FreeForm ND relied on extraneous utilities to work with headers.
In FreeForm ND, header formats are treated the same as data formats. This means that header formats must be identified as either input or output, explicitly or implicitly. If done explicitly, then either the input or the output descriptor will form the format type (e.g., ASCII_input_header). If done implicitly, then the same ambiguity resolution rules that apply to data formats will be applied to header formats. This means that ASCII header formats will be taken as input for data files with a .dat extension, dBASE header formats will be taken as input for data files with a .dab extension, and binary header formats will be taken as input for all other data files.
If an embedded header and the data have different file types, then either the header format or data format (preferably both) must be explicitly identified as input or output (for example, an ASCII header embedded in a binary data file). Obviously, ambiguous formats with different file types cannot both be resolved as input formats.
The same header format is no longer used as both an input and an output header format.
In FreeForm ND, newform honors output header formats that are separate (e.g., ASCII_output_header_separate). The header is written to a separate file which, unless otherwise specified, is named after the output data file with a .hdr extension. This requires that you name the output file using the -o option flag; redirected output cannot be used with separate output headers. The output header file name and path can be specified using the same keywords that tell FreeForm ND how to find an input separate header file (i.e., header_file_ext, header_file_name, and header_file_path).
When defining keywords to specify how an output header file is to be named, you must use a new type of equivalence section, input_eqv, which must appear in the format file along with output_eqv.
Header Types
FreeForm ND recognizes two types of headers. File headers describe all the data in a file whereas record headers describe the data in a single record or data block. FreeForm ND can read headers included in the data file or stored in a separate file. Header formats, like data formats, are described in format description files.
A file header included in a data file is at the beginning of the file. Only one file header can be associated with a data file. Alternatively, a file header can be stored in a file separate from the data file.
In the following example, a file header is used to store the minimum and maximum for each variable and the data are converted from ASCII to binary. There are two variables, latitude and longitude. The file header format and data formats are described in the format description file llmaxmin.fmt.
ASCII_file_header Latitude/Longitude Limits
minmax_title 1 24 char 0
latitude_min 25 36 double 6
latitude_max 37 46 double 6
longitude_min 47 59 double 6
longitude_max 60 70 double 6

ASCII_data lat/lon
latitude 1 10 double 6
longitude 12 22 double 6

binary_data lat/lon
latitude 1 4 long 6
longitude 5 8 long 6
The example ASCII data file llmaxmin.dat contains a file header and data as described in llmaxmin.fmt.
1         2         3         4         5         6         7
1234567890123456789012345678901234567890123456789012345678901234567890

Latitude and Longitude:   -83.223548 54.118314  -176.161101 149.408117
-47.303545 -176.161101
-25.928001    0.777265
-28.286662   35.591879

12.588231  149.408117
-83.223548   55.319598

54.118314 -136.940570

38.818812   91.411330
-34.577065   30.172129

27.331551 -155.233735

11.624981 -113.660611
This use of a file header would be appropriate if you were interested in creating maps from large data files. By including maximums and minimums in a header, the scale of the axes can be determined without reading the entire file.
FreeForm ND naming conventions have been followed in this example, so to convert the ASCII data in the example to binary format, use the following simple command:
newform llmaxmin.dat -o llmaxmin.bin
The file header in the example will be written into the binary file as ASCII text because the header descriptor in llmaxmin.fmt (ASCII_file_header) does not specify read/write type, so the format is used for both the input and output header.
Record headers occur once for every block of data in a file. They are interspersed with the data, a configuration sometimes called a format sandwich. Record headers can also be stored together in a separate file.
The following format description file specifies a record header and ASCII and binary data formats for aeromagnetic trackline data.
ASCII_record_header Aeromagnetic Record Header Format
flight_line_number 1 5 long 0
count 6 13 long 0
fiducial_number_corresponding_to_first_logical_record 14 22 long 0
date_MMDDYY_or_julian_day 23 30 long 0
flight_number 31 38 long 0
utm_easting_of_first_record 39 48 float 0
utm_northing_of_first_record 49 58 float 0
utm_easting_of_last_record 59 68 float 0
utm_northing_of_last_record 69 78 float 0
blank_padding 79 104 char 0

ASCII_data Aeromagnetic ASCII Data Format
flight_line_number 1 5 long 0
fiducial_number 6 15 long 0
utm_easting_meters 16 25 float 0
utm_northing_meters 26 35 float 0
mag_total_field_intensity_nT 36 45 long 0
mag_residual_field_nT 46 55 long 0
alt_radar_meters 56 65 long 0
alt_barometric_meters 66 75 long 0
blank 76 80 char 0
latitude 81 92 float 6
longitude 93 104 float 6

binary_data Aeromagnetic Binary Data Format
flight_line_number 1 4 long 0
fiducial_number 5 8 long 0
utm_easting_meters 9 12 long 0
utm_northing_meters 13 16 long 0
mag_total_field_intensity_nT 17 20 long 0
mag_residual_field_nT 21 24 long 0
alt_radar_meters 25 28 long 0
alt_barometric_meters 29 32 long 0
blank 33 37 char 0
latitude 38 41 long 6
longitude 42 45 long 6
The example ASCII file aeromag.dat contains two record headers followed by a number of data records. The header and data formats are described in aeromag.fmt. The variable count (second variable defined in the header format description) is used to indicate how many data records occur after each header.
1         2         3         4         5         6         7         8         9         10
123456789012345678901234567890123456789012345678901234567890123456789012345678901234567890123456789012345

420       5     5272     178       2   413669.  6669740.   333345.  6751355.

420      5272   413669.  6669740.   2715963   2715449      1088      1348        60.157307 -154.555191

420      5273   413635.  6669773.   2715977   2715464      1088      1350        60.157593 -154.555817

420      5274   413601.  6669807.   2716024   2715511      1088      1353        60.157894 -154.556442

420      5275   413567.  6669841.   2716116   2715603      1079      1355        60.158188 -154.557068

420      5276   413533.  6669875.   2716263   2715750      1079      1358        60.158489 -154.557693

411      10     8366     178       2   332640.  6749449.   412501.  6668591.

411      8366   332640.  6749449.   2736555   2736538       963      1827        60.846806 -156.080185

411      8367   332674.  6749415.   2736539   2736522       932      1827        60.846516 -156.079529

411      8368   332708.  6749381.   2736527   2736510       917      1829        60.846222 -156.078873

411      8369   332742.  6749347.   2736516   2736499       922      1832        60.845936 -156.078217

411      8370   332776.  6749313.   2736508   2736491       946      1839        60.845642 -156.077560

411      8371   332810.  6749279.   2736505   2736488       961      1846        60.845348 -156.076904

411      8372   332844.  6749245.   2736493   2736476       982      1846        60.845062 -156.076248

411      8373   332878.  6749211.   2736481   2736463      1015      1846        60.844769 -156.075607

411      8374   332912.  6749177.   2736470   2736452      1029      1846        60.844479 -156.074951

411      8375   332946.  6749143.   2736457   2736439      1041      1846        60.844189 -156.074295
This file contains two record headers. The first occurs on the first line of the file and has a count of 5, so it is followed by 5 data records. The second record header follows the first 5 data records. It has a count of 10 and is followed by 10 data records.
The FreeForm ND default naming conventions have been used here so you could use the following abbreviated command to reformat aeromag.dat to a binary file named aeromag.bin:
newform aeromag.dat -o aeromag.bin
The ASCII record headers are written into the binary file as ASCII text.
You may need to describe a data set with external headers. An external or separate header file can contain only headers-one file header or multiple record headers.
Suppose you want the file header used to store the minimum and maximum values for latitude and longitude (from the llmaxmin example) in a separate file so that the data file is homogenous, thus easier for applications to read. Instead of one ASCII file (llmaxmin.dat), you will have an ASCII header file, say it is named llmxmn.hdr, and an ASCII data file-call it llmxmn.dat.
Latitude and Longitude: -83.223548 54.118314 -176.161101 149.408117
-47.303545 -176.161101
-25.928001    0.777265
-28.286662   35.591879

12.588231  149.408117
-83.223548   55.319598

54.118314 -136.940570

38.818812   91.411330
-34.577065   30.172129

27.331551 -155.233735

11.624981 -113.660611
You will need to make one change to llmaxmin.fmt, adding the qualifier separate to the header descriptor, so that FreeForm ND will look for the header in a separate file. The first line of llmaxmin.fmt becomes:
ASCII_file_header_separate Latitude/Longitude Limits
Save llmaxmin.fmt as llmxmn.fmt after you make the change.
To convert the data in llmxmn.dat to binary format in llmxmn.bin, use the following command:
newform llmxmn.dat -o llmxmn.bin
| When you run newform, it will write the separate header to llmxmn.bin along with the data in llmxmn.dat. |
Record headers in separate files can act as indexes into data files if the headers specify the positions of the data in the data file. For example, if you have a file containing data from 25 observation stations, you could effectively index the file by including a station ID and the starting position of the data for that station in each record header. Then you could use the index to quickly locate the data for a particular station.
Returning to the aeromag example, suppose you want to place the two record headers in a separate file. Again, the only change you need to make to the format description file (aeromag.fmt) is to add the qualifier separate to the header descriptor. The first line would then be:
ASCII_record_header_separate Aeromagnetic Record Header Format
The separate header file would contain the following two lines:
420       5     5272     178       2   413669.  6669740.   333345.  6751355.
411      10     8366     178       2   332640.  6749449.   412501.  6668591.
The data file would look like the current aeromag.dat with the first and seventh lines removed.
Assuming the data file is named aeromag.dat, the default name and location of the header file would be aeromag.hdr in the same directory as the data file. Otherwise, the separate header file name and location need to be defined in an equivalence table. (For information about equivalence tables, see the GeoVu Tools Reference Guide.)
Headers and data records in dBASE format are represented in ASCII but are not separated by end-of-line characters. They can be difficult to read or to use in applications that expect newlines to separate records. By using newform, dBASE data can be reformatted to include end-of-line characters.
In this example, you will reformat the dBASE data file oceantmp.dab (see below) into the ASCII data file oceantmp.dat. The input file oceantmp.dab contains a record header at the beginning of each line. The header is followed by data on the same line. When you convert the file to ASCII, the header will be on one line followed by the data on the number of lines specified by the variable count. The format description file oceantmp.fmt is used for this reformatting.
dbase_record_header NODC-01 record header format
WMO_quad 1 1 char 0
latitude_deg_abs 2 3 uchar 0
latitude_min 4 5 uchar 0
longitude_deg_abs 6 8 uchar 0
longitude_min 9 10 uchar 0
date_yymmdd 11 16 long 0
hours 17 19 uchar 1
country_code 20 21 char 0
vessel 22 23 char 0
count 24 26 short 0
data_type_code 27 27 char 0
cruise 28 32 long 0
station 33 36 short 0

dbase_data IBT input format
depth_m 1 4 short 0
temperature 5 8 short 2

RETURN NEW LINE INDICATOR

ASCII_data ASCII output format
depth_m 1 5 short 0
temperature 27 31 float 2
This format description file contains a header format description, a description for dBASE input data, the special RETURN descriptor, and a description for ASCII output data. The variable count (fourth from the bottom in the header format description) indicates the number of data records that follow each header. The descriptor RETURN lets newform skip over the end-of-line marker at the end of each data block in the input file oceantmp.dab as it is meaningless to newform here. Because the end-of-line marker appears at the end of the data records in each input data block, RETURN is placed after the input data format description in the format description file.
1         2         3         4         5         6         7
1234567890123456789012345678901234567890123456789012345678901234567890
11000171108603131109998  4686021000000002767001027670020276700302767
110011751986072005690AM  4686091000000002928001028780020287200302872
11111176458102121909998  4681011000000002728009126890241110005000728
112281795780051918090PI  268101100000000268900402711
Each dBASE header in oceantmp.dab is located from position 1 to 36. It is followed by four data records of 8 bytes each. Each record comprises a depth and temperature reading. The variable count in the header (positions 24-26) indicates that there are 4 data records each in the first 3 lines and 2 on the last line. This will all be more obvious after conversion.
To reformat oceantmp.dab to ASCII, use the following command:
newform oceantmp.dab -o oceantmp.dat
The resulting file oceantmp.dat is much easier to read. It is readily apparent that there are 4 data records after the first three headers and 2 after the last.
1         2         3         4
1234567890123456789012345678901234567890
11000171108603131109998  46860210000

0                     27.67

10                     27.67

20                     27.67

30                     27.67
110011751986072005690AM  46860910000

0                     29.28

10                     28.78

20                     28.72

30                     28.72
11111176458102121909998  46810110000

0                     27.28

91                     26.89

241                     11.00

500                     07.28
112281795780051918090PI  26810110000

0                     26.89

40                     27.11
The OPeNDAP FreeForm ND Data Handler
The OPeNDAP FreeForm ND Data Handler is a OPeNDAP server add-on that uses OPeNDAP FreeForm ND to convert and serve data in formats that are not directly supported by existing Hyrax data handlers. Bringing OPeNDAP FreeForm ND 's data conversion capacity into the OPeNDAP world widens data access for DAP2 clients, since any format that can be described in OPeNDAP FreeForm ND can now be served by the OPeNDAP data server.
Like all DAP2 servers, the OPeNDAP FreeForm ND Data Handler responds to client requests for data by returning either data values or information about the data. It differs from other DAP2 servers because it invokes OPeNDAP FreeForm ND to read the data from disk before serving it to the client.
The following sequence of steps illustrates how the OPeNDAP FreeForm ND Data Handler works:
-
A DAP2 client sends a request for data to a OPeNDAP FreeForm ND Data Handler . The request must include the name of the file that contains the data, and may include a constraint expression to sample the data.
-
The OPeNDAP FreeForm ND Data Handler looks in its path for two files: a data file with the name sent by the client, and a format definition file to use with the data file. The format definition file contains a description of the data format, constructed according to the OPeNDAP FreeForm ND syntax.
-
The server uses both files in invoking the OPeNDAP FreeForm ND engine. The OPeNDAP FreeForm ND engine reads the data file and the format file, using the instructions in the latter to convert the former into data which is then passed back to the OPeNDAP FreeForm ND Data Handler .
-
On receiving the converted data, the OPeNDAP FreeForm ND Data Handler converts the data into the DAP2 transmission format. The conversion may involve some adjustment of data types; these are listed below. The server also applies any constraint expressions the client sent along with the URL.
-
The server then constructs DDS and DAS files based on the format of the converted data. If the server has access to DDS and DAS files that describe the data, it applies those definition before sending them back to the client.
-
Finally, the server sends the DDS, DAS, and converted data back to the client.
For information about how to write a OPeNDAP FreeForm ND data description, refer to the Table Format for sequence data and Array Format for array data.
For an introduction to DAP2 and to the OPeNDAP project, please refer to The Opendap User Guide.
Differences between OPeNDAP FreeForm ND and the OPeNDAP FreeForm ND Data Handler
The OPeNDAP FreeForm ND Data Handler is based on the same libraries used to make the OPeNDAP FreeForm ND utilities. However, there are some important differences in the resulting software:
-
The OPeNDAP FreeForm ND Data Handler is a OPeNDAP FreeForm ND application that converts data on receiving a client request for that data, and not before. Data served by the OPeNDAP FreeForm ND Data Handler remains in its original format.
-
The OPeNDAP FreeForm ND Data Handler does not produce an output file containing the converted data, but serves it directly over the network to the DAP2 client. Therefore, the OPeNDAP FreeForm ND Data Handler ignores the output section of the format definition file.
-
To sample a data file, you do not write format definitions that cause the OPeNDAP FreeForm ND engine to sample the data file. Instead, you add a DAP2 "constraint expression" to the URL that the client sends to the OPeNDAP FreeForm ND Data Handler .
-
The OPeNDAP FreeForm ND Data Handler performs data conversion on the fly. Conversion only takes place when the client sends a URL requesting data from the OPeNDAP FreeForm ND Data Handler .
-
Unlike OPeNDAP FreeForm ND , there is no static file created by the conversion.
(If you wish to create or work with such a file, use the OPeNDAP FreeForm ND utilities, such as newform.)
Data Type Conversions
The OPeNDAP FreeForm ND Data Handler performs data conversions, based on the data it receives from the OPeNDAP FreeForm ND engine. Note that OPeNDAP does not recommend the use of int64 and uint64 in the format definition file.
DAP2 Data Type Conversions |
|
text |
String |
int8, unit8 |
Byte |
int16 |
Int16 |
int32, int64 |
Int32 |
uint32, uint64 |
UInt32 |
float32 |
Float32 |
float64, enote |
Float64 |
The examples show how the OPeNDAP FreeForm ND Data Handler treats data received from the OPeNDAP FreeForm ND engine. Please see the OPeNDAP FreeForm ND Data Handler distribution for more test data and format definition files, and the Table Format for more information on writing format definitions.
If you define a variable as an array in the OPeNDAP FreeForm ND format definition file, the OPeNDAP FreeForm ND Data Handler produces an array of variables with matching types.
For exmple, this entry in the format definition file:
binary_input_data array
fvar1 1 4 ARRAY[records 1 to 101] of int32 0
in converted by the OPeNDAP FreeForm ND Data Handler to:
Int32 fvar1[records = 101]
If you define several variables in the format definition file, the OPeNDAP FreeForm ND Data Handler produces a Sequence of variables with matching types.
For example, this entry in the format definition file:
ASCII_input_data ASCII_data
fvar1   1 10  int32 2
svar1  13 18  int16 0
usvar1 21 26 uint16 1
lvar1  29 39  int32 0
ulvar1 42 52 uint32 4
is converted by the OPeNDAP FreeForm ND Data Handler to:
Sequence {
Int32 fvar1;
Int32 svar1;

...
} ASCII_data;
If you define a collection of arrays in the format definition file, as you would expect, the OPeNDAP FreeForm ND Data Handler produces a dataset containing multiple arrays.
For example, this entry in the format definition file:
binary_input_data arrays
fvar1 1 4 ARRAY[records 1 to 101] of int32 0
fvar2 1 4 ARRAY[records 1 to 101] of int32 0
is converted by the OPeNDAP FreeForm ND Data Handler to:
Dataset {
Int32 fvar1[records=101]
Int32 fvar2[records=101]
};
File Servers
The DODS and OPEnDAP projects have used the OPeNDAP FreeForm ND Data Handler to present a catalog of data files to the world as a single dataset. In many ways this was a very successful system, providing catalogs for multi-granule datasets that could be searched by date and time. However, the OPeNDAP project has decided (winter 2006) to adopt the THREDDS xml-based catalog system developed at Unidata, Inc. The remainder of this chapter describes the 'file servers' that can be built using the FreeForm data handler. Even though we feel it’s best to adopt the THREDDS catalogs, there are good reasons to keep existing catalog servers running and to build new catalogs as a stop-gap measure to support existing client software.
Normally, in the OPeNDAP argot, a "dataset" is contained in a single file on a disk. However, this paradigm is often broken by large datasets that may contain many thousands or tens of thousands of data files. The OPeNDAP file server is a way to make these dicrete datasets appear to be a single large dataset.
The OPeNDAP file server is an OPeNDAP server that returns a URL or set of URLs in response to a query containing selection variables. For example, a dataset organized by date and geographic location might provide a file server that allowed you to query the dataset with a range of dates and longitudes. This fileserver would return a list of one or more URLs corresponding to files within that dataset that fell within the given range.
The Problem
Consider the following (imaginary) list of files:
1997360.nc  1998001.nc  1998007.nc  1998013.nc ...
1997361.nc  1998002.nc  1998008.nc  1998014.nc
1997362.nc  1998003.nc  1998009.nc  1998015.nc
1997363.nc  1998004.nc  1998010.nc  1998016.nc
1997364.nc  1998005.nc  1998011.nc  1998017.nc
1997365.nc  1998006.nc  1998012.nc  1998018.nc
These appear to be a set of netCDF files, arranged by date. (A serial date, with a year and the day of the year, expressed in an ordinal number from 1 to 365 or 366.)
If you want data from the first week of January, 1998, it is fairly clear which files to request. However, the OPeNDAP server provides no way to request data from more than one file, so your request would have to be split into 7 different requests, from 1998001.nc to 1998007.nc. This could be represented as a set of seven DODS URLs:
http://opendap/dap/data/1998001.nc
http://opendap/dap/data/1998002.nc
http://opendap/dap/data/1998003.nc
http://opendap/dap/data/1998004.nc
http://opendap/dap/data/1998005.nc
http://opendap/dap/data/1998006.nc
http://opendap/dap/data/1998007.nc
But what if you then uncover another similar dataset whose data you want to compare to the first? Or what if you want to expand the inquiry to cover the entire year? Keeping track of this many URLs will quickly become burdensome.
What’s more, another similar dataset could be arranged in two different directories, 1997 and 1998, each with files:
001.nc
002.nc
003.nc
...
and so on. Now you have to keep track of two large sets of URLs, in two different forms. But you could also imagine files called:
0011998.nc
0021998.nc
0031998.nc
or
00198.nc
00298.nc
00398.nc
or
1Jan98.nc
2Jan98.nc
3Jan98.nc
That is, the number of possible sensible arrangements may not, in fact, be infinite, but it may seem that way to a scientist who is simply trying to find data.
The OPeNDAP File Server Solution
To create a system that allows data providers to assert a degree of uniformity over wildly variable dataset organizations, OPeNDAP provides for the installation of an OPeNDAP \new{file server}. The file server is a server that provides access to a special dataset, containing associations between the names of files within a dataset and some "selectable" data values.
The concept of \new{selectable data} requires some explanation. This is used to indicate the data variables you might ordinarily use to narrow your search for data in the first pass at a dataset.
For geophysical data, the selectable data is often the time and location of the data, since typical searches for data often begin by specifying a part of the globe that bears examining, or a date of some event. For other types of data, other data variables will seem more appropriate. Model data, for example, which has no real location or time, might be arranged by the parameters that varied between runs.
A comprehensive definition of selectable data has so far eluded the OPeNDAP group, but there are some guidelines, albeit fairly vague ones:
-
The selectable data is generally not recorded within each data file. However, the selectable data may often include a range summarizing some of the data within each file.
-
The selectable data should help a user decide whether a particular data file in a dataset is useful. A temperature range might not be as useful as a time range, since data searches more often start with time. (Both would presumably be still more useful,but there is a trade-off between the utility of the file server and the time spent maintaining it.)
Consider again the set of data files shown in (fs,problem). We could associate each one of these files with a date, and this would provide the rudiments of a file server if we then serve that data with an OPeNDAP server such as the OPeNDAP FreeForm ND Data Handler .
1997/360 http://opendap/dap/data/1997360.nc
1997/361 http://opendap/dap/data/1997361.nc
1997/362 http://opendap/dap/data/1997362.nc
1997/363 http://opendap/dap/data/1997363.nc
1997/364 http://opendap/dap/data/1997364.nc
1997/365 http://opendap/dap/data/1997365.nc
1998/001 http://opendap/dap/data/1998001.nc
1998/002 http://opendap/dap/data/1998002.nc
1998/003 http://opendap/dap/data/1998003.nc
1998/004 http://opendap/dap/data/1998004.nc
1998/005 http://opendap/dap/data/1998005.nc
1998/006 http://opendap/dap/data/1998006.nc
1998/007 http://opendap/dap/data/1998007.nc
1998/008 http://opendap/dap/data/1998008.nc
1998/009 http://opendap/dap/data/1998009.nc
1998/010 http://opendap/dap/data/1998010.nc
This list represents a set of DAP URLs, each identified by a date, given as a year and a serial day. The files appear to be netCDF format files, served by an OPeNDAP netCDF server, but that is not important for this discussion.
To use the OPeNDAP FreeForm ND Data Handler for your file server, you could use a format description file with an input section like this:
ASCII_input_data File Server Example Input
year 1 4 short 0
serial_day 6 8 short 0
DODS_Url 10 46 char 0
FreeForm ND Conventions
File name conventions have been defined for FreeForm ND. If you follow these conventions, FreeForm ND can locate format files through a default search sequence. Using the file name conventions also lets you reduce the number of arguments on the command line. In addition to standard file names, FreeForm ND programs recognize various standard command line arguments.
File Name Conventions
Naming conventions have been established for files accessed by FreeForm ND. Although you are not required to follow these conventions, using them lets you enter abbreviated commands when you are using FreeForm ND-based programs. FreeForm ND can then automatically execute several operations:
-
Determination of input and output formats when they are not explicitly identified in the relevant format descriptions in format files
-
Location of format files when they are not specified on the command line
File Name Extensions
The expected extensions for data files are as follows:
.dat: For ASCII, e.g., latlon.dat
.dab: For dBASE, e.g., latlon.dab
.bin: binary or anything that is not .dat or .dab, e.g., latlon.bin
The expected extension for format description files is .fmt, e.g., latlon.fmt. You should not use mixed case extensions for format description files if you want to take advantage of FreeForm ND’s default search capabilities. If you explicitly specify the names of format description files on the command line, you can use mixed case extensions.
Previous versions of FreeForm ND used variable description files (formerly called format specification files) each of which contained variable descriptions for one file. Expected extensions for these files were .afm (ASCII), .bfm (binary), and .dfm (dBASE). Variable descriptions for one or more files can now be incorporated into a single format description file. It is recommended that you convert and combine (as appropriate) existing variable description files into format description files.
File Name Relationships
FreeForm ND-based programs expect certain relationships between data file and format description file names as outlined below.
-
The data file is named datafile.ext where datafile is the file name of your choosing and ext is the extension. Example: latlon.dat
-
The corresponding format description file should be named datafile.fmt. Example: latlon.fmt
-
If one format description file is used for multiple data files, all with the same extension, the format description file should be named ext.fmt. Example: ll.fmt is the format description file for lldat1.ll, lldat2.ll, and lldat3.ll.
Again, although not required, it is to your advantage to use these conventions.
Determining Input and Output Formats
You can optionally include the read/write type ("input" or "output") in format descriptors, e.g., ASCII_input_data. You may not want to specify the read/write type in some circumstances. For example, you may need to translate from native ASCII to binary, then back to ASCII. ASCII is the input format in the first translation and the output format in the second translation, vice versa for binary. You would need to edit the format description file before executing the second translation if you included read/write type in the format descriptors.
If you use the -ft option, you do not need to edit the format description file. See below. If you do not specify read/write type, FreeForm ND can nevertheless determine which format in a format description file is input and which is output as long as you have adhered to FreeForm ND filenaming conventions.
If the input format is not specified, and
-
the input data filename extension is .bin, assume binary input.
-
the input data filename extension is .dab, assume dBASE input.
-
the input data filename extension is .dat, assume ASCII input.
-
the input data filename extension is anything else, assume binary input.
If the output format is not specified, and
-
the input format is dBASE, the output is ASCII or binary, whichever is found first.
-
the input format is ASCII, the output is binary or dBASE, whichever is found first.
The appropriate format descriptions must be in the format description file(s) used by FreeForm ND for a translation. If, for example, FreeForm ND determines the input format is binary and the output format is ASCII, there must be a format description for each type. The checkvar program needs only an input format.
Locating Format Files
FreeForm ND programs use the following search sequence to find a format file (format or variable description file) for the data file datafile.ext when the format file name is not explicitly specified on the command line. In summary, FreeForm ND searches the directory specified by the GeoVu keyword format_dir (defined in a equivalence table or in the environment), the current or working directory, and the data file’s home directory. The rules are applied in the order given below until a format file is found or all rules have been exhausted. If the relevant format file does not follow FreeForm ND conventions for name or location, it should be explicitly specified on the command line.
GeoVu is a FreeForm ND-based application for data access and visualization. FreeForm ND applications other than GeoVu use GeoVu
keywords. For information about equivalence tables, see the GeoVu Tools Reference Guide, available from the NGDC.
-
Search the directory given by the GeoVu keyword format_dir for a format description file named datafile.fmt.
-
Search the directory given by the GeoVu keyword format_dir for variable description files named datafile.afm, datafile.bfm, and datafile.dfm. Step 2 is included to accommodate variable description files that were created using previous versions of FreeForm ND. It is recommended that you convert existing variable description files to format description files.
-
Search the directory given by the GeoVu keyword format_dir for a format description file named ext.fmt. If the GeoVu keyword format_dir is not found, FreeForm ND continues the search for a format file as follows.
-
Search the current (default) directory for a format description file named datafile.fmt.
-
Search the current directory for variable description files named datafile.afm, datafile.bfm, and datafile.dfm. Use the criteria in step 2 for determining input and output format files.
-
Search the current directory for a format description file named ext.fmt. If the data file’s home directory is not the same as the current directory, FreeForm ND continues the search for a format file with steps 7-9. The data file’s home directory is given by the directory path component of the data file name. If the data file name has no directory path component, the home directory search is not done.
-
Search the data file’s home directory for a format description file named datafile.fmt.
-
Search the data file’s home directory for variable description files named datafile.afm, datafile.bfm, and datafile.dfm. Use the criteria in step 2 for determining input and output format files.
-
Search the data file’s home directory for a format description file named ext.fmt.
FreeForm ND adheres to the following rules for case sensitivity (in applicable operating systems) when it searches for a format file for the data file datafile.ext.
-
FreeForm ND preserves the case of datafile, for example, the default format file for the data file LATLON.BIN is LATLON.fmt (or LATLON.bfm).
-
FreeForm ND searches for a format file with a lower case extension. That is, the format file must have its extension in lower case no matter what the case of datafile. For example, the default format file for the data file LatLon.dat is LatLon.fmt (or LatLon.afm), and TIMEDATE.fmt (or TIMEDATE.bfm) is the default format file for TIMEDATE.bin.
-
In searching for a format description file of type ext.fmt, FreeForm ND preserves the case of ext. For example, for data files named lldat1.LL, lldat2.LL, and latlon3.LL, the default format description file is LL.fmt.
Command Line Arguments
FreeForm ND programs can take various command line arguments. The most widely used or standard arguments are discussed in this section. They are used for several different purposes: identifying input and output files, identifying format files and titles, changing run-time operation parameters, and defining data filters.
The only required argument for any FreeForm ND program is the name of the input file or file to be processed. All other arguments are optional and can be in any order following the input file name. The command line of a FreeForm ND program with the standard arguments has the following form:
application_name input_file [-f format_file]

[-if input_format_file] [-of output_format_file] [-ft "title"] [-ift "title"] [-oft "title"] [-b local_buffer_size] [-c count] [-v var_file] [-q query_file] [-o output_file]
| To see a summary of command line usage for a FreeForm ND program, enter the program’s name on the command line without any arguments. |
input_file: Name of the file to be processed. Following FreeForm ND naming conventions, the standard extensions for data files are .dat for ASCII format, .bin for binary, and .dab for dBASE.
-o output_file: Option flag followed by the name of the output file. The standard extensions are the same as for input files.
FreeForm ND offers a number of command line options for specifying the source of the format descriptions that a program must find in order to process data. The proper option or combination of options to use depends on how you have constructed your format files.
-f format_file: Option flag followed by the name of the format description file describing both input and output data.
-if input_format_file: Option flag followed by the name of the format description file describing the input data. Also use this option for an input variable description file written using earlier versions of FreeForm ND.
-of output_format_file: Option flag followed by the name of the format description file describing the output data. Also use this option for an output variable description file written using earlier versions of FreeForm ND.
-ft title: Option flag followed by the title (enclosed in quotes) of the format to be used for both input and output data, in which case there is no reformatting. The title follows format type on the first line of a format description in a format description file.
-ift title: Option flag followed by the title (enclosed in quotes) of the desired input format.
-oft title: Option flag followed by the title (enclosed in quotes) of the desired output format.
| Previous versions of FreeForm ND used variable description files (.afm, .bfm, .dfm). It is recommended that you convert and combine (as appropriate) existing variable description files into format description files. |
The various options available for specifying the source of a format description offer you a great deal of flexibility-in naming files, setting up format description files, and on the command line. In using these options, you need to consider the content of your format description files and how FreeForm ND will interpret the arguments on the command line.
FreeForm ND includes three arguments that let you change run-time parameters according to your needs. One argument lets you specify local buffer size, another indicates the number of records to process, and the third indicates which variables to process.
-b local_buffer_size: Option flag followed by the size of the memory buffer used to process the data and format files. Default buffer size is 32,768. You many want to decrease the buffer size if you are running with low memory. Keep in mind that too small a buffer may result in unexpected behavior.
-c count: Option flag followed by a number that specifies how many data records at the head or tail of the file to process. If <mathcount 0</math, count records at the beginning of the file are processed. If <mathcount < 0</math, count records at the tail or end of the file are processed.
-v var_file: Option flag followed by the name of a variable file. The file contains names of the variables in the input data file to be processed by the FreeForm ND program. Variable names in var_file can be separated by one or more spaces or each name can be on a separate line.
The query option lets you define data filters via a query file so you can precisely specify which data to process. The FreeForm ND program will process only those records meeting the query criteria.
-q query_file: Option flag followed by the name of the file containing query criteria.
Format Conversion
The FreeForm ND utility program newform lets you convert data from one format to another. This allows you to pass data to applications in the format they require. You may also want to create binary archives for efficient data storage and access. With newform, conversion of ASCII data to binary format is straightforward. If you wish to read the data in a binary file, you can convert it to ASCII with newform, or use the interactive program readfile. You can also convert data from one ASCII format to another ASCII format with newform.
newform
The FreeForm ND-based program newform is a general tool for changing the format ofa data file. The only required command line argument, if you use FreeForm ND naming conventions, is the name of the input data file. The reformatted data is written to standard output (the screen) unless you specify an output file. If you reformat to binary, you will generally want to store the output in a file.
You must create a format description file (or files) with format descriptions for the data files involved in a conversion before you can use newform to perform the conversion. The standard extension for format description files is .fmt. If you do not explicitly specify the format description file on the command line, which is unnecessary if you use FreeForm ND naming conventions, newform follows the FreeForm ND search sequence to find a format file.
For details about FreeForm ND naming conventions and the search sequence, see Conventions.
The newform command has the following form:
_newform_ _input_file_ [-f format_file] [-if-if input_format_file] [-of output_format_file]

[-ft "title"] [-ift "title"] [-oft "title"] [-b local_buffer_size] [-c count] [-v var_file] [-q query_file] [-o output_file]
For descriptions of the arguments, see Conventions.
If you want to convert an ASCII file to a binary file, and you follow the FreeForm ND naming conventions, the command is simply:
newform datafile.dat -o datafile.bin
where datafile is the file name of your choosing.
If data files and format files are not in the current directory or in the same directory, you can specify the appropriate path name. For example, if the input data file is not in the current directory, you can enter:
newform /path/datafile.dat -o datafile.bin
To read the data in the resulting binary file, you can reformat back to ASCII using the command:
newform datafile.bin -o datafile.ext
or you can use the readfile program, described in <strong class="selflink">Format Conversion</strong>.
chkform
Though newform is useful for checking data formats, it is limited by requiring a format file to specify an output format. Since some OPeNDAP FreeForm ND applications (such as the OPeNDAP FreeForm handler) do not require an output format, this is extra work for the dataset administrator. For these occasions, OPeNDAP FreeForm ND provides a simpler format-checking program, called chkform.
The chkform program attempts to read an ASCII file, using the specified input format. If the format allows the file to be read
properly, chkform says so. However, if the input format contains errors, or does not accurately reflect the contents of the given data file, chkform delivers an error message, and attempts to provide a rudimentary diagnosis of the problem.
You must create a format description file (or files) with format descriptions for the data files involved before you can use chkform to chack the format. As with newform, the standard extension for format description files is .fmt. If you do not explicitly specify the format description file on the command line (unnecessary if you use FreeForm ND naming conventions) chkform follows the FreeForm ND search sequence to find a format file.
For details about FreeForm ND naming conventions and the search sequence, see Conventions.
The chkform command has the following form:
chkform input_file [-if input_format_file] [-ift title] [-b local_buffer_size]
[-c count] [-q query_file] [-ol log_file] [-el error_log_file] [-ep]
Most of the arguments are described in Conventions. The following are specific to chkform:
-ol log_file: Puts a log of processing information into the specified log_file.
-el error_log_file: Creates an error log file that contains whatever error messages are issued by chkform.
-ep: In normal operation, chkform asks you to manually acknowledge each important error by typing something on the keyboard. If you use this option, chkform will not stop to prompt, but will continue processing until either the file is procesed, or there is an error preventing more processing.
As in the above examples, if you have an ASCII data file called datafile.dat, supposedly described in a format file called datafile.fmt, you can use chkform like this:
chkform datafile.dat
If processing is successful, you will see something like the following:
Welcome to Chkform release 4.2.3 -- an NGDC FreeForm ND application

(llmaxmin.fmt) ASCII_input_file_header  Latitude/Longitude Limits
File llmaxmin.dat contains 1 header record (71 bytes)
Each record contains 6 fields and is 71 characters long.

(llmaxmin.fmt) ASCII_input_data lat/lon
File llmaxmin.dat contains 10 data records (230 bytes)
Each record contains 3 fields and is 23 characters long.

100

No errors found (11 lines checked)
readfile
FreeForm ND includes readfile, a simple interactive binary file reader. The program has one required command line argument, the name of the file to be read. You do not have to write format descriptions to use readfile.
The readfile command has the following form:
readfile binary_data_file
When the program starts, it shows the available options, shown in table 9.3. At the readfile prompt, type these option codes to view binary encoded values. (Pressing return repeats the last option.)
The readfile program options |
|
c |
char --- 1 byte character |
s |
short --- 2 byte signed integer |
l |
long --- 4 byte signed integer |
f |
float --- 4 byte single-precision floating point |
d |
double --- 8 byte double-precision floating point |
uc |
uchar --- 1 byte unsigned integer |
us |
ushort --- 2 byte unsigned integer |
ul |
ulong --- 4 byte unsigned integer |
b |
Toggle between "big-endian" and your machine’s native byte |
order |
|
P |
Show present file position and length |
h |
Display this help screen |
q |
Quit |
The options let you interactively read your way through the specified binary file. The first position in the file is 0. You must type the character(s) indicating variable type (e.g., us for unsigned short) to view each value, so you need to know the data types of variables in the file and the order in which they occur. If successive variables are of the same type, you can press Return to view each value after the first of that type.
You can toggle the byte-order switch on and off by typing b. The byte-order option is used to read a binary data file that requires byte swapping. This is the case when you need cross-platform access to a file that is not byte-swapped, for example, if you are on a Unix machine reading data from a CD-ROM formatted for a PC. When the switch is on, type s or l to swap short or long integers respectively, or type f or d to swap floats or doubles. The readfile program does not byte swap the file itself (the file is unchanged) but byte swaps the data values internally for display purposes only.
To go to another position in the file, type p. You are prompted to enter the new file position in bytes. If, for example, each value in the file is 4 bytes long and you type 16, you will be positioned at the first byte of the fifth value. If you split fields (by not repositioning at the beginning of a field), the results will probably be garbage. Type P to find out your current position in the file and total file length in bytes. Type q to exit from readfile.
You can also use an input command file rather than entering commands directly. In that case, the readfile command has the following form:
readfile binary_data_file < input_command_file
Creating a Binary Archive
By storing data files in binary, you save disk space and make access by applications more efficient. An ASCII data file can take two to five times the disk space of a comparable binary data file. Not only is there less information in each byte, but extra bytes are needed for decimal points, delimiters, and end-of-line markers.
It is very easy to create a binary archive using newform as the following examples show. The input data for these examples are in the ASCII file latlon.dat (shown below). They consist of 20 random latitude and longitude values. The size of the file on a Unix system is 460 bytes.
Here is the latlon.dat file:
-47.303545 -176.161101
-0.928001    0.777265
-28.286662   35.591879
12.588231  149.408117
-83.223548   55.319598
54.118314 -136.940570
38.818812   91.411330
-34.577065   30.172129
27.331551 -155.233735
11.624981 -113.660611
77.652742  -79.177679
77.883119  -77.505502
-65.864879  -55.441896
-63.211962  134.124014
35.130219 -153.543091
29.918847  144.804390
-69.273601   38.875778
-63.002874   36.356024
35.086084  -21.643402
-12.966961   62.152266
In this example, you will use newform to convert the ASCII data file latlon.dat into the binary file latlon.bin. The input and output data formats are described in latlon.fmt.
Here is the latlon.fmt file:
/ This is the format description file for data files latlon.bin
/ and latlon.dat. Each record in both files contains two fields,
/ latitude and longitude.

binary_data binary format
latitude 1 8 double 6
longitude 9 16 double 6

ASCII_data ASCII format
latitude 1 10 double 6
longitude 12 22 double 6
The binary and ASCII variables both have the same names. The binary variable latitude occupies positions 1 to 8 and longitude occupies positions 9-16. The corresponding ASCII variables occupy positions 1-10 and 12-22. Both the binary and ASCII variables are stored as doubles and have a precision of 6.
To convert from an ASCII representation of the numbers in latlon.dat to a binary representation:
-
Change to the directory that contains the FreeForm ND example files.
-
Enter the following command:
newform latlon.dat -o latlon.bin
Because FreeForm ND filenaming conventions have been used, newform will locate and use latlon.fmt for the translation. The newform program creates a new data file (effectively a binary archive) called latlon.bin. The size of the archive file is 2/3 the size of latlon.dat. Additionally, the data do not have to be converted to machine-readable representation by applications.
There are two methods for checking the data in latlon.bin to make sure they converted correctly. You can reformat back to ASCII and view the resulting file, or use readfile to read latlon.bin.
Use the following newform command to reformat the binary data in latlon.bin to its native ASCII format:
newform latlon.bin -o latlon.rf
The ASCII file latlon.rf matches (but does not overwrite) the original input file latlon.dat. You can confirm this by using a file comparison utility. The diff command is generally available on Unix platforms.
To use diff to compare the latlon ASCII files, enter the command:
diff latlon.dat latlon.rf
The output should be something along these lines:
Files are effectively identical.
Several implementations of the diff utility don’t print anything if the two input files are identical.
| The diff utility may detect a difference in other similar cases because FreeForm ND adds a leading zero in front of a decimal and interprets a blank as a zero if the field is described as a number. (A blank described as a character is interpreted as a blank.) |
In this example, you will use newform to reformat the latitude and longitude values in the ASCII data file latlon.dat into binary longs in the binary file latlon2.bin. The input and output data formats are described in latlon2.fmt.
This is what’s in latlon2.fmt:
/ This is the format description file for data files latlon.dat
/ and latlon2.bin. Each record in both files contains two fields,
/ latitude and longitude.

ASCII_data ASCII format
latitude 1 10 double 6
longitude 12 22 double 6

binary_data binary format
latitude 1 4 long 6
longitude 5 8 long 6
The ASCII and binary variables both have the same names. The ASCII variable latitude occupies positions 1-10 and longitude occupies positions 12-22. The ASCII variables are defined to be of type double. The binary variables occupy four bytes each (positions 1-4 and 5-8) and are of type long. The precision for all is 6.
In the previous example, both the ASCII and binary variables were defined to be doubles. Binary longs, which are 4-byte integers, may be more portable across different platforms than binary doubles or floats.
To convert the ASCII data in latlon.dat to binary longs:
-
Change to the directory that contains the FreeForm ND example files.
-
Enter the following command:
newform latlon.dat -f latlon2.fmt -o latlon2.bin
It creates the binary archive file latlon2.bin with the 20 latitude and longitude values in latlon.dat stored as binary longs.
This example duplicates one in the Quickstart Guide. If you completed that example, an error message will indicate that latlon2.bin exists. You can rename, move, or delete the existing file.
The size of the archive file latlon2.bin is about 1/3 the size of latlon.dat. Also, the data do not have to be converted to machine representation by applications. The main tradeoff in achieving savings in space and access time is that although binary longs are more portable than binary doubles or floats, any binary representation is less portable than ASCII.
| There may be a loss of precision when input data of type double is converted to long. |
Once again, you can use readfile to check the data in the binary archive you created.
-
Enter the following command:
readfile latlon2.bin -
The data are stored as longs, so enter l to view each value (or press Return to view each value after the first).
-
Enter q to quit readfile.
If desired, you can enter the commands to readfile from an input command file rather than directly from the command line. The example command file latlon.in is shown next.
llllllp0 llPq
The 6 l’s (l for long) cause the first 6 values in the file to be displayed. The sequence p0 causes a return to the top (position 0) of the file. A position number (0) must be followed by a blank space. The 2 l’s display the first two values again. The P displays the current file position and length, and q closes readfile.
If you enter the following command:
readfile latlon2.bin < latlon.in
you should see the following output on the screen:
long: -47303545 long: -176161101 long: -928001 long: 777265 long: -28286662 long: 35591879 New File Position = 0 long: -47303545 long: -176161101 File Position: 8 File Length: 160
The floating point numbers have been multiplied by 106, the precision of the long variables in latlon2.fmt.
You can use the query option (-q query_file) to specify exactly which records in the data file newform should process. The query file contains query criteria. Query syntax is summarized in Appendix C.
In this example, you will specify a query so that newform will reformat only those value pairs in latlon.dat where latitude is positive and longitude is negative into the binary file llposneg.bin. The input and output data formats are described in latlon2.fmt.
The query criteria are specified in the following file, called llposneg.qry:
[latitude] 0 & [longitude] < 0
To convert the desired data in latlon.dat to binary and then view the results:
-
Enter the following command:
newform latlon.dat -f latlon2.fmt -q llposneg.qry -o llposneg.bin
The llposneg.bin file now contains the positive/negative latitude/longitude pairs in binary form. -
To view the data, first convert the data in llposneg.bin back to ASCII format: newform llposneg.bin -f latlon2.fmt -o llposneg.dat
-
Enter the appropriate command to display the data in llposneg.dat, e.g. more: The following output appears on the screen:
54.118314 -136.940570 27.331551 -155.233735 11.624981 -113.660611 77.652742 -79.177679 77.883119 -77.505502 35.130219 -153.543091 35.086084 -21.643402
| As demonstrated in the examples above, you can check the data in a binary file either by using readfile or by converting the data back to ASCII using newform and then viewing it. |
File Names and Context
In the preceding examples, the read/write type (input or output) was not included in the format descriptors (ASCII_data and binary_data). FreeForm ND naming conventions were used, so newform can determine from the context which format should be used for input and which for output. Consider the command:
newform latlon.dat -o latlon.bin
The input file extension is .dat and the output file extension is .bin. These extensions provide context indicating that ASCII should be used as the input format and binary should be used as the output format. The format description file that newform will look for is the file with the same name as the input file and the extension .fmt, i.e., latlon.fmt.
If you use the following command:
newform latlon.bin
to translate the binary archive latlon.bin back to ASCII, newform identifies the input format as binary and uses the ASCII format for output. The ASCII data is written to the screen because an output file was not specified.
For information about FreeForm ND file name conventions, see Conventions.
If you are working with data files that do not use FreeForm ND naming conventions, you need to more explicitly define the context. For example, the files lldat1.ll, lldat2.ll, lldat3.ll, lldat4.ll, and lldat5.ll all have latitude and longitude values in the ASCII format given in the format description file lldat.fmt. If you wanted to archive these files in binary format, you could not use a command of the form used in the previous examples, i.e., newform datafile.dat -o datafile.bin with datafile.fmt as the default format description file.
First, the ASCII data files do not have the extension .dat, which identifies them as ASCII files. Second, you would need five separate format description files, all with the same content: lldat1.fmt, lldat2.fmt, lldat3.fmt, lldat4.fmt, and lldat5.fmt. Creating the format description file ll.fmt solves both problems.
Here is the ll.fmt file:
/ This is the format description file that describes latlon / data in files with the extension .ll ASCII_input_data ASCII format for .ll latlon data latitude 1 10 double 6 longitude 12 22 double 6 binary_output_data binary format for .ll latlon data latitude 1 4 long 6 longitude 5 8 long 6
The name used for the format description file, ll.fmt, follows the FreeForm ND convention that one format description file can be utilized for multiple data files, all with the same extension, if the format description file is named ext.fmt. Also, the read/write type (input or output) is made explicit by including it in the format descriptors ASCII_input_data and binary_output_data. This provides the context needed for FreeForm ND programs to determine which format to use for input and which for output.
Use the following commands to produce binary versions of the ASCII input files:
newform lldat1.ll -o llbin1.ll newform lldat2.ll -o llbin2.ll newform lldat3.ll -o llbin3.ll newform lldat4.ll -o llbin4.ll newform lldat5.ll -o llbin5.ll
If you want to convert back to ASCII, you can switch the words input and output in the format description file ll.fmt. You could then use the following commands to convert back to native ASCII format with output written to the screen:
newform llbin1.ll newform llbin2.ll newform llbin3.ll newform llbin4.ll newform llbin5.ll
It is also possible to convert back to ASCII without switching the read/write types input and output in ll.fmt. You can specify input and output formats by title instead. In this case, you want to use the output format in ll.fmt as the input format and the input format in ll.fmt as the output format. Use the following command to convert llbin1.ll back to ASCII:
newform llbin1 -ift binary format for .ll latlon data -oft ASCII format for .ll latlon data
Notice that newform reports back the read/write type actually used. Since ASCII_input_data was used as the output format, newform reports it as ASCII_output_data.
Now assume that you want to convert the ASCII data file llvals.asc (not included in the example file set) to the binary file latlon3.bin, and the input and output data formats are described in latlon.fmt. The data file names do not provide the context allowing newform to find latlon.fmt by default, so you must include all file names on the command line:
newform llvals.asc -f latlon.fmt -o latlon3.bin
If you are using a format description file that does not follow FreeForm ND file naming conventions, you must include its name on the command line. Assume that you want to convert the ASCII data file latlon.dat to the binary file latlon.bin, and the input and output data formats are both described in llvals.frm (not included in the example file set). The data file names follow FreeForm ND conventions, but the name of the format description file does not, so it will not be located through the default search sequence. Use the following command to convert to binary:
newform latlon.dat -f llvals.frm -o latlon.bin
Suppose now that the input format is described in latlon.fmt and the output format in llvals.frm. You do not need to explicitly specify the input format description file because it will be located by default, but you must specify the output format description file name. In this case, the command would be:
newform latlon.dat -of llvals.frm -o latlon.bin
You can always unambiguously specify the names of format description files and data files, whether or not their names follow FreeForm ND conventions. Assume you want to look only at longitude values in latlon.bin and that you want them defined as integers (longs) which are right-justified at column 30. You will reformat the specified binary data in latlon.bin into ASCII data in longonly.dat and then view it. The input format is found in latlon.fmt, the output format in longonly.fmt.
/ This is the format description file for viewing longitude as an / integer value right-justified at column 30. ASCII_data ASCII output format, right-justified at 30 longitude 20 30 long 6
In this case, you have decided to look at the first 5 longitude values. Use the following command to unambiguously designate all files involved:
newform latlon.bin -if latlon.fmt -of longonly.fmt -c 5 -o longonly.dat
When you view longonly.dat, you should see the following 5 values:
1 2 3 4 1234567890123456789012345678901234567890 -176161101 777265 35591879 149408117 55319598
Changing ASCII Formats
You may encounter situations where a specific ASCII format is required, and your data cannot be used in its native ASCII format. With newform, you can easily reformat one ASCII format to another. In this example, you will reformat California earthquake data from one ASCII format to three other ASCII formats commonly used for such data.The file calif.tap contains data about earthquakes in California with magnitudes 5.0 since 1980. The data were initially distributed by NGDC on tape, hence the .tap extension. The data format is described in eqtape.fmt:
Here is the eqtape.fmt file:
/ This is the format description file for the NGDC .tap format, / which is used for data distributed on floppy disks or tapes. ASCII_data .tap format source_code 1 3 char 0 century 4 6 short 0 year 7 8 short 0 month 9 10 short 0 day 11 12 short 0 hour 13 14 short 0 minute 15 16 short 0 second 17 19 short 1 latitude_abs 20 24 long 3 latitude_ns 25 25 char 0 longitude_abs 26 31 long 3 longitude_ew 32 32 char 0 depth 33 35 short 0 magnitude_mb 36 38 short 2 MB 39 40 constant 0 isoseismal 41 43 char 0 intensity 44 44 char 0 / The NGDC record check format includes / six flags in characters 45 to 50. These / can be treated as one variable to allow / multiple flags to be set in a single pass, / or each can be set by itself. ngdc_flags 45 50 char 0 diastrophic 45 45 char 0 tsunami 46 46 char 0 seiche 47 47 char 0 volcanism 48 48 char 0 non_tectonic 49 49 char 0 infrasonic 50 50 char 0 fe_region 51 53 short 0 magnitude_ms 54 55 short 1 MS 56 57 char 0 z_h 58 58 char 0 cultural 59 59 char 0 other 60 60 char 0 magnitude_other 61 63 short 2 other_authority 64 66 char 0 ide 67 67 char 0 depth_control 68 68 char 0 number_stations_qual 69 71 char 0 time_authority 72 72 char 0 magnitude_local 73 75 short 2 local_scale 76 77 char 0 local_authority 78 80 char 0
Three other formats used for California earthquake data are hypoellipse, hypoinverse, and hypo71. Subsets of these formats are described in the format description file hypo.fmt. The format descriptions include the parameters required by the AcroSpin program that is distributed as part of the IASPEI Software Library (Volume 2). AcroSpin shows 3D views of earthquake point data.
Here is the hypo.fmt file:
/ This format description file describes subsets of the / hypoellipse, hypoinverse, and hypo71 formats. ASCII_data hypoellipse format year 1 2 uchar 0 month 3 4 uchar 0 day 5 6 uchar 0 hour 7 8 uchar 0 minute 9 10 uchar 0 second 11 14 ushort 2 latitude_deg_abs 15 16 uchar 0 latitude_ns 17 17 char 0 latitude_min 18 21 ushort 2 longitude_deg_abs 22 24 uchar 0 longitude_ew 25 25 char 0 longitude_min 26 29 ushort 2 depth 30 34 short 2 magnitude_local 35 36 uchar 1 ASCII_data hypoinverse format year 1 2 uchar 0 month 3 4 uchar 0 day 5 6 uchar 0 hour 7 8 uchar 0 minute 9 10 uchar 0 second 11 14 ushort 2 latitude_deg_abs 15 16 uchar 0 latitude_ns 17 17 char 0 latitude_min 18 21 ushort 2 longitude_deg_abs 22 24 uchar 0 longitude_ew 25 25 char 0 longitude_min 26 29 ushort 2 depth 30 34 short 2 magnitude_local 35 36 uchar 1 number_of_times 37 39 short 0 maximum_azimuthal_gap 40 42 short 0 nearest_station 43 45 short 1 rms_travel_time_residual 46 49 short 2 ASCII_data hypo71 format year 1 2 uchar 0 month 3 4 uchar 0 day 5 6 uchar 0 hour 8 9 uchar 0 minute 10 11 uchar 0 second 12 17 float 2 latitude_deg_abs 18 20 uchar 0 latitude_ns 21 21 char 0 latitude_min 22 26 float 2 longitude_deg_abs 27 30 uchar 0 longitude_ew 31 31 char 0 longitude_min 32 36 float 2 depth 37 43 float 2 magnitude_local 44 50 float 2 number_of_times 51 53 short 0 maximum_azimuthal_gap 54 57 float 0 nearest_station 58 62 short 1 rms_travel_time_residual 63 67 float 2 error_horizontal 68 72 float 1 error_vertical 73 77 float 1 s_waves_used 79 79 char 0
The parameters from the California earthquake data in the NGDC format needed for use with the AcroSpin program can be extracted and converted using the following commands:
newform calif.tap -if eqtape.fmt -of hypo.fmt -oft hypoellipse format -o calif.he newform calif.tap -if eqtape.fmt -of hypo.fmt -oft hypoinverse format -o calif.hi newform calif.tap -if eqtape.fmt -of hypo.fmt -oft hypo71 format -o calif.h71
If you develop an application that accesses seismicity data in a particular ASCII format, you need only to write an appropriate format description file in order to convert NGDC data into the format used by the application. This lets you make use of the data that NGDC provides in a format that works for you.
Data Checking
The FreeForm ND-based utility program checkvar creates variable summary files, lists of maximum and minimum values, and summaries of processing activity. You can use this information to check data quality and to examine the distribution of the data.
Generating the Summaries
A variable summary file (or list file), which contains histogram information showing the variable’s distribution in the data file, is created for each variable (or designated variables) in the specified data file. You can optionally specify an output file in which a summary of processing activity is saved.
Variable summaries (list files) can be helpful for performing quality control checks of data. For example, you could run checkvar on an ASCII file, convert the file to binary, and then run checkvar on the binary file. The output from checkvar should be the same for both the ASCII and binary files. You can also use variable summaries to look at the data distribution in a data set before extracting data.
The checkvar command has the following form:
checkvar input_file [-f format_file] [-if input_format_file] [-of output_format_file]
[-ft title] [-ift title] [-oft title] [-b local_buffer_size] [-c count] [-v var_file] [-q query_file] [-p precision] [-m maxbins] [-md missing_data_flag] [-mm] [-o processing_summary]
The checkvar program needs to find only an input format description. Output format descriptions will be ignored. If conversion variables are included in input or output formats, no conversion is performed when you run checkvar, since it ignores output formats.
For descriptions of the standard arguments (first eleven arguments above), see Conventions.
-p precision: Option flag followed by the number of decimal places. The number represents the power of 10 that data is multiplied by prior to binning. A value of 0 bins on one’s, 1 on tenth’s, and so on. This option allows an adjustment of the resolution of the checkvar output. The default is 0; maximum is 5.
| If you use the -p option on the command line, the precision set in the relevant format file is overridden. The precision in the format file serves as the default. |
-m maxbins: Option flag followed by the approximate maximum number of bins desired in checkvar output. The checkvar program keeps track of the number of bins filled as the data is processed. The smaller the number of bins, the faster checkvar runs. By keeping the number of bins small, you can check the gross aspects of data distribution rather than the details. The number of bins is adjusted dynamically as checkvar runs depending on the distribution of data in the input file. If the number of filled bins becomes 1.5 * maxbins, the width of the bins is doubled to keep the total number near the desired maximum. The default is 100 bins; minimum is 6. Must be < 10,000.
| The precision (-p) and maxbins (-m) options have no effect on character variables. |
-md missing_data_flag: Option flag followed by a flag value that checkvar should ignore across all variables in creating histogram data. Missing data flags are used in a data file to indicate missing or meaningless data. If you want checkvar to ignore more than one value, use the query (-q) option in conjunction with the variable file (-v) option.
-mm: Option flag indicating that only the maximum and minimum values of variables are calculated and displayed in the processing summary. Variable summary files are not created.
-o processing_summary: Option flag followed by the name of the file in which summary information displayed during processing is stored.
You will use checkvar with a precision of 3 to create a processing summary file and summary files for the two variables latitude and longitude in the file latlon.dat.
Here is latlon.dat:
-47.303545 -176.161101 -0.928001 0.777265 -28.286662 35.591879 12.588231 149.408117 -83.223548 55.319598 54.118314 -136.940570 38.818812 91.411330 -34.577065 30.172129 27.331551 -155.233735 11.624981 -113.660611 77.652742 -79.177679 77.883119 -77.505502 -65.864879 -55.441896 -63.211962 134.124014 35.130219 -153.543091 29.918847 144.804390 -69.273601 38.875778 -63.002874 36.356024 35.086084 -21.643402 -12.966961 62.152266
To create the summary files, enter the following command:
checkvar latlon.dat -p 3 -o latlon.sum
A summary of processing information and the maximum and minimum for each variable are displayed on the screen. The following three files are created:
-
latlon.sum recaps processing activity, maximums and minimums
-
latitude.lst shows distribution of the latitude values in latlon.dat
-
longitude.lst shows distribution of the longitude values in latlon.dat.
Interpreting the Summaries
The processing and variable summary files output by checkvar from the example in the previous section are shown and discussed below.
If you specify an output file on the command line, it stores the information that is displayed on the screen during processing. The file latlon.sum was specified as the output file in the example above.
Here is latlon.sum:
Input file: latlon.dat Requested precision = 3, Approximate number of sorting bins = 100 Input data format (latlon.fmt) ASCII_input_data ASCII format The format contains 2 variables; length is 24. Output data format (latlon.fmt) binary_output_data binary format The format contains 2 variables; length is 16. Histogram data precision: 3, Number of sorting bins: 20 latitude: 20 values read minimum: -83.223548 found at record 5 maximum: 77.883119 found at record 12 Summary file: latitude.lst Histogram data precision: 3, Number of sorting bins: 20 longitude: 20 values read minimum: -176.161101 found at record 1 maximum: 149.408117 found at record 4 Summary file: longitude.lst.
The processing summary file latlon.sum first shows the name of the input data file (latlon.dat). If you specified precision and a maximum number of bins on the command line, those values are given as Requested precision, in this case 3, and Approximate number of sorting bins, in this case the default value of 100. If precision is not specified, No requested precision is shown.
A summary of each format shows the type of format (in this case, Input data format and Output data format) and the name of the format file containing the format descriptions (latlon.fmt), whether specified on the command line or located through the default search sequence. In this case, it was located by default. Since checkvar only needs an input format description, it ignores output format descriptions. Next, you see the format descriptor as resolved by FreeForm ND (e.g., ASCII_input_data) and the format title (e.g., "ASCII format"). Then the number of variables in a record and total record length are given; for ASCII, record length includes the end-of-line character (1 byte for Unix).
A section for each variable processed by checkvar indicates the histogram precision and actual number of sorting bins. Under some circumstances, the precision of values in the histogram file may be different than the precision you specified on the command line. The default value for precision, if none is specified on the command line, is the precision specified in the relevant format description file or 5, whichever is smaller. The second line shows the name of the variable (latitude, longitude) and the number of values in the data file for the variable (20 for both latitude and longitude).
The minimum and maximum values for the variable are shown next (-83.223548 is the minimum and 77.883119 is the maximum value for latitude). The maximum and minimum values are given here with a precision of 6, which is the precision specified in the format description file. The locations of the maximum and minimum values in the input file are indicated. (-83.223548 is the fifth latitude value in latlon.dat and 77.883119 is the twelfth). Finally, the name of the histogram data (or variable summary) file generated for each variable is given (latitude.lst and longitude.lst).
The name of each variable summary file (list file) output by checkvar is of the form variable.lst for numeric variables and variable.cst for character variables. The data in *.lst, and *.cst files can be loaded into histogram plot programs for graphical representation. (You must be familiar enough with your program of choice to manipulate the data as necessary in order to achieve the desired result.) In Unix, there is no need to abbreviate the base file name.
| If you use the -v option, the order of variables in var_file has no effect on the numbering of base file names of the variable summary files. |
Example Variable Summary Files |
|
latitude.lst |
longitude.lst |
-83.224 1 |
-176.162 1 |
-69.274 1 |
-155.234 1 |
-65.865 1 |
-153.544 1 |
-63.212 1 |
-136.941 1 |
-63.003 1 |
-113.661 1 |
-47.304 1 |
-79.178 1 |
-34.578 1 |
-77.506 1 |
-28.287 1 |
-55.442 1 |
-12.967 1 |
-21.644 1 |
-0.929 1 |
0.777 1 |
11.624 1 |
30.172 1 |
12.588 1 |
35.591 1 |
27.331 1 |
36.356 1 |
29.918 1 |
38.875 1 |
35.086 1 |
55.319 1 |
35.130 1 |
62.152 1 |
38.818 1 |
91.411 1 |
54.118 1 |
134.124 1 |
77.652 1 |
144.804 1 |
77.883 1 |
149.408 |
The variable summary files consist of two columns. The first indicates boundary values for data bins and the second gives the number of data points in each bin. Because a precision of 3 was specified in the example, each boundary value has three decimal places. The boundary values are determined dynamically by checkvar and often do not correspond to data values in the input file, even if the checkvar and data file precisions are the same.
The first data bin in latitude.lst contains data points in the range -83.224 (inclusive) to -69.274 (exclusive); neither boundary number exists in latlon.dat. The first bin has one data point, -83.223548. The fourth data bin contains latitude values from -63.212 (inclusive) to -63.003 (exclusive), again with neither boundary value occurring in the data file. The data point in the fourth bin is -63.211962.
HDF Utilities
FreeForm ND includes three utilities for use with HDF (hierarchical data format) files: makehdf, splitdat, and pntshow. These programs were built using both the FreeForm library and the HDF library, which was developed at the National Center for Supercomputer Applications (NCSA).
The makehdf program converts binary and ASCII data files to HDF files and converts multiplexed band interleaved by pixel image files into a series of single parameter files. The splitdat program is used to separate and reformat data files containing headers and data into separate header and data files, or to translate them into HDF files. The pntshow program extracts point data from HDF files into binary or ASCII format.
It is assumed in this chapter that you have a working familiarity with HDF terminology and conventions. See the HDF user documentation for detailed information.
| Do not try the examples in this chapter. The example file set is incomplete. |
makehdf
Using makehdf you can convert data files with formats described in a FreeForm format file into HDF files. You should follow FreeForm naming conventions for the data and format files. For details about FreeForm conventions, see the Conventions documentation.
A dBASE input file must be converted to ASCII or binary using newform before you can run makehdf on it. The HDF file resulting from a conversion consists either of a group of scientific datasets (SDS’s), one for each variable in the input data file, or of a vgroup containing all the variables as one vdata. If you are working with grid data, you will want SDS’s (the default) in the output HDF file. A vdata (-vd option) is the appropriate choice for point data.
The makehdf command has the following form:
makehdf input_file [-r rows] [-c columns] [-v var_file] [-d HDF_description_file]
[-xl x_label -yl y_label] [-xu x_units -yu y_units] [-xf x_format -yf y_format] [-id file_id] [-vd [vdata_file]] [-dmx [-sep]] [-df] [-md missing_data_file] [-dof HDF_file]
input_file: Name of the input data file. Following FreeForm naming conventions, the standard extensions for data files are .dat for ASCII format and .bin for binary.
-r rows: Option flag followed by the number of rows in each resulting scientific dataset. The number of rows must be specified through this option on the command line, or in an equivalence table, or in a header (.hdr) file defined according to FreeForm standards.
-c columns: Option flag followed by the number of columns in each resulting scientific dataset. The number of columns must be specified through this option on the command line, or in an equivalence table, or in a header (.hdr) file defined according to FreeForm standards. For information about equivalence tables, see the GeoVu Tools Reference Guide.
-v var_file: Option flag followed by the name of the variable file. The file contains names of the variables in the input data file to be processed by makehdf. Variable names in \var{var_file} can be separated by one or more spaces or each name can be on a separate line.
-d HDF_description_file: Option flag followed by the name of the file containing a description of the input file. The description will be stored as a file annotation in the resulting HDF file.
-xl x_label -yl y_label: Option flags followed by strings (labels) describing the x and y axes; labels must be in quotes (" ") if more than one word.
-xu x_units -yu y_units: Option flags followed by strings indicating the measurement units for the x and y axes; strings must be in quotes (" ") if more than one word.
- xf x_format -yf y_format: Option flags followed by strings indicating the formats to be used in displaying scale for the x and y dimensions; strings must be in quotes (" ") if more than one word.
- id file_id: Option flag followed by a string that will be stored as the ID of the resulting HDF file.
- vd [vdata_file]: Option flag indicating that the output HDF file should contain a vdata. The optional file name specifies the name of the output HDF file; the default is input_file.HDF.
- dmx [-sep]: The option flag -dmx indicates that input data should be demultiplexed from band interleaved by pixel to band sequential form in input_file.dmx. If -dmx is followed by -sep, the input data are demultiplexed into separate variable files called data_file.1 \ldots data_file.n
- df:
To use this option, the input file (data_file.ext) must be a binary demultiplexed (band sequential) file. For each input variable in the applicable FreeForm format description file, there is a corresponding demultiplexed section in the output HDF file.
- md missing_data_file: Option flag followed by the name of the file defining missing data (data you want to exclude). Use this option only along with the vdata (-vd) option. Each line in the missing data file has the form:
variable_name lower_limit upper_limit
The precision of the upper and lower limits matches the precision of the input data.
- dof HDF_file:
Option flag followed by the name of the output HDF file. If you do not use the -dof option, the default output file name is input_file.HDF.
You will use makehdf to store latlon.dat as an HDF file. The HDF file will consist of two SDS’s, one each for the two variables latitude and longitude. Each SDS will have four rows and five columns.
To convert latlon.dat to an HDF file, enter the following command:
makehdf latlon.dat -r 4 -c 5
As makehdf translates latlon.dat into HDF, processing information is displayed on the screen:
1 Caches (1150 bytes) Processed: 800 bytes written to latlon.dmx Writing latlon.HDF and calculating maxima and minima ... Variable latitude: Minimum: -86.432712 Maximum 89.170904 Variable longitude: Minimum: -176.161101 Maximum 165.066193
The output from makehdf is an HDF file named latlon.HDF (by default). It contains the minimum and maximum values for the two variables as well as the two SDS’s.
A temporary file named latlon.dmx was also created. It contains the data from latlon.dat in demultiplexed form . The data was converted from its original multiplexed form to enable makehdf to write sections of data to SDS’s.
If you start with a demultiplexed file such as latlon.dmx, the translation process is much quicker, particularly for large data files. As an illustration, try this. Rename latlon.dmx to latlon.bin (renaming is necessary for makehdf to find the format description file latlon.fmt by default). Enter the following command:
makehdf latlon.bin -df -r 4 -c 5
The output file again is latlon.HDF, but notice that no demultiplexing was done.
splitdat
The splitdat program translates files with headers and data into separate header and data files or into HDF files. If the translation is to separate header and data files, the header file can include indexing information.
The combination of header and data records in a file is often used for point data sets that include a number of observations made at one or more stations or locations in space. The header records contain information about the stations or locations of the measurements. The data records hold the observational data. A station record usually indicates how many data records follow it. The structure of such a file is similar to the following:
Header for Station 1 Observation 1 for Station 1 Observation 2 for Station 1 . . Observation N for Station 1 Header for Station 2 Observation 1 for Station 2 Observation 2 for Station 2 . . . Observation N for Station 2 Header for Station 3 . . .
Many applications have difficulty reading this sort of heterogeneous data file. One solution is to split the data into two homogeneous files, one containing the headers, the other containing the data. With splitdat, you can easily create the separate data and header files. To use splitdat for this purpose, the input and output formats for the record headers and the data must be described in a FreeForm format description file. To use splitdat for translating files to HDF, the input format must be described in a FreeForm format description file. You should follow FreeForm naming conventions for the data and format files. For details about FreeForm conventions, see the Conventions documentation.
The splitdat command has the following form:
\proto{splitdat \var{input_file} [\var{output_data_file} \var{output_header_file}]}
\var{input_file} : Name of the file to be processed. Following FreeForm naming conventions, the standard extensions for data files are .dat for ASCII format and .bin for binary.
\var{output_data_file} : Name of the output file into which data are transferred with the format specified in the applicable FreeForm format description file. The standard extensions are the same as for input files. If an output file name is not specified, the default is standard output.
\var{output_header_file} : Name of the output file into which headers from the input file are transferred with the format specified in the applicable FreeForm format description file. If an output header file name is not specified, the default is standard output.
You can use the two variables begin and extent (described below) in the format description for the output record headers to indicate the location and size of the data block associated with each record header. If you then use splitdat, the header file that results can be used as an index to the data file.
begin: Indicates the offset to the beginning of the data associated with a particular header. If the data is being translated to HDF, the units are records; if not, the units are bytes.
extent: Indicates the number of records (HDF) or bytes (non-HDF) associated with each header record.
You will use splitdat to extract the headers and data from a rawinsonde (a device for gathering meteorological data) ASCII data file named hara.dat (HARA = Historic Arctic Rawinsonde Archive) and create two output files-23338.dat containing the ASCII data and 23338hdr.dat containing the ASCII headers. The format description file hara.fmt should contain the necessary format descriptions.
Here is hara.fmt:
ASCII_input_record_header ASCII Location Record input format WMO_station_ID_number 1 5 char 0 latitude 6 10 long 2 longitude_east 11 15 long 2 year 17 18 uchar 0 month 19 20 uchar 0 day 21 22 uchar 0 hour 23 24 uchar 0 flag_processing_1 28 28 char 0 flag_processing_2 29 29 char 0 flag_processing_3 30 30 char 0 station_type 31 31 char 0 sea_level_elev 32 36 long 0 instrument_type 37 38 uchar 0 number_of_observations 40 42 ushort 0 identification_code 44 44 char 0 ASCII_input_data Historical Arctic Rawinsonde Archive input format atmospheric_pressure 1 5 long 1 geopotential_height 7 11 long 0 temperature_deg 13 16 short 0 dewpoint_depression 18 20 short 0 wind_direction 22 24 short 0 wind_speed_m/s 26 28 short 0 flag_qg 30 30 char 0 flag_qg1 31 31 char 0 flag_qt 33 33 char 0 flag_qt1 34 34 char 0 flag_qd 36 36 char 0 flag_qd1 37 37 char 0 flag_qw 39 39 char 0 flag_qw1 40 40 char 0 flag_qp 42 42 char 0 flag_levck 43 43 char 0 ASCII_output_record_header ASCII Location Record output format . . . ASCII_output_data Historical Arctic Rawinsonde Archive output format . . .
To "split" hara.dat, enter the following command:
splitdat hara.dat 23338.dat 23338hdr.dat
The data values from hara.dat are stored in 23338.dat and the headers in 23338hdr.dat.
Because the variables begin and extent were used in the header output format in hara.fmt to indicate data offset and number of records, 23338hdr.dat has two columns of data showing offset and extent. Thus, it can serve as an index into 23338.dat.
If output files are not specified on the splitdat command line, a file named input_file.HDF is created. It is hierarchically named and organized as follows:
vgroup input_file_name / \ / \ vdata1 vdata2 PointIndex input_file_name
-
vdata1 contains the record headers
-
vdata2 contains the data
-
If writing to a Vset (represented by a vgroup), both output formats are converted to binary, if not binary already.
To create the file hara.HDF from hara.dat, enter the following abbreviated command:
splitdat hara.dat
The output formats in hara.fmt are automatically converted to binary, and subsequently the ASCII data in hara.dat are also converted to binary for HDF storage.
pntshow
The pntshow program is a versatile tool for extracting point data from HDF files containing scientific datasets and Vsets. The extraction can be done into any binary or ASCII format described in a FreeForm format description file. Before using pntshow on an HDF file, you should pack the file using the NCSA-developed HDF utility hdfpack.
You can use pntshow to extract headers and data from an HDF file into separate files or to extract just the data. It’s a good idea to define GeoVu keywords in an equivalence table to facilitate access to HDF objects. For information about equivalence tables, see the GeoVu Tools Reference Guide. The input and output formats must be described in a FreeForm format description file. You should follow FreeForm naming conventions for the data and format files. For details about FreeForm conventions, see the Conventions documentation.
If a format description file is not specified on the command line, the output format is taken by default from the FreeForm output format annotation stored in the HDF file. If there is no annotation, a default ASCII output format is used.
An equivalence table takes precedence over everything. (vdata=1963, SDS=702) If you have not specified an HDF object in an equivalence table, pntshow uses the following sequence to determine the appropriate source for output:
-
Output the first vdata with class name Data.
-
Output the largest vdata.
-
Output the first SDS.
If no vdatas exist in the file, but an SDS is found, it is extracted and a default ASCII output format is used.
The pntshow command takes the following form when you want to extract headers and data from HDF files into separate files.
pntshow input_HDF_file [-h [output_header_file]] [-hof output_header_format_file]
[-hof output_header_format_file] [-d [output_data_file]] [-dof output_data_format_file]
\var{input_HDF_file}: Name of the input HDF file, which has been packed using hdfpack.
\hdfh: Option flag followed optionally by the name of the file designated to contain the record headers currently stored in a vdata with a class name of Index. If an output header file name is not specified, the default is standard output.
\hdfhof: Option flag followed by the name of the FreeForm format file that describes the format for the headers extracted to standard output or output_header_file.
\hdfd: Option flag followed optionally by the name of the file designated to contain the data currently stored in a vdata with a class name of Data. If an output file name is not specified, the default is standard output.
\hdfdof: Option flag followed by the name of the FreeForm format file that describes the format for data extracted to standard output or \var{output_data_file}.
You will extract data and headers from hara.HDF (created by splitdat in a previous example). This file contains two vdatas: one has the class name Data and the other has the class name Index. Because this file is extremely small, no appending links were created in the file, so there is no need to pack the file before using pntshow, though you can if you wish.
To extract data and headers from hara.HDF, enter the following command:
pntshow hara.HDF -d haradata.dat -h harahdrs.dat
The data from the vdata designated as Data in hara.HDF are now stored in haradata.dat. The data are in their original format because the original output format was stored by splitdat in the HDF file. The header data from the vdata designated as Index in hara.HDF are now stored in harahdrs.dat. In addition to the original header data, the variables begin and extent have also been extracted to harahdrs.dat.
The pntshow command takes the following form when you want to extract just the data from an HDF file:
pntshow input_HDF_file [-of default_output_format_file]
[ output_file]
\var{input_HDF_file}: Name of the input HDF file, which has been packed using hdfpack.
\hdfof: Option flag followed by the name of the FreeForm format file that describes the format for data extracted to standard output or \var{output_file.}
\var{output_file}: Name of the output file into which data is transferred. If an output file name is not specified, the default is standard output.
You can use pntshow to extract designated variables from an HDF file. In this example, you will extract temperature and pressure values from hara.HDF to an ASCII format. First, the following format description file must exist.
Here is haradata.fmt:
ASCII_output_data ASCII format for pressure, temp atmospheric_pressure 1 10 long 1 temperature_deg 15 25 float 1
To create a file named temppres.dat containing only the temperature and pressure variables, enter either of the following commands:
pntshow hara.HDF -of haradata.fmt temppres.dat
or
pntshow hara.HDF -d temppres.dat -dof haradata.fmt
If you use the first command, pntshow searches hara.HDF for a vdata named Data. Since hara.HDF contains only one vdata named Data, this vdata is extracted by default with the format specified in haradata.fmt.
The results are the same if you use the second command. Now, try running pntshow on the previously created file latlon.HDF, which contains two SDS’s. Use the following command:
pntshow latlon.HDF latlon.SDS
The latlon.SDS file now contains the latitude and longitude values extracted from latlon.HDF. They have the default ASCII output format. You could have used the -of option to specify an output format included in a FreeForm format description file.
Error Handling
The FreeForm ND error handling system captures errors, such as improper usage, code problems, and system errors, and places them in an error queue. For each error captured, error type and a short message are placed in the message queue. If a fatal error occurs, the program stops executing and displays all error messages in the queue.
Error Messages
The following is a list of some possible error messages with suggestions for corrections.
Problem opening, reading, or writing to file: Check that all file names and paths are correct.
Problem making format Make sure there is a format file describing the data file formats. Check that input and output format descriptions in the format file accurately describe the data.
Problem making header format: If a header exists in the data file, it must be described in a format file. Check that the header description accurately describes the header in your data file.
Problem getting value
Problem processing variable list: The data formats may not be described correctly or there may be some inconsistencies in the data. Check also for unprintable characters at the end of the data file.
File length / Record length mismatch
Record Length or CR Problem: This usually happens because the input format description is not correct. Make sure the format description’s last position is the last character before the end-of-line character. If you have a header, make sure it is described correctly. The header’s length must include all characters up until the last end-of-line-character before the data begins.
Binary Overflow: Try using a larger output variable type such as a long instead of a short. Be sure you have given enough space for the values to be written. See Chapter for more information.
Variable not found: The variable names in your output format must match the variable names in the input format unless you are using conversion variables.
Data Overflow: Data overflow does not usually cause a fatal error and FreeForm ND functions try to anticipate them. If overflow occurs for a particular value, *'s are written to that value’s location. If you find these in your output, check your variable positions and precision. Increase field width or use a "larger" data type. Be sure the output format specifies space for the output variable. For instance, FreeForm ND adds a leading zero in front of decimal points. If the original data did not have a leading zero, the output will have one more digit than the input.
Insufficient memory allocation: The application has run out of memory. Try using the -b (local buffer size) option, or modify autoexec.bat and config.sys and comment out devices, TSR’s, etc.
Serving Data with Timestamps in the File Names
This handler can read data stored in files that incorporate data strings in their names. This feature was added to support serving data produced and hosted by Remote Sensing Systems (RSS) and while the run-time parameters bear the name of that organization, they can be used for any data that fit the naming conventions they have developed. The naming convention is as follows:
- The convention
-
+ '_' + <date_string> + <version> + [_d3d]
- Daily data
-
When <date_string> includes YYYYMMDDVV, the file contains daily data.
- Averaged data
-
When <date_string> only includes YYYYMMVV (no DD), or includes (DD) and optional _d3d then the file contains averaged data.
For daily data the format file should be named <data source>_daily.fmt while averaged data should be named <data source>_averaged.fmt.
To use this feature, set the run-time parameter FF.RSSFormatSupport to yes or true. If you store the format files (and optional ancillary DAS files) in a directory other than the data, use the parameter FF.RSSFormatFiles to name that other directory. Like all handler run-time configuration parameters, these can go in either the bes.conf or ff.conf file. Here’s an example sniplet from ff.conf showing how these are used:
# # Data Handler Specific key/value parameters # FF.RSSFormatSupport = yes FF.RSSFormatFiles = /usr/local/RSS
Appendix C: S3 Support
DMR++ provides direct access to data in S3, and we have made significant advances to supporting HDF5 files in the DMR++ builder and interpreter. We still have two gaps: support for certain Compound variables and support for some kinds of string arrays. This new release of Hyrax brings support for direct I/O transfers from HDF5 to NetCDF4 when using DMR++ .
We have added generic Memory and File caching, tailored specifically toward the cases that arise when serving data from S3 using the DMR++ system. We have added a BES module that can work with S3 using the DMR++ system. This provides a data flow that is similar to the one we provide for Hyrax in the Cloud as developer for NASA, but this new module does not make use of the NASA/ESDIS CMR system to resolve ‘NASA Granules’ to URLs. This will enable other groups to use the DMR++ system to serve data from S3.
We improved the performance of finding the effective URL for a data item when it is accessed via a series of redirect operations, the last of which is a signed AWS URL. This is a common case for data stored in S3.
We have added generic Memory and File caching, tailored specifically toward the cases that arise when serving data from S3 using the DMR++ system.
The BES can sign S3 URLs using the AWS V4 signing scheme. This uses the Credentials Manager system.
As of 1.16.8, we have added experimental support for DMR++ Aggregations in which multi file aggregations can be described in a single DMR++ file, reaping all of the efficiency benefits (and pitfalls) of DMR++ . Furthermore, Hyrax can generate signed S3 requests when processing DMR++ files whose data content live in S3 when the correct credentials are provided (injected) into the server.
Hyrax now implements lazy evaluation of DMR++ files. This change greatly improves efficiency/speed for requests that subset a dataset that contains a large number of variables as only the variables requested will have their Chunk information read and parsed.
Added version and configuration information to dmr files built using the `build_dmrpp` and get_dmrpp applications. This will enable people to recreate and understand the conditions which resulted in a particular + DMR + instance. This also includes a -z switch for get_dmrpp which will return its version.
The DMR++ production chain: get_dmrpp, build_dmrpp, check_dmrpp, merge_dmrpp, and reduce_mdf received the following updates:
-
Support for injecting configuration modifications to allow fine tuning of the dataset representation in the produced DMR++ file.
-
Optional creation and injection of missing (domain coordinate) data as needed.
-
Endian information carried in Chunks.
-
Updated command line options and help page.
Lastly, we have added support for S3 hosted granules to get_dmrpp. Added regression test suite for get_dmrpp.
Improved S3 reliability by adding retry efforts for common S3 error responses that indicate a retry is worth pursuing (because S3 just fails sometimes and a retry is suggested). We have also added caching of S3 “effective” URLs obtained from NGAP service chain.
For more on DMR++ , read the DMR++ wiki.
Appendix D: Aggregation
Often it is desirable to treat a collection of data files as if they were a single dataset. Hyrax provides two different ways to do this: it enables data providers to define aggregations of files so those appear as a single dataset and it provides a way for users to send the server a list of files along with processing operations and receive a single amalgamated response.
In the first half of this appendix, we discuss aggregations defined by data providers. These aggregations use a simple mark-up language called NCML, first defined by Unidata as a way to work with NetCDF files. Both Hyrax and the THREDDS Data Server use NCML as a tool to describe how data files can be combined to aggregated data sets. In the second part of this appendix, we discuss user-specified aggregations. These aggregations currently use a new interface to the Hyrax server.
10.D.1. The NcML Module
Introduction
| In the past Hyrax was distributed as a collection of separate binary packages which data providers would choose to install to build up a server with certain features. As the number of modules grew, this became more and more complex and time consuming. As of Hyrax 1.12 we started distributing the server in three discreet packages - the DAP library, the BES daemon and all of the most important handlers (including the NcML handler described here) and the Hyrax web services front end. In some places in this documentation you may read about 'installing the handler' or other similar text, and can safely ignore that. If you have a modern version of the server it includes this handler. |
Features
This version currently implements a subset of NcML 2.2 functionality, along with some OPeNDAP extensions:
-
Metadata Manipulation
-
Addition, Removal, and Modification of attributes to other datasets (NetCDF, HDF4, HDF5, etc.) served by the same Hyrax 1.6 server
-
Extends NcML 2.2 to allow for common nested "attribute containers"
-
Attributes can be DAP2 types as well as the NcML types
-
Attributes can be of the special "OtherXML" type for injecting arbitrary XML into a DDX response
-
-
Data Manipulation
-
Addition of new data variables (scalars or arrays of basic types as well as structures)
-
Variables may be removed from the wrapped dataset
-
Allows the creation of "pure virtual" datasets which do not wrap another dataset
-
-
Aggregations: JoinNew, JoinExisting, and Union:
-
-
Allows multiple datasets to be "joined" by creating a new outer dimension for the aggregated variable
-
Aggregation member datasets can be listed explicitly with explicit coordinates for the new dimension for each member
-
Scan: Aggregations can be specified "automatically" by scanning a directory for files matching certain criteria, such as a suffix or regular expression.
-
Metadata may be added to the new coordinate variable for the new dimension
-
-
-
The ncoords element can be left out of the joinexisting granules. However, this may be a slow operation, depending on the number of granules in the aggregation.
-
Scan may also be used with ncoords attribute for uniform sized granules
-
Only allows join dimension to be aggregated from granules and not overridden in NcML
-
-
-
Merges all member datasets into one by taking the first named instance of variables and metadata from the members
-
Useful for combining two or more datasets with different variables into a single set
-
-
Configuration Parameters
TempDirectory
Where should the NCML handler store temporary data on the server’s file system.
Default value is '/tmp'.
NCML.TempDirectory=/tmp
GlobalAttributesContainerName
In DAP2 all global attributes must be held in containers. However, the default behavior for the handler is set for DAP4, where this requirement is relaxed so that any kind of attribute can be a global attribute. However, to support older clients that only understand DAP2, the handler will bundle top-level non-container attributes into a container. Use this option to set the name of that container. By default, the container is named NC_GLOBAL (because lots of clients look for that name), but it can be anything you choose.
NCML.GlobalAttributesContainerName=NC_GLOBAL
Testing Installation
Test data is provided to see if the installation was successful. The file sample_virtual_dataset.ncml is a dataset purely created in NcML and doesn’t contain an underlying dataset. You may also view fnoc1_improved.ncml to test adding attributes to an existing netCDF dataset (fnoc1.nc), but this requires the netCDF data handler to be installed first! Several other examples installed also use the HDF4 and HDF5 handlers.
Functionality
This version of the NcML Module implements a subset of NcML 2.2 functionality.
Our module can currently…
-
Refer only to files being served locally (not remotely)
-
Add, modify, and remove attribute metadata to a dataset
-
Create a purely virtual dataset using just NcML and no underlying dataset
-
Create new scalar variables of any simple NcML type or simple DAP type
-
Create new Structure variables (which can contain new child variables)
-
Create new N-dimensional arrays of simple types (NcML or DAP)
-
Remove existing variables from a wrapped dataset
-
Rename existing variables in a wrapped dataset
-
Name dimensions as a mnemonic for specifying Array shapes
-
Perform union aggregations on multiple datasets, virtual or wrapped or both
-
Perform joinNew aggregations to merge a variable across multiple datasets by creating a new outer dimension
-
Specify aggregation member datasets by scanning directories for files matching certain criteria
We describe each supported NcML element in detail below.
<netcdf> Element
The <netcdf> element is used to define a dataset, either a wrapped dataset that is to be modified, a pure virtual dataset, or a member dataset of an aggregation. The <netcdf> element is assumed to be the topmost node, or as a child of an aggregation element.
The location attribute (netcdf@location) can be used to reference either
local or remote files. If the value of netcdf@location does not begin
with the string http then the value is interpreted as a path to dataset
relative to the BES data root directory. However, if the value of the
netcdf@location attributte begins with http then the value is treated
as a URL and the Gateway System is used to access the remote data. As a
result any URL used in an netcdf@location attribute value must match one
of the Gateway.Whitelist expressions in the bes.conf stack.
If the value of netcdf@location is the empty string (or unspecified, as empty is the default), the dataset is a pure virtual dataset, fully specified within the NcML file itself. Attributes and variables may be fully described and accessed with constraints just as normal datasets in this manner. The installed sample datafile "sample_virtual_dataset.ncml" is an example test case for this functionality.
The current version does not support the following attributes of <netcdf>:
-
enhance
-
addRecords
-
fmrcDefinition (will be supported when FMRC aggregation is added)
<readMetadata> Element
The <readMetadata/> element is the default, so is effectively not needed.
<explicit> element
The <explicit/> element simply clears all attribute tables in the referred to netcdf@location before applying the rest of the NcML transformations to the metadata.
<dimension> Element
The <dimension> element has limited functionality in this release since the DAP2 doesn’t support dimensions as more than mnemonics at this time. The limitations are:
-
We only parse the dimension@name and dimension@length attributes.
-
Dimensions can only be specified as a direct child of a <netcdf> element prior to any reference to them
For example…
<netcdf> <dimension name="station" length="2"/> <dimension name="samples" length="5"/> <!-- Some variable elements refer to the dimensions here --> </netcdf>
The dimension element sets up a mapping from the name to the unsigned integer length and can be used in a variable@shape to specify a length for an array dimension (see the section on <variable> below). The dimension map is cleared when </netcdf> is encountered (though this doesn’t matter currently since we allow only one right now, but it will matter for aggregation, potentially). We also do not support <group>, which is the only other legal place in NcML 2.2 for a dimension element.
Parse Errors:
-
If the name and length are not both specified.
-
If the dimension name already exists in the current scope
-
If the length is not an unsigned integer
-
If any of the other attributes specified in NcML 2.2 are used. We do not handle them, so we consider them errors now.
<variable> Element
The <variable> element is used to:
-
Provide lexical scope for a contained <attribute> or <variable> element
-
Rename existing variables
-
Add new scalar variables of simple types
-
Add new Structure variables
-
Add new N-dimensional Array’s of simple types
-
Specify the coordinate variable for the new dimension in a joinNew aggregation
We describe each in turn in more detail.
| When working with an existing variable (array or otherwise) it is not required that the variable type be specified in it' NcML declaration. All that is needed is the correct name (in lexical scope). When specifying the type for an existing variable care must be taken to ensure that the type specified in the NcML document matches the type of the existing variable. In particular, variables that are arrays must be called array, and not the type of the template primitive. |
Consider the following example:
<variable name="u">
<attribute name="Metadata" type="string">This is metadata!</attribute>
</variable>
This code assumes that a variable named "u" exists (of any type since we do not specify) and provides the lexical scope for the attribute "Metadata" which will be added or modified within the attribute table for the variable "u" (it’s qualified name would be "u.Metadata").
Scoping variable elements may be nested if the containing variable is a Structure (this includes the special case of Grid)
<variable name="DATA_GRANULE" type="Structure">
<variable name="PlanetaryGrid" type="Structure">
<variable name="percipitate">
<attribute name="units" type="String" value="inches"/>
</variable>
</variable>
</variable>
This adds a "unit" attribute to the variable "percipitate" within the nested Structure’s ("DATA_GRANULE.PlanetaryGrid.percipitate" as fully qualified name). Note that we must refer to the type explicitly as a "Structure" so the parser knows to traverse the tree.
| The variable might be of type Grid, but the type "Structure" must be used in the NcML to traverse it. |
Once the variable’s scope is set by the opening <variable> element, more than one attribute can be specified within it. This will make the NcML more readable and also will make the parsing more efficient since the variable will only need to be looked up once.
For example…
<variable name="Foo"> <attribute name="Attr_1" type="string" value="Hello"/> <attribute name="Attr_2" type="string" value="World!"/> </variable>
…should be preferred over…
<variable name="Foo"> <attribute name="Attr_1" type="string" value="Hello"/> </variable> <variable name="Foo"> <attribute name="Attr_2" type="string" value="World!"/> </variable>
…although they produce the same result. Any number of attributes can be specified before the variable is closed.
The attribute variable@orgName is used to rename an existing variable.
For example…
<variable name="NewName" orgName="OldName"/>
…will rename an existing variable at the current scope named "OldName" to "NewName". After this point in the NcML file (such as in constraints specified for the DAP request), the variable is known by "NewName".
Note that the type is not required here --- the variable is assumed to exist and its existing type is used. It is not possible to change the type of an existing variable at this time!
Parse Errors:
-
If a variable with variable@orgName doesn’t exist in the current scope
-
If the new name variable@name is already taken in the current scope
-
If a new variable is created but does not have exactly one values element
The <variable> element can be used to create a new scalar variable of a simple type (i.e. an atomic NcML type such as "int" or "float", or any DAP atomic type, such as "UInt32" or "URL") by specifying an empty variable@shape (which is the default), a simple type for variable@type, and a contained <values> element with the one value of correct type.
For example…
<variable name="TheAnswerToLifeTheUniverseAndEverything" type="double">
<attribute name="SolvedBy" type="String" value="Deep Thought"/>
<values>42.000</values>
</variable>
…will create a new variable named "TheAnswerToLifeTheUniverseAndEverything" at the current scope. It has no shape so will be a scalar of type "double" and will have the value 42.0.
Parse Errors:
-
It is a parse error to not specify a <values> element with exactly one proper value of the variable type.
-
It is a parse error to specify a malformed or out of bounds value for the data type
A new Structure variable can be specified at the global scope or within another Structure. It is illegal for an array to have type structure, so the shape must be empty.
For example…
<variable name="MyNewStructure" type="Structure">
<attribute name="MetaData" type="String" value="This is metadata!"/>
<variable name="ContainedScalar1" type="String"><values>I live in a new structure!</values></variable>
<variable name="ContainedInt1" type="int"><values>42</values></variable>
</variable>
…specifies a new structure called "MyNewStructure" which contains two scalar variable fields "ContainedScalar1" and "ContainedInt1".
Nested structures are allowed as well.
Parse Error:
-
If another variable or attribute exists at the current scope with the new name.
-
If a <values> element is specified as a direct child of a new Structure --- structures cannot contain values, only attributes and other variables.
An N-dimensional array of a simple type may be created virtually as well by specifying a non-empty variable@shape. The shape contains the array dimensions in left-to-right order of slowest varying dimension first. For example…
<variable name="FloatArray" type="float" shape="2 5">
<!-- values specified in row major order (leftmost dimension in shape varies slowest)
Any whitespace is a valid separator by default, so we can use newlines to pretty print 2D matrices.
-->
<values>
0.1 0.2 0.3 0.4 0.5
1.1 1.1 1.3 1.4 1.5
</values>
</variable>
…will specify a 2x5 dimension array of float values called "FloatArray". The <values> element must contain 2x5=10 values in row major order (slowest varying dimension first). Since whitespace is the default separator, we use a newline to show the dimension boundary for the values, which is easy to see for a 2D matrix such as this.
A dimension name may also be used to refer mnemonically to a length. The DAP response will use this mnemonic in its output, but it is not currently used for shared dimensions, only as a mnemonic. See the section on the <dimension> element for more information. For example…
<netcdf>
<dimension name="station" length="2"/>
<dimension name="sample" length="5"/>
<variable name="FloatArray" type="float" shape="station sample">
<values>
0.1 0.2 0.3 0.4 0.5
1.1 1.1 1.3 1.4 1.5
</values>
</variable>
…will produce the same 2x5 array, but will incorporate the dimension mnemonics into the response. For example, here’s the DDS response:
Dataset {
Float32 FloatArray[station = 2][samples = 5];
} sample_virtual_dataset.ncml;
Note that the <values> element respects the values@separator attribute if whitespace isn’t correct. This is very useful for arrays of strings with whitespace, for example…
<variable name="StringArray" type="string" shape="3"> <values separator="*">String 1*String 2*String 3</values> </variable>
…creates a length 3 array of string StringArray = \{"String 1", "String 2", "String 3"}.
Parse Errors:
-
It is an error to specify the incorrect number of values
-
It is an error if any value is malformed or out of range for the data type.
-
It is an error to specify a named dimension which does not exist in the current <netcdf> scope.
-
It is an error to specify an Array whose flattened size (product of dimensions) is > 2^31-1.
In the special case of a joinNew aggregation, the new coordinate variable may be specified with the <variable> element. The new coordinate variable is defined to have the same name as the new dimension. This allows for several things:
-
Explicit specification of the variable type and coordinates for the new dimension
-
Specification of the metadata for the new coordinate variable
In the first case, the author can specify explicitly the type of the new coordinate variable and the actual values for each dataset. In this case, the variable must be specified after the aggregation element in the file so the new dimension’s size (number of member datasets) may be known and error checking performed. Metadata can also be added to the variable here.
In the second case, the author may just specify the variable name, which allows one to specify the metadata for a coordinate variable that is automatically generated by the aggregation itself. This is the only allowable case for a variable element to not contain a values element! Coordinate variables are generated automatically in two cases:
-
The author has specified an explicit list of member datasets, with or without explicit coordVal attributes.
-
The author has used a <scan> element to specify the member datasets via a directory scan
In this case, the <variable> element may come before or after the <aggregation>.
Parse Errors:
-
If an explicit variable is declared for the new coordinate variable:
-
And it contains explicit values, the number of values must be equal to the number of member datasets in the aggregation.
-
It must be specifed after the <aggregation> element
-
-
If a numeric coordVal is used to specify the first member dataset’s coordinate, then all datasets must contain a numerical coordinate.
-
An error is thrown if the specified aggregation variable (variableAgg) is not found in all member datasets.
-
An error is thrown if the specified aggregation variable is not of the same type in all member datasets. Coercion is not performed!
-
An error is thrown if the specified aggregation variables in all member datasets do not have the same shape
-
An error is thrown if an explicit coordinate variable is specified with a shape that is not the same as the new dimension name (and the variable name itself).
<values> Element
The <values> element can only be used in the context of a new variable of scalar or array type. We cannot change the values for existing variables in this version of the handler. The characters content of a <values> element is considered to be a separated list of value tokens valid for the type of the variable of the parent element. The number of specified tokens in the content must equal the product of the dimensions of the enclosing variable@shape, or be one value for a scalar. It is an error to not specify a <values> element for a declared new variable as well.
The author may specify values@separator to change the default value token separator from the default whitespace. This is very useful for specifying arrays of strings with whitespace in them, or if data in CSV form is being pasted in.
We also can parse values@start and values@increment INSTEAD OF tokens in the content. This will "autogenerate" a uniform array of values of the given product of dimensions length for the containing variable. For example:
<variable name="Evens" type="int" shape="100"> <values start="0" increment="2"/> </variable>
will specify an array of the first 100 even numbers (including 0).
Parse Errors:
-
If the incorrect number of tokens are specified for the containing variable’s shape
-
If any value token cannot be parsed as a valid value for the containing variable’s type
-
If content is specified in addition to start and increment
-
If only one of start or increment is specified
-
If the values element is placed anywhere except within a NEW variable.
<attribute> Element
As an overview, whenever the parser encounters an <attribute> with a non-existing name (at the current scope), it creates a new one, whether a container or atomic attribute (see below). If the attribute exists, its value and/or type is modified to those specified in the <attribute> element. If an attribute structure (container) exists, it is used to define a nested lexical scope for child attributes.
Attributes may be scalar (one value) or one dimensional arrays. Arrays are specified by using whitespace (default) to separate the different values. The attribute@separator may also be set in order to specify a different separator, such as CSV format or to specify a non-whitespace separator so strings with whitespace are not tokenized. We will give examples of creating array attributes below.
If a specified attribute with the attribute@name does not exist at the current lexical scope, a new one is created with the given type and value. For example, assume "new_metadata" doesn’t exist at the current parse scope. Then…
<attribute name="new_metadata" type="string" value="This is a new entry!"/>
…will create the attribute at that scope. Note that value can be specified in the content of the element as well. This is identical to the above:
<attribute name="new_metadata" type="string">This is a new entry!</attribute>
If the attribute@name already exists at the scope, it is modified to contain the specified type and value.
As in NcML, for numerical types an array can be specified by separating the tokens by whitespace (default) or be specifying the token separator with attribute@separator. For example…
<attribute name="myArray" type="int">1 2 3</attribute>
…and…
<attribute name="myArray" type="int" separator=",">1,2,3</attribute>
…both specify the same array of three integers named "myArray".
TODO Add more information on splitting with a separator!
We use attribute@type="Structure" to define a new (or existing) attribute container. So if we wanted to add a new attribute structure, we’d use something like this:
<attribute name="MySamples" type="Structure">
<attribute name="Location" type="string" value="Station 1"/>
<attribute name="Samples" type="int">1 4 6</attribute>
</attribute>
Assuming "MySamples" doesn’t already exist, an attribute container will be created at the current scope and the "Location" and "Samples" attributes will be added to it.
Note that we can create nested attribute structures to arbitrary depth this way as well.
If the attribute container with the given name already exists at the current scope, then the attribute@type="Structure" form is used to define the lexical scope for the container. In other words, child <attribute> elements will be processed within the scope of the container. For example, in the above example, if "MySamples" already exists, then the "Location" and "Samples" will be processed within the existing container (they may or may not already exist as well).
We also support the attribute@orgName attribute for renaming attributes.
For example…
<attribute name="NewName" orgName="OldName" type="string"/>
will rename an existing attribute "OldName" to "NewName" while leaving its value alone. If attribute@value is also specified, then the attribute is renamed and has its value modified.
This works for renaming attribute containers as well:
<attribute name="MyNewContainer" orgName="MyOldContainer" type="Structure"/>
…will rename an existing "MyOldContainer" to "MyNewContainer". Note that any children of this container will remain in it.
The module now allows specification of attributes of the new DAP type "OtherXML". This allows the NCML file author to inject arbitrary well-formed XML into an attribute for clients that want XML metadata rather than just string or url. Internally, the attribute is still a string (and in a DAP DAS response will be quoted inside one string). However, since it is XML, the NCMLParser still parses it and checks it for well-formedness (but NOT against schemas). This extension allows the NCMLParser to parse the arbitrary XML within the given attribute without causing errors, since it can be any XML.
The injected XML is most useful in the DDX response, where it shows up directly in the response as XML. XSLT and other clients can then parse it.
-
The XML must be in the content of the <attribute type="OtherXML"> element. It is a parser error for attribute@value to be set if attribute@type is "OtherXML".
-
The XML must also be well-formed since it is parsed. A parse error will be thrown if the OtherXML is malformed.
Here’s an example of the use of this special case:
<netcdf xmlns="http://www.unidata.ucar.edu/namespaces/netcdf/ncml-2.2" location="/coverage/200803061600_HFRadar_USEGC_6km_rtv_SIO.nc">
<attribute name="someName" type="OtherXML">
<Domain xmlns="http://www.opengis.net/wcs/1.1"
xmlns:ows="http://www.opengis.net/ows/1.1"
xmlns:gml="http://www.opengis.net/gml/3.2"
>
<SpatialDomain>
<ows:BoundingBox crs="urn:ogc:def:crs:EPSG::4326">
<ows:LowerCorner>-97.8839 21.736</ows:LowerCorner>
<ows:UpperCorner>-57.2312 46.4944</ows:UpperCorner>
</ows:BoundingBox>
</SpatialDomain>
<TemporalDomain>
<gml:timePosition>2008-03-27T16:00:00.000Z</gml:timePosition>
</TemporalDomain>
</Domain>
<SupportedCRS xmlns="http://www.opengis.net/wcs/1.1">urn:ogc:def:crs:EPSG::4326</SupportedCRS>
<SupportedFormat xmlns="http://www.opengis.net/wcs/1.1">netcdf-cf1.0</SupportedFormat>
<SupportedFormat xmlns="http://www.opengis.net/wcs/1.1">dap2.0</SupportedFormat>
</attribute>
</netcdf>
TODO: Put the DDX response for the above in here!
Furthermore, the parser will make the chunk of OtherXML "namespace closed". This means any namespaces specified in parent NCML elements of the OtherXML tree will be "brought down" and added to the root OtherXML elements so that the subtree may be pulled out and added to the DDX and still have its namespaces. The algorithm doesn’t just bring used prefixes, but brings all of the lexically scoped closest namespaces in all ancestors. In other words, it adds unique namespaces (as determined by prefix) in order from the root of the OtherXML tree as it traverses to the root of the NCML document.
Namespace closure is a syntactic sugar that simplifies the author’s task since they can specify the namespaces just once at the top of the NCML file and expect that when the subtree of XML is added to the DDX that these namespaces will come along with that subtree of XML. Otherwise they have to explicitly add the namespaces to each attributes.
TODO Add an example!
<remove> Element
The <remove> element can remove attributes and variables. For example…
<attribute name="NC_GLOBAL" type="Structure">
<remove name="base_time" type="attribute"/>
</attribute>
…will remove the attribute named "base_time" in the attribute structure named "NC_GLOBAL".
Note that this works for attribute containers as well. We could recursively remove the entire attribute container (i.e. it and all its children) with:
<remove name="NC_GLOBAL" type="attribute"/>
It also can be used to remove variables from existing datasets:
<remove name="SomeExistingVariable" type="variable"/>
This also recurses on variables of type Structure --- the entire structure including all of its children are removed from the dataset’s response.
Parse Errors:
-
It is a parse error if the given attribute or variable doesn’t exist in the current scope
<aggregation> Element
| The syntax used by Hyrax is slightly different from the THREDDS Data Server (TDS). In particular, we do not process the <aggregation> element prior to other elements in the dataset, so in some cases the relative ordering of the <aggregation> and references to variables within the aggregation matters. |
Aggregation involves combining multiple datasets (<netcdf>) into a virtual "single" dataset in various ways. For a tutorial on aggregation in NcML 2.2, the reader is referred to the Unidata page: http://www.unidata.ucar.edu/software/netcdf/ncml/v2.2/Aggregation.html
NcML 2.2 supports multiple types of aggregation: union, joinNew, joinExisting, and fmrc (forecast model run collection).
The current version of the NcML module supports two of these aggregations:
-
JoinNew NCML_Module_Aggregation_JoinNew
A union aggregation specifies that the first instance of a variable or attribute (by name) that is found in the ordered list of datasets will be the one in the output aggregation. This is useful for combining two dataset files, each which may contain a single variable, into a composite dataset with both variables.
A JoinNew aggregation joins a variable which exists in multiple datasets (usually samples of a datum over time) into a new variable containing the data from all member datasets by creating a new outer dimension. The ith component in the new outer dimension is the variable’s data from the ith member dataset. It also adds a new coordinate variable of whose name is the new dimension’s name and whose shape (length) is the new dimension as well. This new coordinate variable may be explicitly given by the author or may be autogenerated in one of several ways.
<scan> Element
The scan element can be used within an aggregation context to allow a directory to be searched in various ways in order to specify the members of an aggregation. This allows a static NcML file to refer to an aggregation which may change over time, such as where a new data file is generated each day.
Errors
There are three types of error messages that may be returned:
-
Internal Error
-
Resource Not Found Error
-
Parse Error
Internal Errors
Internal errors should be reported to support@opendap.org as they are likely bugs.
Resource Not Found Errors
If the netcdf@location specifies a non-existent local dataset (one that is not being served by the same Hyrax server), it will specify the resource was not found. This may also be returned if a handler for the specified dataset is not currently loaded in the BES. Users should test that the dataset to be wrapped already exists and can be viewed on the running server before writing NcML to add metadata. It’s also an error to refer to remote datasets (at this time).
Parse Errors
Parse errors are user errors in the NcML file. These could be malformed XML, malformed NcML, unimplemented features of NcML, or could be errors in referring to the wrapped dataset.
The error message should specify the error condition as well as the "current scope" as a fully qualified DAP name within the loaded dataset. This should be enough information to correct the parse error as new NcML files are created.
The parser will generate parse errors in various situations where it expects to find certain structure in the underlying dataset. Some examples:
-
A variable of the given name was not found at the current scope
-
attribute@orgName was specified, but the attribute cannot be found at current scope.
-
attribute@orgName was specified, but the new name is already used at current scope.
-
remove specified a non-existing attribute name
Additions/Changes to NcML 2.2
This section will keep track of changes to the NcML 2.2 schema. Eventually these will be rolled into a new schema.
Attribute Structures (Containers)
This module also adds functionality beyond the current NcML 2.2 schema --- it can handle nested <attribute> elements in order to make attribute structures. This is done by using the <attribute type="Structure"> form, for example:
<attribute name="MySamples" type="Structure">
<attribute name="Location" type="string" value="Station 1"/>
<attribute name="Samples" type="int">1 4 6</attribute>
</attribute>
"MyContainer" describes an attribute structure with two attribute fields, a string "Location" and an array of int’s called "Samples". Note that an attribute structure of this form can only contain other <attribute> elements and NOT a value.
If the container does not already exist, it will be created at the scope it is declared, which could be:
-
Global (top of dataset)
-
Within a variable’s attribute table
-
Within another attribute container
If an attribute container of the given name already exists at the lexical scope, it is traversed in order to define the scope for the nested (children) attributes it contains.
Unspecified Variable Type Matching for Lexical Scope
We also allow the type attribute of a variable element (variable@type) to be the empty string (or unspecified) when using existing variables to define the lexical scope of an <attribute> transformation. In the schema, variable@type is (normally) required.
DAP 2 Types
Additionally, we allow DAP2 atomic types (such as UInt32, URL) in addition to the NcML types. The NcML types are mapped onto the closest DAP2 type internally.
DAP OtherXML Attribute Type
We also allow attributes to be of the new DAP type "OtherXML" for injecting arbitrary XML into an attribute as content rather than trying to form a string. This allows the parser to check well-formedness.
Forward Declaration of Dimensions
Since we use a SAX parser for efficiency, we require the <dimension> elements to come before their use in a variable@shape. One way to change the schema to allow this is to force the dimension elements to be specified in a sequence after explicit and metadata choice and before all other elements.
Aggregation Element Location and Processing Order Differences
NcML specifies that if a dataset (<netcdf> element) specifies an aggregation element, the aggregation element is always processed first, regardless of its ordering within the <netcdf> element. Our parser, since it is SAX and not DOM, modifies this behavior in that order matters in some cases:
-
Metadata (<attribute>) elements specified prior to an aggregation "shadow" the aggregation versions. This is be useful for "overriding" an attribute or variable in a union aggregation, where the first found will take precedence.
-
JoinNew: If the new coordinate variable’s data is to be set explicitly by specifying the new dimension’s shape (either with explicit data or the autogenerated data using values@start and values@increment attributes), the <variable> must come after the aggregation since the size of the dimension is unknown until the aggregation element is processed.
Backward Compatibility Issues
Due to the way shared dimensions were implemented in the NetCDF, HDF4, and HDF5 handlers, the DAS responses did not follow the DAP2 specification. The NcML module, on the other hand, generates DAP2 compliant DAS for these datasets, which means that wrapping some datasets in NcML will generate a DAS with a different structure. This is important for the NcML author since it changes the names of attributes and variables. In order for the module to find the correct scope for adding metadata, for example, the DAP2 DAS must be used.
In general, what this means is that an empty "passthrough" NcML file should be the starting point for authoring an NcML file. This file would just specify a dataset and nothing else:
<netcdf location="/data/ncml/myNetcdf.nc"/>
The author would then request the DAS response for the NCML file and use that as the starting point for modifications to the original dataset.
More explicit examples are given below.
NetCDF
The NetCDF handler represents some NC datasets as a DAP 2 Grid, but the returned DAS is not consistent with the DAP 2 spec for the attribute hierarchy for such a Grid. The map vector attributes are placed as siblings of the grid attributes rather than within the grid lexical scope. For example, here’s the NetCDF Handler DDS for a given file:
Dataset {
Grid {
Array:
Int16 cldc[time = 456][lat = 21][lon = 360];
Maps:
Float64 time[time = 456];
Float32 lat[lat = 21];
Float32 lon[lon = 360];
} cldc;
} cldc.mean.nc;
…showing the Grid. Here’s the DAS the NetCDF handler generates…
Attributes {
lat {
String long_name "Latitude";
String units "degrees_north";
Float32 actual_range 10.00000000, -10.00000000;
}
lon {
String long_name "Longitude";
String units "degrees_east";
Float32 actual_range 0.5000000000, 359.5000000;
}
time {
String units "days since 1-1-1 00:00:0.0";
String long_name "Time";
String delta_t "0000-01-00 00:00:00";
String avg_period "0000-01-00 00:00:00";
Float64 actual_range 715511.00000000000, 729360.00000000000;
}
cldc {
Float32 valid_range 0.000000000, 8.000000000;
Float32 actual_range 0.000000000, 8.000000000;
String units "okta";
Int16 precision 1;
Int16 missing_value 32766;
Int16 _FillValue 32766;
String long_name "Cloudiness Monthly Mean at Surface";
String dataset "COADS 1-degree Equatorial Enhanced\\012AI";
String var_desc "Cloudiness\\012C";
String level_desc "Surface\\0120";
String statistic "Mean\\012M";
String parent_stat "Individual Obs\\012I";
Float32 add_offset 3276.500000;
Float32 scale_factor 0.1000000015;
}
NC_GLOBAL {
String title "COADS 1-degree Equatorial Enhanced";
String history "";
String Conventions "COARDS";
}
DODS_EXTRA {
String Unlimited_Dimension "time";
}
}
Note the map vector attributes are in the "dataset" scope.
Here’s the DAS that the NcML Module produces from the correctly formed DDX:
Attributes {
NC_GLOBAL {
String title "COADS 1-degree Equatorial Enhanced";
String history "";
String Conventions "COARDS";
}
DODS_EXTRA {
String Unlimited_Dimension "time";
}
cldc {
Float32 valid_range 0.000000000, 8.000000000;
Float32 actual_range 0.000000000, 8.000000000;
String units "okta";
Int16 precision 1;
Int16 missing_value 32766;
Int16 _FillValue 32766;
String long_name "Cloudiness Monthly Mean at Surface";
String dataset "COADS 1-degree Equatorial Enhanced\\012AI";
String var_desc "Cloudiness\\012C";
String level_desc "Surface\\0120";
String statistic "Mean\\012M";
String parent_stat "Individual Obs\\012I";
Float32 add_offset 3276.500000;
Float32 scale_factor 0.1000000015;
cldc {
}
time {
String units "days since 1-1-1 00:00:0.0";
String long_name "Time";
String delta_t "0000-01-00 00:00:00";
String avg_period "0000-01-00 00:00:00";
Float64 actual_range 715511.00000000000, 729360.00000000000;
}
lat {
String long_name "Latitude";
String units "degrees_north";
Float32 actual_range 10.00000000, -10.00000000;
}
lon {
String long_name "Longitude";
String units "degrees_east";
Float32 actual_range 0.5000000000, 359.5000000;
}
}
}
Here the Grid Structure "cldc" and its contained data array (of the same name "cldc") and map vectors have their own attribute containers as DAP 2 specifies.
What this means for the author of an NcML file adding metadata to a NetCDF dataset that returns a Grid is that they should generate a "passthrough" file and get the DAS and then specify modifications based on that structure.
Here’s an example passthrough:
<netcdf location="data/ncml/agg/cldc.mean.nc" title="This file results in a Grid"> </netcdf>
For example, to add an attribute to the map vector "lat" in the above, we’d need the following NcML:
<netcdf location="data/ncml/agg/cldc.mean.nc" title="This file results in a Grid">
<!-- Traverse into the Grid as a Structure -->
<variable name="cldc" type="Structure">
<!-- Traverse into the "lat" map vector (Array) -->
<variable name="lat">
<attribute name="Description" type="string">I am a new attribute in the Grid map vector named lat!</attribute>
</variable>
<variable name="lon">
<attribute name="Description" type="string">I am a new attribute in the Grid map vector named lon!</attribute>
</variable>
</variable>
</netcdf>
This clearly shows that the structure of the Grid must be used in the NcML: the attribute being added is technically "cldc.lat.Description" in a fully qualified name. The parser would return an error if it was attempted as "lat.Description" as the NetCDF DAS for the original file would have led one to believe.
HDF4/HDF5
Similarly to the NetCDF case, the Hyrax HDF4 Module produces DAS responses that do not respect the DAP2 specification. If an NcML file is used to "wrap" an HDF4 dataset, the correct DAP2 DAS response will be generated, however.
This is important for those writing NcML for HDF4 data since the lexical scope for attributes relies on the correct DAS form --- to handle this, the user should start with a "passthrough" NcML file (see the above NetCDF example) and use the DAS from that as the starting point for knowing the structure the NcML handler expects to see in the NcML file. Alternatively, the DDX has the proper attribute structure as well (the DAS is generated from it).
Known Bugs
There are no known bugs currently.
Planned Enhancements
Planned enhancements for future versions of the module include…
-
New NcML Aggregations
-
Forecast Model Run Collection (FMRC)
-
Special case of JoinNew for forecast data with two time variables
-
See: http://www.unidata.ucar.edu/software/netcdf/ncml/v2.2/FmrcAggregation.html
-
-
10.D.2. JoinNew Aggregation
Introduction
A joinNew aggregation joins existing datasets along a new outer Array dimension. Essentially, it adds a new index to the existing variable which points into the values in each member dataset. One useful example of this aggregation is for joining multiple samples of data from different times into one virtual dataset containing all the times. We will first provide a basic introduction to the joinNew aggregation, then demonstrate examples for the various ways to specify the members datasets of an aggregation, the values for the new dimension’s coordinate variable (map vector), and ways to specify metadata for this aggregation.
The reader is also directed to a basic tutorial of this NcML aggregation which may be found at http://www.unidata.ucar.edu/software/thredds/current/netcdf-java/ncml/Aggregation.html#joinNew
A joinNew aggregation combines a variable with data across n datasets by creating a new outer dimension and placing the data from aggregation member i into the element i of the new outer dimension of size n. By "outer dimension" we mean a slowest varying dimension in a row major order flattening of the data (an example later will clarify this). For example, the array A[day][sample] would have the day dimension as the outer dimension. The data samples all must have the same data syntax; specifically the DDS of the variables must all match. For example, if the aggregation variable has name sample and is a 10x10 Array of float32, then all the member datasets in the aggregation must include a variable named sample which are all also 10x10 Arrays of float32. If there were 100 datasets specified in the aggregation, the resulting DDS would contain a variable named sample that was now of data shape 100x10x10.
In addition, a new coordinate variable specifying data values for the new dimension will be created at the same scope as (a sibling of) the specified aggregation variable. For example, if the new dimension is called "filename" and the new dimension’s values are unspecified (the default), then an Array of type String will be created with one element for each member dataset --- the filename of the dataset. Additionally, if the aggregation variable was represented as a DAP Grid, this new dimension coordinate variable will also be added as a new Map vector inside the Grid to maintain the Grid specification.
There are multiple ways to specify the member datasets of a joinNew aggregation:
-
Explicit: Specifying a separate <netcdf> element for each dataset
-
Scan: scan a directory tree for files matching a conjunction of certain criteria:
-
Specific suffix
-
Older than a specific duration
-
Matching a specific regular expression
-
Either in a specific directory or recursively searching subdirectories
-
Additionally, there are multiple ways to specify the new coordinate variable’s (the new outer dimension’s associated data variable) data values:
-
Default: An Array of type String containing the filenames of the member datasets
-
Explicit Value Array: Explicit list of values of a specific data type, exactly one per dataset
-
Dynamic Array: a numeric Array variable specified using start and increment values — one value is generated automatically per dataset
-
Timestamp from Filename: An Array of String with values of ISO 8601 Timestamps extracted from scanned dataset filenames using a specified Java SimpleDataFormat string. (Only works with <scan> element!)
A Simple Self-Contained Example
First, we start with a simple purely virtual (no external datasets) example to give you a basic idea of this aggregation. This example will join two one-dimensional Arrays of int’s of length 5. The variable they describe will be called V. In this example, we assume we are joining samples of some variable V where each dataset is samples from 5 stations on a single day. We want to join the datasets so the new outer dimension is the day, resulting in a 2x5 array of int values for V.
Here’s our NcML, with comments to describe what we are doing:
<?xml version="1.0" encoding="UTF-8"?>
<!-- A simple pure virtual joinNew aggregation of type Array<int>[5][2] -->
<netcdf title="Sample joinNew Aggregation on Pure NCML Datasets">
<!-- joinNew forming new outer dimension "day" -->
<aggregation type="joinNew" dimName="day">
<!-- For variables with this name in child datasets -->
<variableAgg name="V"/>
<!-- Datasets are one-dimensional Array<int> with cardinality 5. -->
<netcdf title="Sample Slice 1">
<!-- Must forward declare the dimension size -->
<dimension name="station" length="5"/>
<variable name="V" type="int" shape="station">
<values>1 3 5 7 9</values>
</variable>
</netcdf>
<!-- Second slice must match shape! -->
<netcdf title="Sample Slice 2">
<dimension name="station" length="5"/>
<variable name="V" type="int" shape="station">
<values>2 4 6 8 10</values>
</variable>
</netcdf>
</aggregation>
<!-- This is what the expected output aggregation will look like.
We can use the named dimensions for the shape here since the aggregation
comes first and the dimensions will be added to the parent dataset by now -->
<variable name="V_expected" type="int" shape="day station">
<!-- Row major values. Since we create a new outer dimension, the slices are concatenated
since the outer dimension varies the slowest in row major order. This gives a 2x5 Array.
We use the newline to show the dimension separation for the reader's benefit -->
<values>
1 3 5 7 9
2 4 6 8 10
</values>
</variable>
</netcdf>Notice that we specify the name of the aggregation variable V inside the aggregation using a <variableAgg> element --- this allows to to specify multiple variables in the datasets to join. The new dimension, however, is specified by the attribute dimName of <aggregation>. We do NOT need to specify a <dimension> element for the new dimension (in fact, it would be an error to do so). Its size is calculated based on the number of datasets in the aggregation.
Running this file through the module produces the following DDS:
Dataset {
Int32 V[day = 2][station = 5];
Int32 V_expected[day = 2][station = 5];
String day[day = 2];
} joinNew_virtual.ncml;
Notice how the new dimension caused a coordinate variable to be created with the same name and shape as the new dimension. This array will contain the default values for the new outer dimension’s map as we shall see if we ask for the ASCII version of the DODS (data) response:
The data:
Int32 V[day = 2][station = 5] = {{1, 3, 5, 7, 9},{2, 4, 6, 8, 10}};
Int32 V_expected[day = 2][station = 5] = {{1, 3, 5, 7, 9},{2, 4, 6, 8, 10}};
String day[day = 2] = {"Virtual_Dataset_0", "Virtual_Dataset_1"};
We see that the resulting aggregation data matches what we expected to create, specified by our V_expected variable. Also, notice that the values for the coordinate variable are "Virtual_Dataset_i", where i is the number of the dataset. Since the datasets did not have the location attribute set (which would have been used if it was), the module generates unique names for the virtual datasets in the output.
We could also have specified the value for the dataset using the netcdf@coordValue attribute:
<?xml version="1.0" encoding="UTF-8"?>
<netcdf title="Sample joinNew Aggregation on Pure NCML Datasets">
<aggregation type="joinNew" dimName="day">
<variableAgg name="V"/>
<netcdf title="Sample Slice 1" coordValue="100">
<dimension name="station" length="5"/>
<variable name="V" type="int" shape="station">
<values>1 3 5 7 9</values>
</variable>
</netcdf>
<netcdf title="Sample Slice 2" coordValue="107">
<dimension name="station" length="5"/>
<variable name="V" type="int" shape="station">
<values>2 4 6 8 10</values>
</variable>
</netcdf>
</aggregation>
</netcdf>This results in the ASCII DODS of…
The data:
Int32 V[day = 2][station = 5] = {{1, 3, 5, 7, 9},{2, 4, 6, 8, 10}};
Float64 day[day = 2] = {100, 107};
Since the coordValue’s could be parsed numerically, the coordinate variable is of type double (Float64). If they could not be parsed numerically, then the variable would be of type String.
Now that the reader has an idea of the basics of the joinNew aggregation, we will create examples for the many different use cases the NcML aggregation author may wish to create.
A Simple Example Using Explicit Dataset Files
Using virtual datasets is not that common. More commonly, the aggregation author wants to specify files for the aggregation. As an introductory example of this, we’ll create a simple aggregation explicitly listing the files and giving string coordValue’s. Note that this is a contrived example: we are using the same dataset file for each member, but changing the coordValue’s. Also notice that we have specified that both the u and v variables be aggregated using the same new dimension name source.
<?xml version="1.0" encoding="UTF-8"?>
<netcdf title="joinNew Aggregation with explicit string coordValue.">
<aggregation type="joinNew" dimName="source">
<variableAgg name="u"/>
<variableAgg name="v"/>
<!-- Same dataset a few times, but with different coordVal -->
<netcdf title="Dataset 1" location="data/ncml/fnoc1.nc" coordValue="Station_1"/>
<netcdf title="Dataset 2" location="data/ncml/fnoc1.nc" coordValue="Station_2"/>
<netcdf title="Dataset 3" location="data/ncml/fnoc1.nc" coordValue="Station_3"/>
</aggregation>
</netcdf>…which produces the DDS:
Dataset {
Int16 u[source = 3][time_a = 16][lat = 17][lon = 21];
Int16 v[source = 3][time_a = 16][lat = 17][lon = 21];
Float32 lat[lat = 17];
Float32 lon[lon = 21];
Float32 time[time = 16];
String source[source = 3];
} joinNew_string_coordVal.ncml;
Since there’s so much data we only show the new coordinate variable:
String source[source = 3] = {"Station_1", "Station_2", "Station_3"};
Also notice that other coordinate variables (lat, lon, time) already existed in the datasets along with the u and v arrays. Any variable that is not aggregated over (specified as an aggregationVar) is explicitly union aggregated (please see NCML_Module_Aggregation_Union into the resulting dataset --- the first instance of every variable found in the order the datasets are listed is used.
Now that we’ve seen simple cases, let’s look at more complex examples.
Examples of Explicit Dataset Listings
In this section we will give several examples of joinNew aggregation with a static, explicit list of member datasets. In particular, we will go over examples of…
-
Default values for the new coordinate variable
-
Explicitly setting values of any type on the new coordinate variable
-
Autogenerating uniform numeric values for the new coordinate variable
-
Explicitly setting String or double values using the netcdf@coordValue attribute
There are several ways to specify values for the new coordinate variable of the new outer dimension. If String or double values are sufficient, the author may set the value for each listed dataset using the netcdf@coordValue attribute for each dataset. If another type is required for the new coordinate variable, then the author has a choice of specifying the entire new coordinate variable explicitly (which must match dimensionality of the aggregated dimension) or using the start/increment autogeneration <values> element for numeric, evenly spaced samples.
Please see the Join Explicit Dataset Tutorial.
Adding/Modifying Metadata on Aggregations
It is possible to add or modify metadata on existing or new variables in an aggregation. The syntax for these varies somewhat, so we give examples of the different cases. We will also give examples of providing metadata:
-
Adding/modifying metadata to the new coordinate variable
-
Adding/modifying metadata to the aggregation variable itself
-
Adding/modifying metadata to existing maps in an aggregated Grid
Dynamic Aggregations Using Directory Scanning
A powerful way to create dynamic aggregations (rather than by listing datasets explicitly) is by specifying a data directory where aggregation member datasets are stored and some criteria for which files are to be added to the aggregation. These criteria will be combined in a conjunction (an AND operator) to handle various types of searches. The way to specify datasets in an aggregation is by using the <scan> element inside the <aggregation> element.
A key benefit of using the <scan> element is that the NcML file need not change as new datasets are added to the aggregation, say by an automated process which simply writes new data files into a specific directory. By properly specifying the NcML aggregation with a scan, the same NcML will refer to a dynamically changing aggregation, staying up to date with current data, without the need for modifications to the NcML file itself. If the filenames have a timestamp encoded in them, the use of the dateFormatMark allows for automatic creation of the new coordinate variable data values as well, as shown below.
The scan element may be used to search a directory to find files that match the following criteria:
-
Suffix : the aggregated files end in a specific suffix, indicating the file type
-
Subdirectories: any subdirectories of the given location are to be searched and all regular files tested against the criteria
-
Older Than: the aggregated files must have been modified longer than some duration ago (to exclude files that may be currently being written)
-
Reg Exp: the aggregated file pathnames must match a specific regular expression
-
Date Format Mark: this highly useful criterion, useful in conjunction with others, allows the specification of a pattern in the filename which encodes a timestamp. The timestamp is extracted from the filenames using the pattern and is used to create ISO 8601 date elements for the new dimension’s coordinate variable.
We will give examples of each of these criteria in use in our tutorial. Again, if more than one is specified, then ALL must match for the file to be included in the aggregation.
10.D.3. JoinExisting Aggregation
Introduction
A joinExisting aggregation joins multiple granule datasets by concatenating the specified outer dimensional data from the granules into the output. This results in matrices of the same number of dimensions, but with larger outer dimension cardinality. The outer dimension sizes of the granules may vary across granule, but any inner dimensions for multi-dimensional data still are required to match.
The reader is also directed to a basic tutorial of this NcML aggregation which may be found at http://www.unidata.ucar.edu/software/netcdf/ncml/v2.2/Aggregation.html#joinExisting. Note that version 1.1.0 of the module does not support all features of joinExisting.
Content Summary
This section describes the behavior of the initial implementation of joinExisting for version 1.2.x of the NcML Module, bundled with Hyrax 1.8. It is a limited feature set described below. Please see the Limitations section for more information.
In version 1.2.x, a joinExisting aggregation may be specified in three ways:
-
Using explicit lists of netcdf elements with the the ncoords attribute correctly specified for all of them.
-
Leaving off the ncoords attribute for all of the netcdf elements.
-
Using a scan element with ncoords specified and all matching granule datasets having this dimension size
Our example below will clarify this.
Future versions of the module will implement more of the joinExisting feature set.
Examples
Here we give an example that illustrates the functionality offered by the current version of the aggregation. This example may also be found on…
…with the data granules located in
Granules
Assume we have some number of granule datasets with a DDS the same as the following (modulo the dataset name):
Dataset {
Grid {
Array:
Float32 PHssta[time = 1][altitude = 1][lat = 4096][lon = 8192];
Maps:
Float64 time[time = 1];
Float64 altitude[altitude = 1];
Float64 lat[lat = 4096];
Float64 lon[lon = 8192];
} PHssta;
} PH2006001_2006031_ssta.nc;
Explicit Listing of Granules
We see that here time is the outer dimension, which is the only dimension we may join along (it is an error to specify an inner). Given some number of granules with this same shape, consider the following explicit joinExisting aggregation:
<?xml version="1.0" encoding="UTF-8"?>
<netcdf title="joinExisting test on netcdf Grid granules">
<aggregation type="joinExisting" dimName="time" >
<!-- Note explicit use of ncoords specifying size of "time" -->
<netcdf location="/coverage/mday/PH2006001_2006031_ssta.nc" ncoords="1"/>
<netcdf location="/coverage/mday/PH2006032_2006059_ssta.nc" ncoords="1"/>
<netcdf location="/coverage/mday/PH2006060_2006090_ssta.nc" ncoords="1"/>
</aggregation>
</netcdf>Here’s the same aggregation using the scan element instead of explicitly listing each file:
<?xml version="1.0" encoding="UTF-8"?>
<netcdf title="joinExisting test on netcdf Grid granules using scan">
<aggregation type="joinExisting" dimName="time" >
<scan location="/coverage/mday/" suffix=".nc"/>
</aggregation>
</netcdf>First, note that the ncoords attribute should be specified on the individual granules for this version of the module. In many cases the handler will be more efficient if the ncoords attribute is used. Note that we also specify the dimName. Any data array whose outer dimension is called this will be subject to aggregation in the output.
Serving this from Hyrax will result in the following DDS:
Dataset {
Grid {
Array:
Float32 PHssta[time = 3][altitude = 1][lat = 4096][lon = 8192];
Maps:
Float64 time[time = 3];
Float64 altitude[altitude = 1];
Float64 lat[lat = 4096];
Float64 lon[lon = 8192];
} PHssta;
Float64 time[time = 3];
} mday_joinExist.ncml;
We see that the time dimension is now of size 3 to match that we joined three granule datasets together.
Also notice that the map vector for the joined dimension, time, has been duplicated as a sibling of the dataset. This is done automatically by the aggregation and it is copied into the actual map of the Grid. This copy is to facilitate datasets which have multiple Grid’s that are to be joined --- the top-level map vector is used as the canonical template map which is then copied into the maps for all the aggregated Grids. In the case of the joined data being of type Array, this vector would already exist as the coordinate variable for the data matrix. Since this is the source map for all aggregated Grid’s, any attribute (metadata) changes should be made explicitly on this top-level coordinate variable so that the metadata is shared among all the aggregated Grid map vectors.
Using the Scan Element
The collection of member datasets in a joinExisiting aggregation can be specified using the NcML scan element as described in the dynamic aggregation tutorial.
NcML Dimension Cache
If the scan element is used without the ncoords extension (see below),
then the first time a joinExisiting aggregation is accessed (say by
requesting it’s DDS) the BES process will open every file in the
aggregation and cache its dimension information in the NcML dimension
cache. By default the cache files are written into /tmp and the total
size of the cache is limited to a maximum size of 2GB. These settings
can be changed by modifying the ncml.conf file, typically located in
/etc/bes/modules/ncml.conf:
#-----------------------------------------------------------------------# # NcML Aggregation Dimension Cache Parameters # #-----------------------------------------------------------------------# # Directory into which the cache files will be stored. NCML.DimensionCache.directory=/tmp # Filename prefix to be used for the cache files NCML.DimensionCache.prefix=ncml_dimension_cache # This is the size of the cache in megabytes; e.g., 2,000 is a 2GB cache NCML.DimensionCache.size=2000 # Maximum number of dimension allowed in any particular dataset. # If not set in this configuration the value defaults to 100. # NCML.DimensionCache.maxDimensions=100
The cache files are small compared to the source dataset files, typically less than 1kb for a dataset with a few named dimensions. However, the cache files are numerous, one for each file used in a joinExisiting aggregation. If you have large joinExisiting aggregations, it is important to be sure that the NCML.DimensionCache.directory has space to contain the cache and that the NCML.DimensionCache.size to an appropriately large value.
Because the first access of the aggregation triggers the population of the NcML dimension cache for that aggregation the time for this first access can be significant. It may be that typical HTTP clients will timeout before that requests completes. If a client timeout occurs dimension cache may not get fully populated, however subsequent requests will cause the cache population to pick up where it was left off.
With only a modicum of effort one could write a shell program that utilizes the BES standalone functionality to pre-populate the dimension caches for large joinExisiting aggregations.
ncoords Extension
If all of the granules are of uniform dimensional size, we may also use the syntactic sugar provided by a Hyrax-specific extension to NcML — adding the ncoords attribute to a scan element. The behavior of this extension is to set the ncoords for each granule matching the scan to be this value, as if the datasets were each listed explicitly with this value of the attribute. Here’s an example of using the syntactic sugar that results in the same exact aggregation as the previous explicit one:
<?xml version="1.0" encoding="UTF-8"?>
<!-- joinExisting test on netcdf granules using scan@ncoords extension-->
<netcdf title="joinExisting test on netcdf Grid granules using scan@ncoords"
>
<attribute name="Description" type="string"
value=" joinExisting test on netcdf Grid granules using scan@ncoords"/>
<aggregation type="joinExisting"
dimName="time" >
<!-- Filenames have lexicographic and chronological ordering match -->
<scan location="/coverage/mday"
subdirs="false"
suffix=".nc"
ncoords="1"
/>
</aggregation>
</netcdf>…which we see results in the same DDS:
Dataset {
Grid {
Array:
Float32 PHssta[time = 3][altitude = 1][lat = 4096][lon = 8192];
Maps:
Float64 time[time = 3];
Float64 altitude[altitude = 1];
Float64 lat[lat = 4096];
Float64 lon[lon = 8192];
} PHssta;
Float64 time[time = 3];
} mday_joinExist.ncml;
The advantage of this is that the server does not have to inspect all of the member granules to determine their dimensional size, which allows server to manufacture responses much more quickly.
Limitations
The current version implements only basic functionality. If there is extended functionality that is needed for your use, please send <mailto:support@opendap.org> to let us know!
Join Dimension Sizes Should Be Explicitly Declared
As we have seen, the most important limitation to the JoinExisting aggregation support is that the ncoords attribute should be specified for efficiency reasons. Future versions will continue to relax this requirement. The problem is that the size of the output join dimension is dependent on checking the DDS of every granule in the aggregation, which is computationally expensive for large aggregations.
Source of Data for Aggregated Coordinate Variable on Join Dimension
This version does not allow the join dimension’s data to be declared explicitly in the NcML as the NcML tutorial page describes. This version automatically aggregates all variables with the outer dimension matching the dimName. This includes the coordinate variable (map vector in the case of Grid’s) for the join dimension. These data cannot be overridden from those pulled from the files. Currently the TDS lists about 5 ways this data can be specified in addition to pulling them from the granules --- we only can pull them from granules now, which seems the most common use.
Source of Join Dimension Metadata
The metadata for the coordinate variable is pulled from the first granule dataset. Modification of coordinate variable metadata is not fully supported yet.
10.D.4. Union Aggregation
Introduction
The current trunk version of the module supports the union aggregation element of the form:
<netcdf>
<aggregation type="union">
<!-- some <netcdf> nodes -->
</aggregation>
</netcdf>
Functionality
The union aggregation specifies the attributes and variables (and perhaps dimensions) for the dataset it is contained within (i.e. it’s parent <netcdf> node, which must be be virtual, in other words, have no location specifed). To do this it…
-
Processes each child netcdf element recursively, creating the final transformed dataset
-
Scans the processed child datasets in order of specification and:
-
Adds to the parent dataset any attribute, variable, or dimension that doesn’t already exist in the parent dataset
-
Skips any attribute or variable that already exists in the parent dataset
-
Skips any dimension already in the parent dataset, unless the lengths do not match, in which case it throws a parse error.
-
Note that the module processes each child dataset entirely as if it were a top level element, obeying all the normal processing for a dataset, but collecting the result into that netcdf node. This means that any child netcdf of an aggregation may refer to a location, have transformations applied to it, have metadata removed, or may even contain its own nested aggregation!
Which items will show up in the output? We need to discuss this in a little more detail, in particular since we have deviated slightly from the Unidata implementation.
Order of Element Processing
The NCML Module processes the nodes in a <netcdf> element in the order encountered. This means that the parent dataset of an aggregation may place attributes and variables into the union prior to an aggregation taking place, meaning that those items matching the name in the aggregation itself will be skipped. It also implies that any changes to existing metadata within a member of the aggregation by using an attribute element, for example, must come AFTER the actual aggregation element, or else a parse error will be thrown.
Shadowing an Aggregation Member
For example, the following examples show how to "shadow" a variable contained in an aggregation by specifying it in the parent dataset prior to the aggregation:
<netcdf>
<variable name="Foo" type="string">
<values>I come before the aggregation, so will appear in the output!</values>
</variable>
<aggregation type="union">
<netcdf>
<variable name="Foo" type="string">
<values>I will be skipped since there's a Foo in the dataset prior to the aggregation.</values>
</variable>
</netcdf>
<netcdf>
<variable name="Bar" type="string">
<values>I do not exist prior, so will be in the output!</values>
</variable>
</netcdf>
</aggregation>
</netcdf>
The values make it clear what the output will be. The variable "Foo" in the first child will be skipped since the parent dataset already specified it, but the variable "Bar" in the second child dataset will show up in the output since it doesn’t already exist in either the parent or the previous child. Note that this would also work on an attribute or dimension.
Modifying the "Winner" of the Union Aggregation
The following example shows how to modify the "winning" variable in a union aggregation by specifying the attribute change AFTER the aggregation element:
<netcdf>
<aggregation type="union">
<netcdf>
<variable name="Foo" type="string">
<attribute name="Description" type="string" value="Winning Foo before we modify, should NOT be in output!"/>
<values>I am the winning Foo!</values>
</variable>
</netcdf>
<netcdf>
<variable name="Foo" type="string">
<attribute name="Description" type="string" value="I will be the losing Foo and should NOT be in output!"/>
<values>I am the losing Foo!</values>
</variable>
</netcdf>
</aggregation>
<!-- Now we modify the "winner" of the previous union -->
<variable name="Foo">
<attribute name="Description" type="string" value="I am Foo.Description and have modified the winning Foo and deserve to be in the output!"/>
</variable>
</netcdf>
In this case, the output dataset will have the variable Foo with a value of "I am the winning Foo!", but its metadata will have been modified by the transformation after the aggregation, so its attribute "Description" will have the value "I am Foo.Description and have modified the winning Foo and deserve to be in the output!".
If this entire netcdf element were contained within another aggregation, then other transformations might be applied after the fact as well, again in the order encountered for clarity.
Dimensions
Since the DAP2 does not specify dimensions as explicit data items, a union of dimensions is only done if the child netcdf elements explicitly declare dimensions. In practice, this is mostly of little utility since the only time dimensions are specified is to create virtual array variables (Note: we do not load dimensions from wrapped sets, so effectively they do not exist in them, even if the wrapped dataset was an NcML file!)
If a dimension does exist explicitly in a child dataset and a second with the same name is encountered in another child dataset, the cardinalities are checked and a parse error is thrown if they do not exist. This is a simple check that can be done to ensure the resulting arrays are of the correct size. Note that even if an array had a named dimension within a wrapped set, we do not check that these match at this time.
Here is an example of a valid use of dimension in the current module:
<netcdf xmlns="http://www.unidata.ucar.edu/namespaces/netcdf/ncml-2.2">
<!-- Test that a correct union with dimensions in the virtual datasets will work if the dimensions match as they need to -->
<attribute name="title" type="string" value="Testing union with dimensions"/>
<aggregation type="union">
<netcdf>
<attribute name="Description" type="string" value="The first dataset"/>
<dimension name="lat" length="5"/>
<!-- A variable that uses the dimension, this one will be used -->
<variable name="Grues" type="int" shape="lat">
<attribute name="Description" type="string">I should be in the output!</attribute>
<values>1 3 5 3 1</values>
</variable>
</netcdf>
<netcdf>
<attribute name="Description" type="string" value="The second dataset"/>
<!-- This dimension will be skipped, but the length matches the previous as required -->
<dimension name="lat" length="5"/>
<!-- This dimension is new so will be used... -->
<dimension name="station" length="3"/>
<!-- A variable that uses it, this one will NOT be used -->
<variable name="Grues" type="int" shape="lat">
<attribute name="Description" type="string">!!!! I should NOT be in the output! !!!!</attribute>
<values>-3 -5 -7 -3 -1</values>
</variable>
<!-- This variable uses both and will show up in output correctly -->
<variable name="Zorks" type="int" shape="station lat">
<attribute name="Description" type="string">I should be in the output!</attribute>
<values>
1 2 3 4 5
2 4 6 8 10
4 8 12 16 20
</values>
</variable>
</netcdf>
</aggregation>
</netcdf>
Here is an example that will produce a dimension mismatch parse error:
<netcdf xmlns="http://www.unidata.ucar.edu/namespaces/netcdf/ncml-2.2">
<!-- Test that a union with dimensions in the virtual datasets will ERROR if the child set dimensions DO NOT match as they need to -->
<attribute name="title" type="string" value="Testing union with dimensions"/>
<aggregation type="union">
<netcdf>
<dimension name="lat" length="5"/>
<!-- A variable that uses the dimension, this one will be used -->
<variable name="Grues" type="int" shape="lat">
<attribute name="Description" type="string">I should be in the output!</attribute>
<values>1 3 5 3 1</values>
</variable>
</netcdf>
<netcdf>
<!-- This dimension WOULD be skipped, but does not match the representative and will cause an error on union! -->
<dimension name="lat" length="6"/>
<!-- This dimension is new so will be used... -->
<dimension name="station" length="3"/>
<!-- A variable that uses it, this one will NOT be used -->
<variable name="Grues" type="int" shape="lat">
<attribute name="Description" type="string">!!!! I should NOT be in the output! !!!!</attribute>
<values>-3 -5 -7 -3 -3 -1</values>
</variable>
<!-- This variable uses both and will show up in output correctly -->
<variable name="Zorks" type="int" shape="station lat">
<attribute name="Description" type="string">I should be in the output!</attribute>
<values>
1 2 3 4 5 6
2 4 6 8 10 12
4 8 12 16 20 24
</values>
</variable>
</netcdf>
</aggregation>
</netcdf>
Note that the failure is that the second dataset had an extra "lat" sample added to it, but the prior dataset did not. Again, these dimension checks only occur now in a pure virtual dataset like we see here. Using netcdf@location will effectively "hide" all the dimensions within it at this point.
Thoughts About Future Directions for Dimension
For a future implementation, we may want to consider a DAP2 Grid Map vector as a dimension and do cardinality checks on them if we have multiple grids in a union each of which specify the same names for their map vectors. One argument is that this should be done if an explicit dimension element with the map vector name is specified in the parent dataset and is explicitly specified as "isShared". Although DAP2 does not have shared dimensions, this would be a basic first step in the error checking that will have to be done for shared dimensions.
Notes About Changes from NcML 2.2 Implementation
In the Aggregation tutorial, it is mentioned that in a given <netcdf> node, the <aggregation> element is process prior to any other nodes, which reflects an explicitly DOM implementation of the NcML parser. Since we are using a SAX parser for efficiency, we cannot follow this prescription. Instead, we process the elements in the order encountered. We argue that this approach, while more efficient, also allows for more explicit control over which attributes and variables show up in the dataset which is the parent node of the aggregation. The examples above show this extra power gained by allowing elements to be added to the resultant dataset prior to or after the aggregation has been processed. In particular, it will let us shadow potential members of the aggregation.
10.D.5. JoinNew Explicit Dataset Tutorial
Default Values for the New Coordinate Variable (on a Grid)
The default for the new coordinate variable is to be of type String with the location of the dataset as the value. For example, the following NcML file…
<?xml version="1.0" encoding="UTF-8"?>
<netcdf title="Simple test of joinNew Grid aggregation">
<aggregation type="joinNew" dimName="filename">
<variableAgg name="dsp_band_1"/>
<netcdf location="data/ncml/agg/grids/f97182070958.hdf"/>
<netcdf location="data/ncml/agg/grids/f97182183448.hdf"/>
<netcdf location="data/ncml/agg/grids/f97183065853.hdf"/>
<netcdf location="data/ncml/agg/grids/f97183182355.hdf"/>
</aggregation>
</netcdf>…specifies an aggregation on a Grid variable dsp_band_1 sampled in four HDF4 datasets listed explicitly.
First, the data structure (DDS) is:
Dataset {
Grid {
Array:
UInt32 dsp_band_1[filename = 4][lat = 1024][lon = 1024];
Maps:
String filename[filename = 4];
Float64 lat[1024];
Float64 lon[1024];
} dsp_band_1;
String filename[filename = 4];
} joinNew_grid.ncml;
We see the aggregated variable dsp_band_1 has the new outer dimension filename. A coordinate variable filename[filename]' was created as a sibling of the aggregated variable (the top level Grid we specified) and was also copied into the aggregated Grid as a new map vector.
The ASCII data response for just the new coordinate variable filename[filename] is:
String filename[filename = 4] = {"data/ncml/agg/grids/f97182070958.hdf",
"data/ncml/agg/grids/f97182183448.hdf",
"data/ncml/agg/grids/f97183065853.hdf",
"data/ncml/agg/grids/f97183182355.hdf"};
We see that the absolute location we specified for the dataset as a String is the value for each element of the new coordinate variable.
The newly added map dsp_band_1.filename contains a copy of this data.
Explicitly Specifying the New Coordinate Variable
If the author wishes to have the new coordinate variable be of a specific data type with non-uniform values, then they must specify the new coordinate variable explicitly.
Here’s an example using a contrived pure virtual dataset:
<?xml version="1.0" encoding="UTF-8"?>
<netcdf title="JoinNew on Array with Explicit Map">
<!-- joinNew and form new outer dimension "day" -->
<aggregation type="joinNew" dimName="day">
<variableAgg name="V"/>
<netcdf title="Slice 1">
<dimension name="sensors" length="3"/>
<variable name="V" type="int" shape="sensors">
<values>1 2 3</values>
</variable>
</netcdf>
<netcdf title="Slice 2">
<dimension name="sensors" length="3"/>
<variable name="V" type="int" shape="sensors">
<values>4 5 6</values>
</variable>
</netcdf>
</aggregation>
<!-- This is recognized as the definition of the new coordinate variable,
since it has the form day[day] where day is the dimName for the aggregation.
It MUST be specified after the aggregation, so that the dimension size of day
has been calculated.
-->
<variable name="day" type="int" shape="day">
<!-- Note: metadata may be added here as normal! -->
<attribute name="units" type="string">Days since 01/01/2010</attribute>
<values>1 30</values>
</variable>
</netcdf>The resulting DDS:
Dataset {
Int32 V[day = 2][sensors = 3];
Int32 day[day = 2];
} joinNew_with_explicit_map.ncml;
…and the ASCII data:
Int32 V[day = 2][sensors = 3] = {{1, 2, 3},{4, 5, 6}};
Int32 day[day = 2] = {1, 30};
Note that the values we have explicitly given are used here as well as the specified NcML type, int which is mapped to a DAP Int32.
If metadata is desired on the new coordinate variable, it may be added just as in a normal new variable declaration. We’ll give more examples of this later.
Let’s give one more example using a Grid to demonstrate the recognition of the coordinate variable as it is added to the Grid as the map vector for the new dimension:
<?xml version="1.0" encoding="UTF-8"?>
<netcdf title="joinNew Grid aggregation with explicit map">
<aggregation type="joinNew" dimName="sample_time">
<variableAgg name="dsp_band_1"/>
<netcdf location="data/ncml/agg/grids/f97182070958.hdf"/>
<netcdf location="data/ncml/agg/grids/f97182183448.hdf"/>
<netcdf location="data/ncml/agg/grids/f97183065853.hdf"/>
<netcdf location="data/ncml/agg/grids/f97183182355.hdf"/>
</aggregation>
<!-- Note: values are contrived -->
<variable name="sample_time" shape="sample_time" type="float">
<!-- Metadata here will also show up in the Grid map -->
<attribute name="units" type="string">Days since 01/01/2010</attribute>
<values>100 200 400 1000</values>
</variable>
</netcdf>This produces the DDS:
Dataset {
Grid {
Array:
UInt32 dsp_band_1[sample_time = 4][lat = 1024][lon = 1024];
Maps:
Float32 sample_time[sample_time = 4];
Float64 lat[1024];
Float64 lon[1024];
} dsp_band_1;
Float32 sample_time[sample_time = 4];
} joinNew_grid_explicit_map.ncml;
You can see the explicit coordinate variable sample_time was found as the sibling of the aggregated Grid as was added as the new map vector for the Grid.
The values for the projected coordinate variables are as expected:
Float32 sample_time[sample_time = 4] = {100, 200, 400, 1000};
Errors
It is a Parse Error to…
-
Give a different number of values for the explicit coordinate variable than their are specified datasets.
-
Specify the new coordinate variable prior to the <aggregation> element since the dimension size is not yet known.
Autogenerated Uniform Numeric Values
If the number of datasets might vary (for example, if a <scan> element, described later, is used), but the values are uniform, the start/increment version of the <values> element may be used to generate the values for the new coordinate variable. For example…
<?xml version="1.0" encoding="UTF-8"?>
<netcdf title="JoinNew on Array with Explicit Autogenerated Map">
<aggregation type="joinNew" dimName="day">
<variableAgg name="V"/>
<netcdf title="Slice 1">
<dimension name="sensors" length="3"/>
<variable name="V" type="int" shape="sensors">
<values>1 2 3</values>
</variable>
</netcdf>
<netcdf title="Slice 2">
<dimension name="sensors" length="3"/>
<variable name="V" type="int" shape="sensors">
<values>4 5 6</values>
</variable>
</netcdf>
</aggregation>
<!-- Explicit coordinate variable definition -->
<variable name="day" type="int" shape="day">
<attribute name="units" type="string" value="days since 2000-01-01 00:00"/>
<!-- We sample once a week... -->
<values start="1" increment="7"/>
</variable>
</netcdf>The DDS is the same as before and the coordinate variable is generated as expected:
Int32 sample_time[sample_time = 4] = {1, 8, 15, 22};
Note that this form is useful for uniform sampled datasets (or if only a numeric index is desired) where the variable need not be changed as datasets are added. It is especially useful for a <scan> element that refers to a dynamic number of files that can be described with a uniformly varying index.
Explicitly Using coordValue Attribute of <netcdf>
The netcdf@coordValue may be used to specify the value for the given dataset right where the dataset is declared. This attribute will cause a coordinate variable to be automatically generated with the given values for each dataset filled in. The new coordinate variable will be of type double if the coordValue’s can all be parsed as a number, otherwise they will be of type String.
String coordValue Example
<?xml version="1.0" encoding="UTF-8"?>
<netcdf title="joinNew Aggregation with explicit string coordValue">
<aggregation type="joinNew" dimName="source">
<variableAgg name="u"/>
<variableAgg name="v"/>
<!-- Same dataset a few times, but with different coordVal -->
<netcdf title="Dataset 1" location="data/ncml/fnoc1.nc" coordValue="Station_1"/>
<netcdf title="Dataset 2" location="data/ncml/fnoc1.nc" coordValue="Station_2"/>
<netcdf title="Dataset 3" location="data/ncml/fnoc1.nc" coordValue="Station_3"/>
</aggregation>
</netcdf>This results in the following DDS:
Dataset {
Int16 u[source = 3][time_a = 16][lat = 17][lon = 21];
Int16 v[source = 3][time_a = 16][lat = 17][lon = 21];
Float32 lat[lat = 17];
Float32 lon[lon = 21];
Float32 time[time = 16];
String source[source = 3];
} joinNew_string_coordVal.ncml;
…and ASCII data response of the projected coordinate variable is:
String source[source = 3] = {"Station_1", "Station_2", "Station_3"};
…as we specified.
Numeric (double) Use of coordValue
If the first coordValue can be successfully parsed as a double numeric type, then a coordinate variable of type double (Float64) is created and all remaining coordValue specifications must be parsable as a double or a Parse Error is thrown.
Using the same example but with numbers instead:
<?xml version="1.0" encoding="UTF-8"?>
<netcdf title="joinNew Aggregation with numeric coordValue">
<aggregation type="joinNew" dimName="source">
<variableAgg name="u"/>
<variableAgg name="v"/>
<!-- Same dataset a few times, but with different coordVal -->
<netcdf title="Dataset 1" location="data/ncml/fnoc1.nc" coordValue="1.2"/>
<netcdf title="Dataset 2" location="data/ncml/fnoc1.nc" coordValue="3.4"/>
<netcdf title="Dataset 3" location="data/ncml/fnoc1.nc" coordValue="5.6"/>
</aggregation>
</netcdf>This time we see that a Float64 array is created:
Dataset {
Int16 u[source = 3][time_a = 16][lat = 17][lon = 21];
Int16 v[source = 3][time_a = 16][lat = 17][lon = 21];
Float32 lat[lat = 17];
Float32 lon[lon = 21];
Float32 time[time = 16];
Float64 source[source = 3];
} joinNew_numeric_coordValue.ncml;
The values we specified are in the coordinate variable ASCII data:
Float64 source[source = 3] = {1.2, 3.4, 5.6};
10.D.6. Metadata on Aggregations Tutorial
Metadata Specification on the New Coordinate Variable
We can add metadata to the new coordinate variable in two ways:
-
Adding it to the <variable> element directly in the case where the new coordinate variable and values is defined explicitly
-
Adding the metadata to an automatically created coordinate variable by leaving the <values> element out
The first case we have already seen, but we will show it again explicitly. The second case is a little different and we’ll cover it separately.
Adding Metadata to the Explicit New Coordinate Variable
We have already seen examples of explicitly defining the new coordinate variable and giving its values. In these cases, the metadata is added to the new coordinate variable exactly like any other variable. Let’s see the example again:
<?xml version="1.0" encoding="UTF-8"?>
<netcdf title="joinNew Grid aggregation with explicit map">
<aggregation type="joinNew" dimName="sample_time">
<variableAgg name="dsp_band_1"/>
<netcdf location="data/ncml/agg/grids/f97182070958.hdf"/>
<netcdf location="data/ncml/agg/grids/f97182183448.hdf"/>
<netcdf location="data/ncml/agg/grids/f97183065853.hdf"/>
<netcdf location="data/ncml/agg/grids/f97183182355.hdf"/>
</aggregation>
<variable name="sample_time" shape="sample_time" type="float">
<!-- Metadata here will also show up in the Grid map -->
<attribute name="units" type="string">Days since 01/01/2010</attribute>
<values>100 200 400 1000</values>
</variable>
</netcdf>We see that the units attribute for the new coordinate variable has been specified. This subset of the DAS (we don’t show the extensive global metadata) shows this:
dsp_band_1 {
Byte dsp_PixelType 1;
Byte dsp_PixelSize 2;
UInt16 dsp_Flag 0;
UInt16 dsp_nBits 16;
Int32 dsp_LineSize 0;
String dsp_cal_name "Temperature";
String units "Temp";
UInt16 dsp_cal_eqnNumber 2;
UInt16 dsp_cal_CoeffsLength 8;
Float32 dsp_cal_coeffs 0.125, -4;
Float32 scale_factor 0.125;
Float32 add_off -4;
sample_time {
---> String units "Days since 01/01/2010";
}
dsp_band_1 {
}
lat {
String name "lat";
String long_name "latitude";
}
lon {
String name "lon";
String long_name "longitude";
}
}
sample_time {
---> String units "Days since 01/01/2010";
}
We show the new metadata with the "--→" marker. Note that the metadata for the coordinate variable is also copied into the new map vector of the aggregated Grid.
Metadata can be specified in this way for any case where the new coordinate variable is listed explicitly.
Adding Metadata to An Autogenerated Coordinate Variable
If we expect the coordinate variable to be automatically added, we can also specify its metadata by referring to the variable without setting its values. This is useful in the case of using netcdf@coordValue and we will also see it is very useful when using a <scan> element for dynamic aggregations.
Here’s a trivial example using the default case of the filename:
<?xml version="1.0" encoding="UTF-8"?>
<netcdf title="Test of adding metadata to the new map vector in a joinNew Grid aggregation">
<aggregation type="joinNew" dimName="filename">
<variableAgg name="dsp_band_1"/>
<netcdf location="data/ncml/agg/grids/f97182070958.hdf"/>
</aggregation>
<!--
Add metadata to the created new outer dimension variable after
the aggregation is defined by using a placeholder variable
whose values will be defined automatically by the aggregation.
-->
<variable type="string" name="filename">
<attribute name="units" type="string">Filename of the dataset</attribute>
</variable>
</netcdf>Note here that we just neglected to add a <values> element since we want the values to be generated automatically by the aggregation. Note also that this is almost the same way we’d modify an existing variable’s metadata. The only difference is we need to "declare" the type of the variable here since technically the variable specified here is a placeholder for the generated coordinate variable. So after the aggregation is specified, we are simply modifying the created variable’s metadata, in this case the newly generated map vector.
Here is the DAS portion with just the aggregated Grid and the new coordinate variable:
dsp_band_1 {
Byte dsp_PixelType 1;
Byte dsp_PixelSize 2;
UInt16 dsp_Flag 0;
UInt16 dsp_nBits 16;
Int32 dsp_LineSize 0;
String dsp_cal_name "Temperature";
String units "Temp";
UInt16 dsp_cal_eqnNumber 2;
UInt16 dsp_cal_CoeffsLength 8;
Float32 dsp_cal_coeffs 0.125, -4;
Float32 scale_factor 0.125;
Float32 add_off -4;
filename {
String units "Filename of the dataset";
}
dsp_band_1 {
}
lat {
String name "lat";
String long_name "latitude";
}
lon {
String name "lon";
String long_name "longitude";
}
}
filename {
String units "Filename of the dataset";
}
Here also the map vector gets a copy of the coordinate variable’s metadata.
We can also use this syntax in the case that netcdf@coordValue was used to autogenerate the coordinate variable:
<?xml version="1.0" encoding="UTF-8"?>
<netcdf title="joinNew Grid aggregation with coordValue and metadata">
<aggregation type="joinNew" dimName="sample_time">
<variableAgg name="dsp_band_1"/>
<netcdf location="data/ncml/agg/grids/f97182070958.hdf" coordValue="1"/>
<netcdf location="data/ncml/agg/grids/f97182183448.hdf" coordValue="10"/>
<netcdf location="data/ncml/agg/grids/f97183065853.hdf" coordValue="15"/>
<netcdf location="data/ncml/agg/grids/f97183182355.hdf" coordValue="25"/>
</aggregation>
<!-- Note: values are contrived -->
<variable name="sample_time" shape="sample_time" type="double">
<attribute name="units" type="string">Days since 01/01/2010</attribute>
</variable>
</netcdf>Here we see the metadata added to the new coordinate variable and associated map vector:
Attributes {
dsp_band_1 {
Byte dsp_PixelType 1;
Byte dsp_PixelSize 2;
UInt16 dsp_Flag 0;
UInt16 dsp_nBits 16;
Int32 dsp_LineSize 0;
String dsp_cal_name "Temperature";
String units "Temp";
UInt16 dsp_cal_eqnNumber 2;
UInt16 dsp_cal_CoeffsLength 8;
Float32 dsp_cal_coeffs 0.125, -4;
Float32 scale_factor 0.125;
Float32 add_off -4;
sample_time {
---> String units "Days since 01/01/2010";
}
dsp_band_1 {
}
lat {
String name "lat";
String long_name "latitude";
}
lon {
String name "lon";
String long_name "longitude";
}
}
sample_time {
---> String units "Days since 01/01/2010";
}
}
Parse Errors
Since the processing of the aggregation takes a few steps, care must be taken in specifying the coordinate variable in the cases of autogenerated variables.
In particular, it is a Parse Error…
-
To specify the shape of the autogenerated coordinate variable if <values> are not set
-
To leave out the type or to use a type that does not match the autogenerated type
The second can be somewhat tricky to remember since for existing variables it can be safely left out and the variable will be "found". Since aggregations get processed fulled when the <netcdf> element containing them is closed, the specified coordinate variables in these cases are placeholders for the automatically generated variables, so they must match the name and type, but not specify a shape since the shape (size of the new aggregation dimension) is not known until this occurs.
Metadata Specification on the Aggregation Variable Itself
It is also possible to add or modify the attributes on the aggregation variable itself. If it is a Grid, metadata can be modified on the contained array or maps as well. Note that the aggregated variable begins with the metadata from the first dataset specified in the aggregation just like in a union aggregation.
We will use a Grid as our primary example since other datatypes are similar and simpler and this case will cover those as well.
Let’s start from this example aggregation:
<?xml version="1.0" encoding="UTF-8"?>
<netcdf>
<aggregation type="joinNew" dimName="filename">
<variableAgg name="dsp_band_1"/>
<netcdf location="data/ncml/agg/grids/f97182070958.hdf"/>
<netcdf location="data/ncml/agg/grids/f97182183448.hdf"/>
<netcdf location="data/ncml/agg/grids/f97183065853.hdf"/>
<netcdf location="data/ncml/agg/grids/f97183182355.hdf"/>
</aggregation>
</netcdf>Here is the DAS for this unmodifed aggregated Grid (with the global dataset metadata removed):
Attributes {
dsp_band_1 {
Byte dsp_PixelType 1;
Byte dsp_PixelSize 2;
UInt16 dsp_Flag 0;
UInt16 dsp_nBits 16;
Int32 dsp_LineSize 0;
String dsp_cal_name "Temperature";
String units "Temp";
UInt16 dsp_cal_eqnNumber 2;
UInt16 dsp_cal_CoeffsLength 8;
Float32 dsp_cal_coeffs 0.125, -4;
Float32 scale_factor 0.125;
Float32 add_off -4;
filename {
}
dsp_band_1 {
}
lat {
String name "lat";
String long_name "latitude";
}
lon {
String name "lon";
String long_name "longitude";
}
}
filename {
}
}
We will now add attributes to all the existing parts of the Grid:
-
The Grid Structure itself
-
The Array of data within the Grid
-
Both existing map vectors (lat and lon)
We have already seen how to add data to the new coordinate variable as well.
Here’s the NcML we will use. Note we have added units data to the subparts of the Grid, and also added some metadata to the grid itself.
<?xml version="1.0" encoding="UTF-8"?>
<netcdf title="Showing how to add metadata to all parts of an aggregated grid">
<aggregation type="joinNew" dimName="filename">
<variableAgg name="dsp_band_1"/>
<netcdf location="data/ncml/agg/grids/f97182070958.hdf"/>
<netcdf location="data/ncml/agg/grids/f97182183448.hdf"/>
<netcdf location="data/ncml/agg/grids/f97183065853.hdf"/>
<netcdf location="data/ncml/agg/grids/f97183182355.hdf"/>
</aggregation>
<variable name="dsp_band_1" type="Structure"> <!-- Enter the Grid level scope -->
1) <attribute name="Info" type="String">This is metadata on the Grid itself.</attribute>
<variable name="dsp_band_1"> <!-- Enter the scope of the Array dsp_band_1 -->
2) <attribute name="units" type="String">Temp (packed)</attribute> <!-- Units of the array -->
</variable> <!-- dsp_band_1.dsp_band_1 -->
<variable name="lat"> <!-- dsp_band_1.lat map -->
3) <attribute name="units" type="String">degrees_north</attribute>
</variable>
<variable name="lon"> <!-- dsp_band_1.lon map -->
4) <attribute name="units" type="String">degrees_east</attribute>
</variable> <!-- dsp_band_1.lon map -->
</variable> <!-- dsp_band_1 Grid -->
<!-- Note well: this is a new coordinate variable so requires the correct type.
Also note that it falls outside of the actual grid since we must specify it
as a sibling coordinate variable it will be made into a Grid when the netcdf is closed.
-->
<variable name="filename" type="String">
5) <attribute name="Info" type="String">Filename with timestamp</attribute>
</variable> <!-- filename -->
</netcdfHere we show metadata being injected in several ways, denoted by the 1) — 5) notations.
1) We are inside the scope of the top-level Grid variable, so this metadata will show up in the attribute table inside the Grid Structure.
2) This is the actual data Array of the Grid, dsp_band_1.dsp_band_1. We specify the units are a packed temperature. 3) Here we are in the scope of a map variable, dsp_band_1.lat. We add the units specification to this map.
4) Likewise, we add units to the lon map vector.
5) Finally, we must close the actual grid and specify the metadata for the NEW coordinate variable as a sibling of the Grid since this will be used as the canonical prototype to be added to all Grid’s which are to be aggregated on the new dimension. Note in this case (unlike previous cases) the type of the new coordinate variable is required since we are specifying a "placeholder" variable for the new map until the Grid is actually processed once its containing <netcdf> is closed (i.e. all data is available to it).
The resulting DAS (with global dataset metadata removed for clarity):
Attribute {
... global data clipped ...
dsp_band_1 {
Byte dsp_PixelType 1;
Byte dsp_PixelSize 2;
UInt16 dsp_Flag 0;
UInt16 dsp_nBits 16;
Int32 dsp_LineSize 0;
String dsp_cal_name "Temperature";
String units "Temp";
UInt16 dsp_cal_eqnNumber 2;
UInt16 dsp_cal_CoeffsLength 8;
Float32 dsp_cal_coeffs 0.125, -4;
Float32 scale_factor 0.125;
Float32 add_off -4;
1) String Info "This is metadata on the Grid itself.";
filename {
5) String Info "Filename with timestamp";
}
dsp_band_1 {
2) String units "Temp (packed)";
}
lat {
String name "lat";
String long_name "latitude";
3) String units "degrees_north";
}
lon {
String name "lon";
String long_name "longitude";
4) String units "degrees_east";
}
}
filename {
5) String Info "Filename with timestamp";
}
}
We have annotated the DAS with numbers representing which lines in the NcML above correspond to the injected metadata.
10.D.7. Dynamic Aggregation Tutorial
Introduction
Dynamic aggregation is achieved through the use of the scan element.
The NcML-2.2 scan element schema:
<xsd:element name="scan" minOccurs="0" maxOccurs="unbounded">
<xsd:complexType>
<xsd:attribute name="location" type="xsd:string" use="required"/>
<xsd:attribute name="regExp" type="xsd:string" />
<xsd:attribute name="suffix" type="xsd:string" />
<xsd:attribute name="subdirs" type="xsd:boolean" default="true"/>
<xsd:attribute name="olderThan" type="xsd:string" />
<xsd:attribute name="dateFormatMark" type="xsd:string" />
<xsd:attribute name="enhance" type="xsd:string"/>
</xsd:complexType>
</xsd:element>
This document discusses the use and significance of scan in creating dynamically aggregated datasets.
Location (Location Location…)
The most important attribute of the scan element is the scan@location element that specifies the top-level search directory for the scan, relative to the BES data root directory specified in the BES configuration.
| ALL locations are interpreted relative to the BES root directory and NOT relative to the location of the NcML file itself! This means that all data to be aggregated must be in a subdirectory of the BES root data directory and that these directories must be specified fully, not relative to the NcML file. |
For example, if the BES root data dir is "/usr/local/share/hyrax", let ${BES_DATA_ROOT} refer to this location. If the NcML aggregation file is in "${BES_DATA_ROOT}/data/ncml/myAgg.ncml" and the aggregation member datasets are in "${BES_DATA_ROOT}/data/hdf4/myAggDatasets", then the location in the NcML file for the aggregation data directory would be…
<scan location="data/hdf4/myAggDatasets" />
…which specifies the data directory relative to the BES data root as required.
Again, for security reasons, the data is always searched under the BES data root. Trying to specify an absolute filesystem path, such as…
<scan location="/usr/local/share/data" />
…will NOT work. This directory will also be assumed to be a subdirectory of the ${BES_DATA_ROOT}, regardless of the preceding "/" character.
Suffix Criterion
The simplest criterion is to match only files of a certain datatype in a given directory. This is useful for filtering out text files and other files that may exist in the directory but which do not form part of the aggregation data.
Here’s a simple example:
<?xml version="1.0" encoding="UTF-8"?>
<netcdf title="Example of joinNew Grid aggregation using the scan element.">
<aggregation type="joinNew" dimName="filename">
<variableAgg name="dsp_band_1"/>
<scan location="data/ncml/agg/grids" suffix=".hdf" />
</aggregation>
</netcdf>Assuming that the specified location "data/ncml/agg/grids" contains no subdirectories, this NcML will return all files in that directory that end in ".hdf" in alphanumerical order. In the case of our installed example data, there are four HDF4 files in that directory:
data/ncml/agg/grids/f97182070958.hdf data/ncml/agg/grids/f97182183448.hdf data/ncml/agg/grids/f97183065853.hdf data/ncml/agg/grids/f97183182355.hdf
These will be included in alphanumerical order, so the scan element will in effect be equivalent to the following list of <netcdf> elements:
<netcdf location="data/ncml/agg/grids/f97182070958.hdf"/> <netcdf location="data/ncml/agg/grids/f97182183448.hdf"/> <netcdf location="data/ncml/agg/grids/f97183065853.hdf"/> <netcdf location="data/ncml/agg/grids/f97183182355.hdf"/>
By default, scan will search subdirectories, which is why we mentioned "grids has no subdirectories". We discuss this in the next section.
Subdirectory Searching (The Default!)
If the author specifies the scan@subdirs attribute to the value "true" (which is the default!), then the criteria will be applied recursively to any subdirectories of the scan@location base scan directory as well as to any regular files in the base directory.
For example, continuing our previous example, but giving a higher level location:
<?xml version="1.0" encoding="UTF-8"?>
<netcdf title="joinNew Grid aggregation using the scan element.">
<aggregation type="joinNew" dimName="filename">
<variableAgg name="dsp_band_1"/>
<scan location="data/ncml/agg/" suffix=".hdf" subdirs="true"/>
</aggregation>
</netcdf>Assuming that only the "grids" subdir of "/data/ncml/agg" contains HDF4 files with that extension, the same aggregation as prior will be created, in other words, an aggregation isomorphic to:
<netcdf location="data/ncml/agg/grids/f97182070958.hdf"/> <netcdf location="data/ncml/agg/grids/f97182183448.hdf"/> <netcdf location="data/ncml/agg/grids/f97183065853.hdf"/> <netcdf location="data/ncml/agg/grids/f97183182355.hdf"/>
The scan@subdirs attribute is much for useful for turning off the default recursion. For example, if recursion is NOT desired, but only files with the given suffix in the given directory are required, the following will do that:
<?xml version="1.0" encoding="UTF-8"?>
<netcdf title="joinNew Grid aggregation using the scan element.">
<aggregation type="joinNew" dimName="filename">
<variableAgg name="dsp_band_1"/>
<scan location="data/ncml/agg/grids" suffix=".hdf" subdirs="false"/>
</aggregation>
</pre>OlderThan Criterion
The scan@olderThan attribute can be used to filter out files that are "too new". This feature is useful for excluding partial files currently being written by a daemon process, for example.
The value of the attribute is a duration specified by a number followed by a basic time unit. The time units recognized are as follows:
-
seconds: \{ s, sec, secs, second, seconds }
-
minutes: \{ m, min, mins, minute, minutes }
-
hours: \{ h, hour, hours }
-
days: \{ day, days }
-
months: \{ month, months }
-
years: \{ year, years }
The strings inside \{ } are all recognized as referring to the given time unit.
For example, if we are following our previous example, but we suspect a new HDF file may be written at any time and usually takes 5 minutes to do so, we might use the following NcML:
<?xml version="1.0" encoding="UTF-8"?>
<netcdf title="joinNew Grid aggregation using the scan element.">
<aggregation type="joinNew" dimName="filename">
<variableAgg name="dsp_band_1"/>
<scan location="data/ncml/agg/grids" suffix=".hdf" subdirs="false" olderThan="10 mins" />
</aggregation>
</netcdf>Assuming the file will always be written withing 10 minutes, this files does what we wish. Only files whose modification date is older than the given duration from the current system time are included.
NOTE that the modification date of the file, not the creation date, is used for the test.
Regular Expression Criterion
The scan@regExp attribute may be used for more complicated filename matching tests where data for multiple variables, for example, may live in the same directory by whose filenames can be used to distinguish which are desired in the aggregation. Additionally, since the pathname including the location is used for the test, a regular expression test may be used in conjunction with a recursive directory search to find files in subdirectories where the directory name itself is specified in the regular expression, not just the filename. We’ll give examples of both of these cases.
We also reiterate that this test is used in conjunction with any other tests --- the author may also include a suffix and an olderThan test if they wish. All criteria must match for the file to be included in the aggregation.
We recognize the POSIX regular expression syntax. For more information on regular expressions and the POSIX syntax, please see: http://en.wikipedia.org/wiki/Regular_expression.
Consider the following, basic examples:
-
Finding all subdirectories with a given name
-
Matching a filename starting with a certain substring
Here’s an example where we use a subdirectory search to find ".hdf" files in all subdirectories named "grids":
<?xml version="1.0" encoding="UTF-8"?>
<netcdf title="Example of joinNew Grid aggregation using the scan element with a regexp">
<aggregation type="joinNew" dimName="filename">
<variableAgg name="dsp_band_1"/>
<scan
location="data/"
subdirs="true"
regExp="^.*/grids/.+\.hdf$"
/>
</aggregation>
</netcdf>The regular expression here is "^.*/grids/.+\/hdf". Let’s pull it apart quickly (this is not intended to be a regular expression tutorial):
The "^" matching the beginning of the string, so starts at the beginning of the location pathname. (without this we can match substrings in the middle of strings, etc)
We then match ".*" meaning 0 or more of any character.
We then match the "/grids/" string explicitly, meaning we want all pathnames that contain "/grids/" as a subdirectory.
We then match ".+" meaning 1 or more of any character.
We then match "\." meaning a literal "." character (the backslash "escapes" it).
We then match the suffix "hdf".
Finally, we match "$" meaning the end of the string.
So ultimately, this regular expression finds all filenames ending in ".hdf" that exist in some subdirectory named "grids" of the top-level location.
In following with our previous example, if there was only the one "grids" subdirectory in the ${BES_DATA_ROOT} with our four familiar files, we’d get the same aggregation as before.
Let’s say we have a given directory full of data files whose filename prefix specifies which variable they refer to. For example, let’s say our "grids" directory has files that start with "grad" as well as the files that start with "f" we have seen in our examples. We still want just the files starting with "f" to filter out the others. Here’s an example for that:
<?xml version="1.0" encoding="UTF-8"?>
<netcdf title="Example of joinNew Grid aggregation using the scan element with a regexp">
<aggregation type="joinNew" dimName="filename">
<variableAgg name="dsp_band_1"/>
<scan
location="data/"
subdirs="true"
regExp="^.*/grids/f.+\.hdf$"
/>
</aggregation>
</netcdf>Here we match all pathnames ending in "grids" and files that start with the letter "f" and end with ".hdf" as we desire.
Date Format Mark and Timestamp Extraction
This section shows how to use the scan@dateFormatMark attribute along with other search criteria in order to extract and sort datasets by a timestamp encoded in the filename. All that is required is that the timestamp be parseable by a pattern recognized by the Java language "SimpleDateFormat" class, which has also been implemented in C++ in the International Components for Unicode library which we use.
We base this example from the Unidata site Aggregation Tutorial. Here we have a directory with four files whose filenames contain a timestamp describable by a SimpleDataFormat (SDF) pattern. We will also use a regular expression criterion and suffix criterion in addition to the dateFormatMark since we have other files in the same directory and only wish to match those starting with the characters "CG" that have suffix ".nc".
Here’s the list of files (relative to the BES data root dir):
data/ncml/agg/dated/CG2006158_120000h_usfc.nc data/ncml/agg/dated/CG2006158_130000h_usfc.nc data/ncml/agg/dated/CG2006158_140000h_usfc.nc data/ncml/agg/dated/CG2006158_150000h_usfc.nc
Here’s the NcML:
<?xml version="1.0" encoding="UTF-8"?>
<netcdf title="Test of joinNew aggregation using the scan element and dateFormatMark">
<aggregation type="joinNew" dimName="fileTime">
<variableAgg name="CGusfc"/>
<scan
location="data/ncml/agg/dated"
suffix=".nc"
subdirs="false"
regExp="^.*/CG[^/]*"
dateFormatMark="CG#yyyyDDD_HHmmss"
/>
</aggregation>
</netcdf>So here we joinNew on the new outer dimension fileTime. The new coordinate variable fileTime[fileTime] for this dimension will be an Array of type String that will contain the parsed ISO 8601 timestamps we will extract from the matching filenames.
We have specified that we want only Netcdf files (suffix ".nc") which match the regular expression "./CG[/]". This means match the start of the string, then any number of characters that end with a "/" (the path portion of the filename), then the letters "CG", then some number of characters that do not include the "/" character (which is what "[^/]*" means). Essentially, we want files whose basename (path stripped) start with "CG" and end with ".nc". We also do not want to recurse, but only look in the location directory "/data/ncml/agg/dated" for the files.
Finally, we specify the scan@dateFormatMark pattern to describe how to parse the filename into an ISO 8601 date. The dateFormatMark is processed as follows:
-
Skip the number of characters prior to the "#" mark in the pattern while scanning the base filename (no path)
-
Interpret the next characters of the file basename using the given SimpleDateFormat string
-
Ignore any characters after the SDF portion of the filename (such as the suffix)
First, note that we do not match the characters in the dateFormatMark --- they are simply counted and skipped. So rather than "CG#" specifying the prefix before the SDF, we could have also used "XX#". This is why we must also use a regular expression to filter out files with other prefixes that we do not want in the aggregation. Note that the "#" is just a marker for the start of the SDF pattern and doesn’t count as an actual character in the matching process.
Second, we specify the dateFormatMark (DFM) as the following SDF pattern: "yyyyDDD_HHmmss". This means that we use the four digit year, then the day of the year (a three digit number), then an underscore ("_") separator, then the 24 hour time as 6 digits. Let’s take the basename of the first file as an example:
"CG2006158_120000h_usfc.nc"
We skip two characters due to the "CG#" in the DFM. Then we want to match the "yyyy" pattern for the year with: "2006".
We then match the day of the year as "DDD" which is "158", the 158th day of the year for 2006.
We then match the underscore character "_" which is only a separator.
Next, we match the 24 hour time "HHmmss" as 12:00:00 hours:mins:secs (i.e. noon).
Finally, any characters after the DFM are ignored, here "h_usfc.nc".
We see that the four dataset files are on the same day, but sampled each hour from noon to 3 pm.
These parsed timestamps are then converted to an ISO 8601 date string which is used as the value for the coordinate variable element corresponding to that aggregation member. The first file would thus have the time value "2006-06-07T12:00:00Z", which is 7 June 2006 at noon in the GMT timezone.
The matched files are then sorted using the ISO 8601 timestamp as the sort key and added to the aggregation in this order. Since ISO 8601 is designed such that lexicographic order is isomorphic to chronological order, this orders the datasets monotonically in time from past to future. This is different from the <scan> behavior without a dateFormatMark specified, where files are ordered lexicographically (alphanumerically by full pathname) --- this order may or may not match chronological order.
If we project out the ASCII dods response for the new coordinate variable, we see all of the parsed timestamps and that they are in chronological order:
String fileTime[fileTime = 4] = {"2006-06-07T12:00:00Z",
"2006-06-07T13:00:00Z",
"2006-06-07T14:00:00Z",
"2006-06-07T15:00:00Z"};
We also check the resulting DDS to see that it is added as a map vector to the Grid as well:
Dataset {
Grid {
Array:
Float32 CGusfc[fileTime = 4][time = 1][altitude = 1][lat = 29][lon = 26]
;
Maps:
String fileTime[fileTime = 4];
Float64 time[time = 1];
Float32 altitude[altitude = 1];
Float32 lat[lat = 29];
Float32 lon[lon = 26];
} CGusfc;
String fileTime[fileTime = 4];
} joinNew_scan_dfm.ncml;
Finally, we look at the DAS with global metadata removed:
Attributes {
CGusfc {
Float32 _FillValue -1.000000033e+32;
Float32 missing_value -1.000000033e+32;
Int32 numberOfObservations 303;
Float32 actual_range -0.2876400054, 0.2763200104;
fileTime {
---> String _CoordinateAxisType "Time";
}
CGusfc {
}
time {
String long_name "End Time";
String standard_name "time";
String units "seconds since 1970-01-01T00:00:00Z";
Float64 actual_range 1149681600.0000000, 1149681600.0000000;
}
altitude {
String long_name "Altitude";
String standard_name "altitude";
String units "m";
Float32 actual_range 0.000000000, 0.000000000;
}
lat {
String long_name "Latitude";
String standard_name "latitude";
String units "degrees_north";
String point_spacing "even";
Float32 actual_range 37.26869965, 38.02470016;
String coordsys "geographic";
}
lon {
String long_name "Longitude";
String standard_name "longitude";
String units "degrees_east";
String point_spacing "even";
Float32 actual_range 236.5800018, 237.4799957;
String coordsys "geographic";
}
}
fileTime {
---> String _CoordinateAxisType "Time";
}
}
We see that the aggregation has also automatically added the "_CoordinateAxisType" attribute and set it to "Time" (denoted by the "-→") as defined by the NcML 2.2 specification. The author may add other metadata to the new coordinate variable as discussed previously.
Order of Inclusion
In cases where a dateFormatMark is not specified, the member datasets are added to the aggregation in alphabetical order on the full pathname. This is important in the case of subdirectories since the path of the subdirectory is taken into account in the sort.
In cases where a dateFormatMark is specified, the extracted ISO 8601 timestamp is used as the sorting criterion, with older files being added before newer files.
10.D.8. Grid Metadata Tutorial
An Example of Adding Metadata to a Grid
We will go through a basic example of adding metadata to all the possible scopes in a Grid variable:
-
The top-level Grid Structure itself
-
The data Array in the Grid
-
Each Map vector in the Grid
We will also modify the global dataset attribute container to elucidate the difference between an attribute Structure and a variable Structure.
Let’s start with a "pass-through" NcML file which wraps a Netcdf dataset that Hyrax represents as a Grid. This will let us see the exact structure of the data we will want to modify (which may be slightly different than the wrapped dataset due to legacy issues with how shared dimensions are represented, etc):
<?xml version="1.0" encoding="UTF-8"?>
<netcdf location="data/ncml/agg/grids/f97182070958.hdf" title="This file results in a Grid">
<!-- This space intentionally left blank! -->
</netcdf>This gives the DDS:
Dataset {
Grid {
Array:
UInt32 dsp_band_1[lat = 1024][lon = 1024];
Maps:
Float64 lat[1024];
Float64 lon[1024];
} dsp_band_1;
} grid_attributes_2.ncml;
and the (extensive) DAS:
Attributes {
HDF_GLOBAL {
UInt16 dsp_SubImageId 0;
String dsp_SubImageName "N/A";
Int32 dsp_ModificationDate 20040416;
Int32 dsp_ModificationTime 160521;
Int32 dsp_SubImageFlag 64;
String dsp_SubImageTitle "Ingested by SCRIPP";
Int32 dsp_StartDate 19970701;
Float32 dsp_StartTime 70958.5;
Int32 dsp_SizeX 1024;
Int32 dsp_SizeY 1024;
Int32 dsp_OffsetX 0;
Int32 dsp_RecordLength 2048;
Byte dsp_DataOrganization 64;
Byte dsp_NumberOfBands 1;
String dsp_ing_tiros_ourid "NO14****C\\217\\345P?\\253\\205\\037";
UInt16 dsp_ing_tiros_numscn 44305;
UInt16 dsp_ing_tiros_idsat 2560;
UInt16 dsp_ing_tiros_iddata 768;
UInt16 dsp_ing_tiros_year 24832;
UInt16 dsp_ing_tiros_daysmp 46592;
Int32 dsp_ing_tiros_milsec 1235716353;
Int32 dsp_ing_tiros_slope 1075636998, 551287046, -426777345, -1339034123, 5871604;
Int32 dsp_ing_tiros_intcpt 514263295, 1892553983, -371365632, 9497638, -2140793044;
UInt16 dsp_ing_tiros_tabadr 256, 512, 768;
UInt16 dsp_ing_tiros_cnlins 256;
UInt16 dsp_ing_tiros_cncols 256;
UInt16 dsp_ing_tiros_czncs 8;
UInt16 dsp_ing_tiros_line 256;
UInt16 dsp_ing_tiros_icol 0;
String dsp_ing_tiros_date0 "23-MAY-10 13:54:29\\030";
String dsp_ing_tiros_time0 "13:54:29\\030";
UInt16 dsp_ing_tiros_label 14112, 12576, 14137;
UInt16 dsp_ing_tiros_nxtblk 1280;
UInt16 dsp_ing_tiros_datblk 1280;
UInt16 dsp_ing_tiros_itape 256;
UInt16 dsp_ing_tiros_cbias 0;
UInt16 dsp_ing_tiros_ccoeff 0;
Int32 dsp_ing_tiros_pastim 1235716353;
UInt16 dsp_ing_tiros_passcn 3840;
UInt16 dsp_ing_tiros_lostct 0;
UInt16 dsp_ing_tiros_lost 0, 0, 0, 0, 0, 0, 0, 0, 0, 0, 0, 0, 0, 0, 0, 0, 0, 0, 0, 0;
UInt16 dsp_ing_tiros_ndrll 1280;
UInt16 dsp_ing_tiros_ndrrec 3840, 5376, 6912, 8448, 9984, 0, 0, 0, 0, 0;
UInt16 dsp_ing_tiros_ndrlat 46110, 44318, 42526, 40478, 38686, 0, 0, 0, 0, 0;
UInt16 dsp_ing_tiros_ndrlon 49891, 48611, 47075, 45539, 44259, 0, 0, 0, 0, 0;
UInt16 dsp_ing_tiros_chncnt 1280;
UInt16 dsp_ing_tiros_chndsq 8, 8, 8, 8, 8;
UInt16 dsp_ing_tiros_czncs2 4;
UInt16 dsp_ing_tiros_wrdsiz 512;
UInt16 dsp_ing_tiros_nchbas 256;
UInt16 dsp_ing_tiros_nchlst 1280;
Float32 dsp_ing_tiros_rpmclc 0;
UInt16 dsp_ing_tiros_numpix 8;
UInt16 dsp_ing_tiros_scnden 256;
UInt16 dsp_ing_tiros_eltden 256;
UInt16 dsp_ing_tiros_orbtno 23858;
Int32 dsp_ing_tiros_slope2 1075636998, 551287046, -426777345, -1339034123, 5871604;
Int32 dsp_ing_tiros_intcp2 514263295, 1892553983, -371365632, 9497638, -2140793044;
Float32 dsp_ing_tiros_prtemp 3.0811e+10;
Float32 dsp_ing_tiros_timerr 5.6611e-20;
UInt16 dsp_ing_tiros_timstn 8279;
String dsp_nav_xsatid "NO14\\005\\002";
Byte dsp_nav_xsatty 5;
Byte dsp_nav_xproty 2;
Byte dsp_nav_xmapsl 0;
Byte dsp_nav_xtmpch 4;
Float32 dsp_nav_ximgdy 97182;
Float32 dsp_nav_ximgtm 70954.4;
Float32 dsp_nav_xorbit 12893;
Float32 dsp_nav_ximgcv 71.1722, 0, 4.88181, 0, -112.11, 0, -27.9583, 0;
Float32 dsp_nav_earth_linoff 0;
Float32 dsp_nav_earth_pixoff 0;
Float32 dsp_nav_earth_scnstr 1;
Float32 dsp_nav_earth_scnstp 1024;
Float32 dsp_nav_earth_pixstr 1;
Float32 dsp_nav_earth_pixstp 1024;
Float32 dsp_nav_earth_latorg 0;
Float32 dsp_nav_earth_lonorg 0;
Float32 dsp_nav_earth_orgrot 0;
Float32 dsp_nav_earth_lattop 0;
Float32 dsp_nav_earth_latbot 0;
Float32 dsp_nav_earth_latcen 38;
Float32 dsp_nav_earth_loncen -70;
Float32 dsp_nav_earth_height 66.3444;
Float32 dsp_nav_earth_width 84.2205;
Float32 dsp_nav_earth_level 1;
Float32 dsp_nav_earth_xspace 5.99902;
Float32 dsp_nav_earth_yspace 5.99902;
String dsp_nav_earth_rev " 0.1";
Float32 dsp_nav_earth_dflag 0;
Float32 dsp_nav_earth_toplat 71.1722;
Float32 dsp_nav_earth_botlat 4.88181;
Float32 dsp_nav_earth_leflon -112.11;
Float32 dsp_nav_earth_ritlon -27.9583;
Float32 dsp_nav_earth_numpix 1024;
Float32 dsp_nav_earth_numras 1024;
Float32 dsp_nav_earth_magxx 6;
Float32 dsp_nav_earth_magyy 6;
Int32 dsp_hgt_llnval 18;
Int32 dsp_hgt_lltime 25744350;
Float32 dsp_hgt_llvect 869.428, 1.14767, 868.659, 1.09635, 867.84, 1.04502, 866.979, 0.9937, 866.084, 0.942374, 865.165, 0.891045, 864.231, 0.839715, 863.292, 0.788383, 862.356, 0.737049, 861.434, 0.685714, 860.536, 0.634378, 859.67, 0.58304, 858.847, 0.531702, 858.075, 0.480362, 857.363, 0.429022, 856.718, 0.377682, 856.148, 0.326341, 855.66, 0.275, 0, 0, 0, 0, 0, 0, 0, 0, 0, 0, 0, 0, 0, 0, 0, 0, 0, 0, 0, 0, 0, 0, 0, 0, 0, 0, 0, 0, 0, 0, 0, 0, 0, 0, 0, 0, 0, 0, 0, 0, 0, 0, 0, 0, 0, 0, 0, 0, 0, 0, 0, 0, 0, 0, 0, 0, 0, 0, 0, 0, 0, 0, 0, 0, 0, 0, 0, 0, 0, 0, 0, 0, 0, 0, 0, 0, 0, 0, 0, 0, 0, 0, 0, 0, 0, 0, 0, 0, 0, 0, 0, 0, 0, 0, 0, 0, 0, 0, 0, 0, 0, 0, 0, 0, 0, 0, 0, 0, 0, 0, 0, 0, 0, 0, 0, 0, 0, 0, 0, 0, 0, 0, 0, 0, 0, 0, 0, 0, 0, 0, 0, 0, 0, 0, 0, 0, 0, 0, 0, 0, 0, 0, 0, 0, 0, 0, 0, 0, 0, 0, 0, 0, 0, 0, 0, 0, 0, 0, 0, 0, 0, 0, 0, 0, 0, 0, 0, 0, 0, 0, 0, 0, 0, 0, 0, 0, 0, 0, 0, 0, 0, 0, 0, 0, 0, 0, 0, 0, 0, 0, 0, 0, 0, 0, 0, 0, 0, 0, 0, 0, 0, 0, 0, 0, 0, 0, 0, 0, 0, 0, 0, 0, 0, 0, 0, 0, 0, 0, 0, 0, 0, 0, 0, 0, 0, 0, 0, 0, 0, 0, 0, 0, 0, 0, 0, 0, 0, 0, 0, 0, 0, 0, 0, 0, 0, 0, 0, 0, 0, 0, 0, 0, 0, 0, 0, 0, 0, 0, 0, 0, 0, 0, 0, 0;
String history "\\001PATHNLC May 23 22:40:54 2000 PATHNLC t,3,269.16,0.125,0.,0.01,271.16,308.16,,,,1,,,2,,,3,,,,,,4,,,,,,,2.,,35.,0.1,5,,,,,,,2.,,35.,0.15,55.,80.,0.005,20,,,-2,6.,t,,,,,,,,,,16,,3.5 allb=0 nlsst=1 in=/pathfdr5//97182070958.N14@INGEST@ in1=/pathfdr10/mask/oi.9727.mean out=/pathfdr4/nlc/f97182070958.FMG@0\\012\\004PATHNLC NLSST Temp calculation date: April 10, 1996\\012\\001OISST Jan 12 17:53:43 1998 OISST /usr3/gacsst/maketc/oi/dinp/oi.comp.bias.1997,/usr3/gacsst/maketc/oi/dout/oi.97,-3.,0.15,oi.dates.97,0\\012\\004OISST 26 97 06 22 97 06 28 7 472\\012\\001STATS Jan 12 18:27:34 1998 STATS minpix=1 maxpix=255 in=/usr3/gacsst/maketc/oi/dout//oi.9726 \\011 audit=t, callim=f, cal=f, cloud=f \\011 outm=/usr3/gacsst/etc/oi/oi.9727.mean\\012\\001OISST Jan 12 17:53:43 1998 OISST /usr3/gacsst/maketc/oi/dinp/oi.comp.bias.1997,/usr3/gacsst/maketc/oi/dout/oi.97,-3.,0.15,oi.dates.97,0\\012\\004OISST 27 97 06 29 97 07 05 7 472\\012\\002STATS /usr3/gacsst/maketc/oi/dout//oi.9727\\012\\001OISST Jan 12 17:53:43 1998 OISST /usr3/gacsst/maketc/oi/dinp/oi.comp.bias.1997,/usr3/gacsst/maketc/oi/dout/oi.97,-3.,0.15,oi.dates.97,0\\012\\004OISST 27 97 06 29 97 07 05 7 472\\012\\002STATS /usr3/gacsst/maketc/oi/dout//oi.9727\\012\\001OISST Jan 12 17:53:43 1998 OISST /usr3/gacsst/maketc/oi/dinp/oi.comp.bias.1997,/usr3/gacsst/maketc/oi/dout/oi.97,-3.,0.15,oi.dates.97,0\\012\\004OISST 28 97 07 06 97 07 12 7 472\\012\\002STATS /usr3/gacsst/maketc/oi/dout//oi.9728\\012\\002PATHNLC /pathfdr10/mask/oi.9727.mean\\012\\004PATHNLC 45d coeffs used (1) = 0.759 0.947 0.110 1.460 0.000\\012\\004PATHNLC 45d coeffs used (2) = 1.320 0.952 0.071 0.882 0.000\\012\\004PATHNLC 45d coeffs used (3) = 0.000 0.000 0.000 0.000 0.000\\012\\004PATHNLC GETOZONE I 0.0900 0.0000\\012\\001REMAP Jun 4 07:59:42 2000 REMAP in=/coral/miami/remaps/sst_8r/file_uZ.FMG out=/coral/miami/remaps/sst_8r/f97182070958.nwa16\\012\\004REMAP Output image pixel, line size = 6144, 6144\\012\\004REMAP Grid spacing (X,Y) = ( 6.00, 6.00), Projection Code= 1\\012\\004REMAP center lon,lat,dlon,dlat = -70.00 38.00 0.01 0.01\\012\\001merge_sb Apr 16 16:05:09 2004 merge_sb in=(file=/NOPP/carlw/atlantic/remaps/nwa16/f97182070958.nwa16, filecheck=/RAID2/sbaker/atlantic/bslines97/f97182070958.nwa16) val=0 valcheck=0 tag=0 out=(file1=/RAID2/sbaker/nwa1024d/NDC/dsp_data/f97182070958.tmp_m2)\\012\\001merge_sb Apr 16 16:05:18 2004 merge_sb in=(file=/RAID2/sbaker/nwa1024d/NDC/dsp_data/f97182070958.tmp_m2, filecheck=/RAID/sbaker/DECLOUD/landmask16.img) val=1 valcheck=2 tag=0 out=(file1=/RAID2/sbaker/nwa6144d/NDC/dsp_data/f97182070958.nwa16)\\012\\001CONVRT Apr 16 16:05:21 2004 CONVRT 1024,1024,0,0,6,6,0,0,f,f,t,16,,SUB,1 in=/RAID2/sbaker/nwa6144d/NDC/dsp_data/f97182070958.nwa16 out=/RAID2/sbaker/nwa1024d/NDC/dsp_data/f97182070958.nwa16\\012\\012@\\000\\000\\000";
}
dsp_band_1 {
Byte dsp_PixelType 1;
Byte dsp_PixelSize 2;
UInt16 dsp_Flag 0;
UInt16 dsp_nBits 16;
Int32 dsp_LineSize 0;
String dsp_cal_name "Temperature";
String units "Temp";
UInt16 dsp_cal_eqnNumber 2;
UInt16 dsp_cal_CoeffsLength 8;
Float32 dsp_cal_coeffs 0.125, -4;
Float32 scale_factor 0.125;
Float32 add_off -4;
dsp_band_1 {
}
lat {
String name "lat";
String long_name "latitude";
}
lon {
String name "lon";
String long_name "longitude";
}
}
}
Let’s say we want to add the following attributes:
-
Add an attribute to the HDF_GLOBAL attribute container called "ncml_location" since the file is wrapped by our NcML and the original location being wrapped might not be obvious.
-
Add the same attribute to the dsp_band_1 Grid itself so it’s easier to see and in case of projections
-
Add "units" to the Array member variable dsp_band_1 of the Grid that matches the containing Grid’s "units" attribute with value "Temp"
-
Add "units" to the lat map vector as a String with value "degrees_north"
-
Add "units" to the lon map vector as a String with value "degrees_east"
First, let’s add the "ncml_location" into the HDF_GLOBAL attribute container. To do this, we need to specify the "scope" of the HDF_GLOBAL attribute container (called a Structure in NcML):
<?xml version="1.0" encoding="UTF-8"?>
<netcdf location="data/ncml/agg/grids/f97182070958.hdf" title="This file results in a Grid">
<!-- Traverse into the HDF_GLOBAL attribute Structure (container) -->
<attribute name="HDF_GLOBAL" type="Structure">
<!-- Specify the new attribute in that scope -->
1) <attribute name="ncml_location" type="String" value="data/ncml/agg/grids/f97182070958.hdf"/>
</attribute>
</netcdf>This results in the following (clipped for clarity) DAS:
Attributes {
HDF_GLOBAL {
UInt16 dsp_SubImageId 0;
... *** CLIPPED FOR CLARITY *** ...
1) String ncml_location "data/ncml/agg/grids/f97182070958.hdf";
}
dsp_band_1 {
Byte dsp_PixelType 1;
Byte dsp_PixelSize 2;
UInt16 dsp_Flag 0;
UInt16 dsp_nBits 16;
Int32 dsp_LineSize 0;
String dsp_cal_name "Temperature";
String units "Temp";
UInt16 dsp_cal_eqnNumber 2;
UInt16 dsp_cal_CoeffsLength 8;
Float32 dsp_cal_coeffs 0.125, -4;
Float32 scale_factor 0.125;
Float32 add_off -4;
dsp_band_1 {
}
lat {
String name "lat";
String long_name "latitude";
}
lon {
String name "lon";
String long_name "longitude";
}
}
}
We can see at the 1) where the new attribute has been added to HDF_GLOBAL as desired.
Next, we want to add the same attribute to the top-level dsp_band_1 Grid variable. Here’s the NcML:
<?xml version="1.0" encoding="UTF-8"?>
<netcdf location="data/ncml/agg/grids/f97182070958.hdf" title="This file results in a Grid">
<!-- Traverse into the HDF_GLOBAL attribute Structure (container) -->
<attribute name="HDF_GLOBAL" type="Structure">
<!-- Specify the new attribute in that scope -->
<attribute name="ncml_location" type="String" value="data/ncml/agg/grids/f97182070958.hdf"/>
</attribute>
<!-- Traverse into the dsp_band_1 variable Structure (actually a Grid) -->
<variable name="dsp_band_1" type="Structure">
<!-- Specify the new attribute in that scope -->
2) <attribute name="ncml_location" type="String" value="data/ncml/agg/grids/f97182070958.hdf"/>
</variable>
</netcdf>…which gives the (clipped again) DAS:
Attributes {
HDF_GLOBAL {
... *** CLIPPED FOR CLARITY *** ...
String ncml_location "data/ncml/agg/grids/f97182070958.hdf";
}
dsp_band_1 {
Byte dsp_PixelType 1;
Byte dsp_PixelSize 2;
UInt16 dsp_Flag 0;
UInt16 dsp_nBits 16;
Int32 dsp_LineSize 0;
String dsp_cal_name "Temperature";
String units "Temp";
UInt16 dsp_cal_eqnNumber 2;
UInt16 dsp_cal_CoeffsLength 8;
Float32 dsp_cal_coeffs 0.125, -4;
Float32 scale_factor 0.125;
Float32 add_off -4;
2) String ncml_location "data/ncml/agg/grids/f97182070958.hdf";
dsp_band_1 {
}
lat {
String name "lat";
String long_name "latitude";
}
lon {
String name "lon";
String long_name "longitude";
}
}
}
We have denoted the injected metadata with a 2).
As a learning exercise, let’s say we made a mistake and tried to use <attribute> to specify the dsp_band_1 attribute table:
<?xml version="1.0" encoding="UTF-8"?>
<netcdf location="data/ncml/agg/grids/f97182070958.hdf" title="This file results in a Grid">
<!-- Traverse into the HDF_GLOBAL attribute Structure (container) -->
<attribute name="HDF_GLOBAL" type="Structure">
<!-- Specify the new attribute in that scope -->
<attribute name="ncml_location" type="String" value="data/ncml/agg/grids/f97182070958.hdf"/>
</attribute>
<!-- THIS IS AN ERROR! -->
<attribute name="dsp_band_1" type="Structure">
<!-- Specify the new attribute in that scope -->
<attribute name="ncml_location" type="String" value="data/ncml/agg/grids/f97182070958.hdf"/>
</attribute>
</netcdf>Then we get a Parse Error…
<?xml version="1.0" encoding="ISO-8859-1"?>
<response xmlns="http://xml.opendap.org/ns/bes/1.0#" reqID="some_unique_value">
<getDAS>
<BESError><Type>3</Type>
<Message>NCMLModule ParseError: at line 11: Cannot create a new attribute container with name=dsp_band_1 at current scope since a variable with that name already exists. Scope=</Message>
<Administrator>admin.email.address@your.domain.name</Administrator><Location><File>AttributeElement.cc</File><Line>277</Line></Location>
</BESError>
</getDAS>
</response>…which basically tells us the problem: we tried to specify an attribute with the same name as the Grid, but dsp_band_1 is a variable already with that name. It is illegal for an attribute and variable at the same scope to have the same name.
Next, we want to add the "units" attribute that is on the Grid itself to the actual data Array inside the Grid (say we know we will be projecting it out with a constraint and don’t want to lose this metadata). The NcML now becomes:
<?xml version="1.0" encoding="UTF-8"?>
<netcdf location="data/ncml/agg/grids/f97182070958.hdf" title="This file results in a Grid">
<!-- Traverse into the HDF_GLOBAL attribute Structure (container) -->
<attribute name="HDF_GLOBAL" type="Structure">
<!-- Specify the new attribute in that scope -->
<attribute name="ncml_location" type="String" value="data/ncml/agg/grids/f97182070958.hdf"/>
</attribute>
<!-- Traverse into the dsp_band_1 variable Structure (actually a Grid) -->
<variable name="dsp_band_1" type="Structure">
<!-- Specify the new attribute in the Grid's attribute table -->
<attribute name="ncml_location" type="String" value="data/ncml/agg/grids/f97182070958.hdf"/>
<!-- While remaining in the Grid, traverse into the Array dsp_band_1: -->
<variable name="dsp_band_1">
<!-- And add the attribute there. Fully qualified name of this scope is "dsp_band_1.dsp_band_1" -->
3) <attribute name="units" type="String" value="Temp"/>
</variable> <!-- Exit the Array variable scope, back to the Grid level -->
</variable>
</netcdf>Our modified DAS is now…
Attributes {
HDF_GLOBAL {
... *** CLIPPED FOR CLARITY *** ...
String ncml_location "data/ncml/agg/grids/f97182070958.hdf";
}
dsp_band_1 {
Byte dsp_PixelType 1;
Byte dsp_PixelSize 2;
UInt16 dsp_Flag 0;
UInt16 dsp_nBits 16;
Int32 dsp_LineSize 0;
String dsp_cal_name "Temperature";
String units "Temp";
UInt16 dsp_cal_eqnNumber 2;
UInt16 dsp_cal_CoeffsLength 8;
Float32 dsp_cal_coeffs 0.125, -4;
Float32 scale_factor 0.125;
Float32 add_off -4;
String ncml_location "data/ncml/agg/grids/f97182070958.hdf";
dsp_band_1 {
3) String units "Temp";
}
lat {
String name "lat";
String long_name "latitude";
}
lon {
String name "lon";
String long_name "longitude";
}
}
}
…where the 3) denotes the newly injected metadata on dsp_band_1.dsp_band_1.
Next, we will add the units to both of the map vectors in the next version of our NcML:
<?xml version="1.0" encoding="UTF-8"?>
<netcdf location="data/ncml/agg/grids/f97182070958.hdf" title="This file results in a Grid">
<!-- Traverse into the HDF_GLOBAL attribute Structure (container) -->
<attribute name="HDF_GLOBAL" type="Structure">
<!-- Specify the new attribute in that scope -->
<attribute name="ncml_location" type="String" value="data/ncml/agg/grids/f97182070958.hdf"/>
</attribute>
<!-- Traverse into the dsp_band_1 variable Structure (actually a Grid) -->
<variable name="dsp_band_1" type="Structure">
<!-- Specify the new attribute in the Grid's attribute table -->
<attribute name="ncml_location" type="String" value="data/ncml/agg/grids/f97182070958.hdf"/>
<!-- While remaining in the Grid, traverse into the Array dsp_band_1: -->
<variable name="dsp_band_1">
<!-- And add the attribute there. Fully qualified name of this scope is "dsp_band_1.dsp_band_1" -->
<attribute name="units" type="String" value="Temp"/>
</variable> <!-- Exit the Array variable scope, back to the Grid level -->
<!-- Traverse into the lat map vector variable -->
<variable name="lat">
<!-- Add the units -->
4) <attribute name="units" type="String" value="degrees_north"/>
</variable>
<!-- Traverse into the lon map vector variable -->
<variable name="lon">
<!-- Add the units -->
5) <attribute name="units" type="String" value="degrees_east"/>
</variable>
</variable>
</netcdf>…where we denote the changed with 4) and 5). Here’s the resulting DAS:
Attributes {
HDF_GLOBAL {
... *** CLIPPED FOR CLARITY *** ...
1) String ncml_location "data/ncml/agg/grids/f97182070958.hdf";
}
dsp_band_1 {
Byte dsp_PixelType 1;
Byte dsp_PixelSize 2;
UInt16 dsp_Flag 0;
UInt16 dsp_nBits 16;
Int32 dsp_LineSize 0;
String dsp_cal_name "Temperature";
String units "Temp";
UInt16 dsp_cal_eqnNumber 2;
UInt16 dsp_cal_CoeffsLength 8;
Float32 dsp_cal_coeffs 0.125, -4;
Float32 scale_factor 0.125;
Float32 add_off -4;
2) String ncml_location "data/ncml/agg/grids/f97182070958.hdf";
dsp_band_1 {
3) String units "Temp";
}
lat {
String name "lat";
String long_name "latitude";
4) String units "degrees_north";
}
lon {
String name "lon";
String long_name "longitude";
5) String units "degrees_east";
}
}
}
…where we have marked all the new metadata we have injected, including the new attributes on the map vectors.
Although we added metadata to the Grid, it is possible to also use the other forms of <attribute> in order to modify existing attributes or remove unwanted or incorrect attributes.
The only place where this syntax varies slightly is in adding metadata to an aggregated Grid. Please see the tutorial section on aggregating grids for more information.
Appendix E: User-Specified Aggregation
10.E.1. Introduction
In response to requests from NASA, and with their support, we have added two new kinds of aggregation to Hyrax. Both of these aggregation operations provide a way for client software to specify the granules that will be used to build the aggregate result. While our existing aggregation interface, based on NcML, works well for NASA’s level 3 data products, it is all but useless for level 2 swath data. These aggregation functions are specifically designed to work with satellite swath data without being limited to just swath data and are explicitly intended for use with search interfaces that have knowledge of the individual files that make up typical satellite data sets (often called a dataset inventory).
| This service provides value-based subsetting for satellite swath data. It’s applicable to lots of other kinds of data, but works best with data that meet certain requirements. |
Providing search results that include explicit references to hundreds or thousands of discrete files has been the only option for many search interfaces up to this point. This is especially when the datasets holds satellite swath data because swath data are not easily aggregated. For this interface to Hyrax’s aggregation software, we provide two kinds of responses: Data in multiple files that are bundled together using an zip archive and data in tabular form. For clients that request the aggregate result in a zip file, given a request for values from N files, there will be N entries in the resulting zip archive. Some of these entries may simply indicate that no data matching the spatial or other constraints were found. While the source data files can be in any format that the Hyrax server can read, the response will be either netCDF3, netCDF4 or ASCII. The netCDF3/4 files returned will conform to CF 1.6 to the extent possible (the underlying data files may lack information CF 1.6 requires). For clients that request data in tabular form, the data from N files will be returned in one ASCII CSV response. These values can be easily assimilated by database systems, Excel and other tools.
10.E.2. Intended Audience
This service was originally intended for software developers working data search tools who need to be able to return results that encompass hundreds or thousands of granules. It works best from a programmatic interface, but it’s certainly open to end users, see the examples using curl for one way to access the service.
10.E.3. Accessing the Aggregation Services
This 'service' is accessed using HTTP’s GET or POST methods. In this documentation I will describe how to use POST to send information, but the same key-value parameters can be sent using the GET method, albeit within the character limits of a URL (which vary depending on implementation).
The service is accessed using the following set of key-value parameters:
- operation
-
Use operation to select from various kinds of responses. The form of the response also determines how the aggregation is built. The current values for this parameter are: version which returns information about the service’s version; file returns a collection of files; netcdf3, netcdf4, ascii all translate the underlying granule format to netcdf3, etc., and return that collection of translated files; csv returns data from many granules as a single table of data, using Comma Separated Values (csv) format. More information about this is given below.
- file
-
The URL path component to a granule served by Hyrax. This parameter will appear once for each file in the aggregation.
- var
-
A comma-separated list of variables to include in the files returned when using operation equal to netcdf3, netcdf4, ascii, or csv
- bbox
-
Limit the values returned to those that fall within a bounding box for a given variable. Like var, this applies only to netcdf3, netcdf4, ascii, or csv
How to Use These Parameters
The operation and file parameters are the key to the service. By listing multiple files, you can explicitly control which files are accessed and the order of that access. The operation parameter provides a way to choose between a zipped response with many files either in their native format (file) or in one of three well known representations (netcdf3, netcdf4 or ascii).
While a complete request can make use of only the operation and file parameters, adding the variable and value subsetting can provide a much more manageable response. The var and bbox parameters can appear either once or N times where N is the number of time the file parameter appears. In the first case, the values of the single instances of var and/or bbox are applied to every file/granule listed in the request. In the second case the value of var1 is used with file1, var2 with file2, and so on up to varN and fileN. The same is true of the bbox parameter. Furthermore, these parameters act independently, so a request can use one value for var and N values for bbox or vice versa.
Response Formats
This service will either return a collection of files bundled in a zip archive or it will return a since CSV/text file. When operation is file, netcdf3, netcdf4 or ascii, the service will take each of the files as they are retrieve or built and put them in a zip archive that it streams back to the client. The ZIP64(tm) format extensions are used to overcome the size limitations of the original ZIP format.
For the csv operation, the response is a single CSV/text file.
More About var
The var parameter is a comma-separated list of variables in the files listed in the request. Each of the variables must be named just as it is in the DAP dataset. If you’re getting errors from the service that 'No such variable exists in the dataset …', use a web browser or curl to look at one of the granules and see what the exact name is. For many NASA dataset, these names can be quite long and have several components, separated by dots. One way to test the name is to build a URL to the file and use the getdap (part of the libdap software package) tool like this
getdap -d <url> -c
If this returns an error, look at the DDS or DMR from the dataset and figure out the correct name. Do that using
getdap -d <url> or
getdap4 -d <url>
More About bbox
The bbox parameter is probably the most powerful of the parameters in terms of its ability to select specific data values. It has two different modes, one when used with the zip-formatted responses (i.e., operation is netcdf3, netcdf4 or ascii) and another when its used with operation equal to csv. However, ther are somethings that are common to both uses of the parameter. In either case, bbox is used to select a range of values for a particular variable or a set of variables. The format for a bbox request has the following form
[ <lower value> , <variable name> , <upper value> ]
for each variable in the subset request. If more than one variable is included, use a series of range requests surrounded by double quotes. An example box request looks like
&bbox="[49,Latitude,50][167,Longitude,170]"
which translates to "for the variable Latitude, return only values between 49 and 50 (inclusive) and for the variable Longitude return only values between 167 and 170". Note that the example here uses two variables named Latitude and Longitude, but any variables in the dataset could be used.
The bbox operation is special, however, because the range limitation applies not only to the variable listed, but to any other variables in the request that share dimensions with those variables. Thus, for a dataset that contains Latitude, longitude and Optical_Depth where all have the shared dimensions x and y, the bbox parameter will choose values of Latitude and Longitude within the given values and then apply the resulting bounding box to those variables and any other variables that use the same named dimensions as those variables. The named (i.e., shared) dimensions form the linkage between the subsetting of the variables named in the bbox value subset operation and the other variables in the list of vars to return.
You can find out if variables in a dataset share named dimensions by looking at the DDS (DAP2) or DMR (DAP4) for the dataset. Note that for DAP4, in the example used in the previous paragraph, Latitude, longitude and Optical_Depth form a 'coverage' where Latitude and longitude are the domain and Optical_Depth is the 'range'.
Note that the variables in the bbox range requests must also be listed in the var parameter if you want their values to be returned.
The next two sections describe how the return format (zipped collection of files or CSV table of data) affects the way the bbox subset request is interpreted.
bbox & zip-formatted returns
When the Aggregation Service is asked to provide a zipped collection of files (operation = netcdf3, netcdf4 or ascii), the resulting data is stored as N-dimensional arrays in those kinds of responses. This limits how bbox can form subsets, particularly when the values are in the form of 'swath data.' For this request type, bbox forms a bounding box for each variable in the list of range requests and then forms the union of those bounding boxes. For swath data, this means that some extra values will be returned both because the data rarely fit perfectly in a box for any given domain variable and then the union of those two (imperfect) subsets usually results in some data that are actually in neither bounding box. The bbox operation (which maps to a Hyrax server function) was designed to be liberal in applying the subset to as to include all data points that meet the subset criteria at the cost of including some that don’t. The alternative would be to exclude some matching data. Similarly, the bounding box for the set of variables is the union for the same reason. Hyrax contains server functions that can form both the union and intersection of several bounding boxes returned by the bbox function.
bbox & the csv response
The csv response format is treated differently because the data values are returned in a table and not arrays. Because of this, the interpretation of bbox is quite different. The subset request syntax is interpreted as a set of value filters that can be expressed as an series of relational expressions that are combined using a logical AND operation. Returning to the original example
&bbox="[49,Latitude,50][167,Longitude,170]"
a corresponding relational expression for this subset request would be
49 ⇐ Latitude ⇐ 50 AND 167 ⇐ Longitude ⇐ 170
Because the response is a single table, each variable named in the request appears as a column. If there are N variables listed in var, then N columns will appear in the resulting table (with one potential exception where N+1 columns may appear). The filter expression built from the bbox subset request will be applied to each row of this table, and only those rows with values that satisfy it will be included in the output.
A tabular response like this implies that all of the values of a particular row are related. For this kind of response (operation = csv) to work, each variable listed by use a common set of named dimensions (i.e., shared dimensions). The one exception to this rule is when the variables listed with var fall into two groups, one of which has M dimensions (e.g., 2) and another group has N (e.g., 3) and the second group’s named dimensions contains the first group’s as a proper subset. In this case, the extra dimension(s) of the second group will appear as additional columns in the response. It sounds confusing, but in practice it is pretty straightforward. Here’s a concrete example. Suppose a dataset has Latitude, Longitude and Corrected_Optical_Depth and both Latitude and Longitude are two dimensional arrays with named dimensions x and y and Corrected_Optical_Depth is a three dimensional array with named dimensions Solution_3_Land, x and y. The csv response would include four columns, one each for Latitude, Longitude and Corrected_Optical_Depth and a fourth for Solution_3_Land where the value would be the index number.
10.E.4. Performance and Implementation
Performance is linear in terms of the number of granules. The response is streamed as it is built, so even very large responses use only a little memory on the server. Of course, that won’t be the case on the client.
Implementation
The interface described here is built using a Servlet that talks to the Hyrax BES - a C/C++ Unix daemon that reads and processes data building the raw DAP2/4 response objects. The Servlet builds the response objects it returns using the response objects returned by the BES. In the case of the 'zipped files' response, the BES is told one by one to subset the granules and return the result as netcdf3, et cetera. It streams each returned file using a ZipPOutputStream object from the Apache Commons set of Java libraries. In the case of the csv response the BES is told to return the filtered data as ASCII and the servlet uses the Java FilteredOutputStream class to strip away redundant header information from the second, …, Nth file/granule.
For each type of request, most of the work of subsetting the values is performed by the BES, its constraint evaluator and a small set of server functions. The server functions used for this service are:
- roi
-
subsetting based on indices of shared dimensions
- bbox
-
building bounding boxes described in array index space
- bbox_union
-
building bounding boxes for forming the union or intersection of two or more bounding boxes
- tabular
-
building a DAP Sequence from N arrays, where when N > 1, each array must be a member of the same DAP4 'coverage'
It is possible to access the essential functionality of the Aggregation Service using these functions.
Design
The design of the Aggregation Service is documented as well, although some aspects of that document are old and incorrect. it may also be useful to look at the source code, which can be found on GitHub at olfs and bes in the aggregation and functions parts of those repos, respectively.
Examples
This section lists a number of examples of the aggregation service. We have only a handful of data on our test server, but these examples should work. Because the aggregation service is a machine interface, the examples require that use of curl and text files that contain the POST requests (except for the version operation).
Version
- Request
- Returns
Aggregation Interface Version: 1.1
<?xml version="1.0" encoding="UTF-8"?>
<response xmlns="http://xml.opendap.org/ns/bes/1.0#" reqID="[ajp-bio-…">
<showVersion>
<Administrator>support@opendap.org</Administrator>
<library name="bes">3.16.0</library>
<module name="dap-server/ascii">4.1.5</module>
<module name="csv_handler">1.1.2</module>
<library name="libdap">3.16.0</library>
…
</response>Returning an Archive
NB: To get these examples, clone https://github.com/opendap/olfs, then cd to resources/aggregation/tests/demo.
The example files are also available here:
In the OLFS repo on github, you’ll see a file named resources/aggregation/tests/demo/short_names/d1_netcdf3_variable_subset.txt. Here’s what it looks like:
edamame:demo jimg$ more short_names/d1_netcdf3_variable_subset.txt &operation=netcdf3 &var=Latitude,Longitude,Optical_Depth_Land_And_Ocean &file=/data/modis/MOD04_L2.A2015021.0020.051.NRT.hdf &file=/data/modis/MOD04_L2.A2015021.0025.051.NRT.hdf &file=/data/modis/MOD04_L2.A2015021.0030.051.NRT.hdf
This example shows how the DAP2 projection constraint can be given once and applied to a number of files. It’s also possible to provide a unique constraint for each file.
Each of the parameters begins with an ampersand (&). This command, which will be sent to the service using POST, specifies the netcdf3 response, three files, and the DAP projection constraint Latitude,Longitude,Optical_Depth_Land_And_Ocean. It may be that the parameter name &var is a bit misleading since you can actually provide array subsetting there as well (but not the filtering-type DAP2/DAP4 constraints).
To send this command to the service, use curl like this:
edamame:demo jimg$ curl -X POST -d @short_names/d1_netcdf3_variable_subset.txt http://test.opendap.org/opendap/aggregation > d1.zip
% Total % Received % Xferd Average Speed Time Time Time Current
Dload Upload Total Spent Left Speed
100 552k 0 552k 100 226 305k 124 0:00:01 0:00:01 --:--:-- 305k
The output of curl is redirected to a file (d1.zip) and we can list its contents
verifying that it contains the files we expect.
edamame:demo jimg$ unzip -t d1.zip
Archive: d1.zip
testing: MOD04_L2.A2015021.0020.051.NRT.hdf.nc OK
testing: MOD04_L2.A2015021.0025.051.NRT.hdf.nc OK
testing: MOD04_L2.A2015021.0030.051.NRT.hdf.nc OK
No errors detected in compressed data of d1.zip.
Returning a Table
In this example, a request is made for data from the same three variables from the same files, but the data are returned in a single table. This request file is in the same directory as the previous example.
The command file is close to the same as before, but uses the &operation or csv and also adds a &bbox command, the latter provides a way to specify filtering based on latitude/longitude bounding boxes.
edamame:demo jimg$ more short_names/d3_csv_subset.txt &operation=csv &var=Latitude,Longitude,Image_Optical_Depth_Land_And_Ocean &bbox="[49,Latitude,50][167,Longitude,170]" &file=/data/modis/MOD04_L2.A2015021.0020.051.NRT.hdf &file=/data/modis/MOD04_L2.A2015021.0025.051.NRT.hdf &file=/data/modis/MOD04_L2.A2015021.0030.051.NRT.hdf
The command is sent using 'curl as before:
edamame:demo jimg$ curl -X POST -d @short_names/d3_csv_subset.txt http://test.opendap.org/opendap/aggregation > d3.csv
% Total % Received % Xferd Average Speed Time Time Time Current
Dload Upload Total Spent Left Speed
100 4141 0 3870 100 271 5150 360 --:--:-- --:--:-- --:--:-- 5153
However, the response is now an ASCII table:
edamame:demo jimg$ more d3.csv Dataset: function_result_MOD04_L2.A2015021.0020.051.NRT.hdf table.Latitude, table.Longitude, table.Image_Optical_Depth_Land_And_Ocean 49.98, 169.598, -9999 49.9312, 169.82, -9999 49.9878, 169.119, -9999 49.9423, 169.331, -9999 49.8952, 169.548, -9999 49.8464, 169.77, -9999 49.7958, 169.998, -9999 49.9897, 168.659, -9999 49.9471, 168.862, -9999 ...
10.E.5. Potential Extensions to the Service
This service was purpose-built for the NASA CMR system, but it could be extended in several useful ways.
-
Support general DAP2 and DAP4 constraint expressions, including function calls (functions are used behind the scenes already)
-
Increased parallelism.
-
Support for the tar.gz return type.
Appendix F: MetaData Store (MDS)
A new cache, the MetaData Store (MDS), has been added to the BES for metadata responses. This cache is unlike the other BES caches in that it is intended to be operated as either a "cache" or a "store." In the latter case, added items will never be removed. It is an open-ended place where metadata response objects are kept indefinitely. The contents of the MDS (as a cache or a store) will persist through Hyrax restarts.
| The MDS is especially important for scenarios where data is not as close as you need it to be. By using the MDS, you can reduce the time it takes to look through files and make quick decisions based on the metadata that the MDS has saved; however, because the underlying data in the MDS does not update automatically, the metadata may be out of sync with the actual data. |
10.F.1. Enable or Disable the MDS
To enable or disable the MDS, access dap.conf in the
/etc/bes/modules directory, and remove the comment before
the following line of code:
DAP.GlobalMetadataStore.path = /usr/share/mds
See the code block below for the MDS section of dap.conf:
#-----------------------------------------------------------------------# # Metadata Store parameters # #-----------------------------------------------------------------------# # Control the Metadata Response Store. Here, DAP metadata responses # are stored/cached so that they can be returned by the server w/o # having to touch the data files/objects. Setting the 'path' to null # disables uses of the MDS. Setting 'size' to zero makes the MDS # hold objects forever; setting a positive non-zero size makes the # MDS behave like a cache, purging responses when the size is exceeded. #DAP.GlobalMetadataStore.path = /usr/share/mds DAP.GlobalMetadataStore.prefix = mds # Size in MB DAP.GlobalMetadataStore.size = 200 # The MDS writes a ledger of additions and removals. By default the # ledger is kept in 'mds_ledger.txt' in the directory used to start # the BES. DAP.GlobalMetadataStore.ledger = /usr/share/mds_ledger.txt # This tells the BES Framework's DAP module to use the DMR++ # handler for data requests if it find a DMR++ response in the MDS # for a given granule. # DAP.Use.Dmrpp = yes
10.F.2. Configure the MDS
The MDS' parameters should be configured in site.conf.
For more information, please see the site.conf section.
To configure the MDS to work as a store, rather than a cache,
set the Dap.GlobalMetadataSote.size to 0.
To configure the MDS as a cache, set it to your desired size.
10.F.3. Cache Ejection Strategy
The MDS caches complete metadata responses and serves those directly.
The MDS can be configured to not exceed a certain size. When the configured size is met, the MDS ejects the metadata files in the cache that were least recently accessed.
By default the metadata files are stored in usr/share/mds.
You can change this location by modifying the
DAP.GlobalMetadataStore.path. You can modify this parameter
in dap.conf, but you should modify it in site.conf.
For more information, please see the site.conf section.
Appendix G: Server Side Processing Functions
10.G.1. Server Functions, Invocation, and Composition
To run a server function, you call the function with its arguments in the 'query string' part of a URL. The server function call is a kind of DAP Constraint Expression. Here are some examples:
Get the U and V components of the fnoc1 dataset, but apply the dataset’s scale_factor attribute (the 'm' in y=mx+b; for these variables, 'b' is zero). Compare the values returned by the linear_scale() server function to those returned by accessing the variables without using the function
Function Composition
Server-side functions provide a way to access the processing power of the data server and perform operations that fall outside the scope of the DAP constraint mechanism of projection and selection. Each server can load functions at run-time, so the set of functions supported may be different than those documented here. Use the version() function to get a list of functions supported by a particular server. To get information about a particular function, call that function with no arguments. The 'help' response from both version() and a function such as linear_scale() is a simple XML document listing the function’s name, version and URL to more complete documentation.
All the functions listed here are included in the Hyrax server, versions 1.6 and later. Other servers may also support these.
All of these functions can be composed. Thus, the values from the geogrid() function can be used by the linear_scale() function. Here’s an example:
linear_scale(geogrid(SST, 45, -82, 40, -78)) // spaces added for clarity
This first subsets the variable SST, so only those values in latitude 45 to 40 and longitude -82 to -78 are returned; it then passes those values to the linear_scale() function, which will scale them and return those new values to the caller.
10.G.2. Server Functions in the BES functions Module
For Hyrax 1.9, the server functions listed here were moved from libdap, where they were 'hard coded' into the constraint evaluator to a module that is loaded like the other BES modules. Currently, this 'functions' module is part of the BES source code while we decide where it should reside. Also note that make_array(), the #Type special form, bind_name() and bind_shape() are new functions designed to pass large arrays filled with constant values into custom server functions. We will expand on these as part of an NSF-sponsored project in the coming two years.
geogrid()
Version Documented: 1.2
The geogrid() function applies a constraint given in latitude and longitude to a DAP Grid variable. The arguments to the function are…
geogrid(grid variable, top, left, bottom, right[, expression ...]) geogrid(grid variable, latitude map, longitude map, top, left, bottom, right[, expression ...])
The grid variable is the data to be sub-sampled and must be a Grid. The optional latitude and longitude maps must be Maps in the named Grid and specifying these overrides the geogrid heuristics for choosing the lat/lon maps. The Top, left, bottom, right are the latitude and longitude coordinates of the northwesterm and southeastern corners of the selection box. The expressions consist of one or more quoted relational expressions. See grid() for more information about the expressions.
The function will always return a single Grid variable whose values completely cover the given region, although there may be cases when some additional data are also returned. If the longitude values 'wrap around' the right edge of the data, the function will make two requests and return those joined together as a single Grid. If the data are stored with the southern latitudes at the top of the array, the return result will be flipped so that the northern latitudes are at the top. If the Longitude values are offset, the function will correct for that as well.
Version Documented: 1.1
The geogrid() function applies a constraint given in latitude and longitude to a DAP Grid variable. The arguments to the function are:
geogrid(variable, top, left, bottom, right[, expression ...])
The variable is the data to be sub-sampled. The Top, left, bottom, right are the latitude and longitude coordinates of the northwesterm and southeastern corners of the selection box. The expressions consist of one or more quoted relational expressions. See grid() for more information about the expressions.
The function will always return a single Grid variable whose values completely cover the given region, although there may be cases when some additional data are also returned. If the longitude values 'wrap around' the right edge of the data, then the function will make two requests and return those joined together as a single Grid. If the data are stored with the southern latitudes at the top of the array, the return result will be flipped so that the northern latitudes are at the top.
grid
Version Documented: 1.0
The grid() function takes a DAP Grid variable and zero or more relational expressions. Each relational expression is applied to the grid using the server’s constraint evaluator and the resulting grid is returned. The expressions may use constants and the grid’s map vectors but may not use any other variables. In particular, you cannot use the grid values themselves
Two forms of expression are provided:
-
var relop const -
const relop var relop const
Where relop stands for one of the relational operators, such as =
>, or <
For example: grid(sst,"20>TIME>=10") and grid(sst,"20>TIME","TIME>=10")
are both legal and, in this case, also equivalent.
linear_scale
Version Documented: 1.0b1
The linear_scale() function applies the familiar y = mx + b equation to data. It has three forms:
linear_scale(var) linear_scale(var,scale_factor,add_offset) linear_scale(var,scale_factor,add_offset,missing_value)
If only the name of a variable is given, the function looks for the COARDS/CF-1.0 scale_factor, add_offset and missing_value attributes. In the equation, 'm' is scale_factor, 'b' is add_offset and data values that match missing_value are not scaled.
If add_offset cannot be found, it defaults to zero; if missing_value cannot be found, the test for it is not performed.
In the second and third form, if the given values conflict with the dataset’s attributes, the given values override.
The make_array() Function
The make_array() function takes three or more arguments and returns a DAP2 Array with the values passed to the function.
- make_array(<type>, <shape>, <values>, …)
-
<type> is any of the DAP2 numeric types (Byte, Int16, UInt16, Int32, UInt32, Float32, Float64); <shape> is a string that indicates the size and number of the array’s dimensions. Following those two arguments are N arguments that are the values of the array. The number of values must equal the product of the dimension sizes.
Example: make_array(Byte,"[4][4]",2,3,4,5,2,3,4,5,2,3,4,5,2,3,4,5) will return a DAP2 four by four Array of Bytes with the values 2, 3, … . The Array will be named g<int> where <int> is 1, 2, …, such that the name does not conflict with any existing variable in the dataset. Use bind_name() to change the name.
This function can build an array with 1024 X 1024 Int32 elements in about 4 seconds.
The 'make array' Special Forms
These special forms can build vectors with specific values and return them as DAP2 Arrays. The Array variables can be named using the bind_name() function and have their shape set using bind_shape().
- $<type>(size hint,: values, …)
-
The $<type> ($Byte, $Int32, …) literal starts the special form. The first argument size hint provides a way to preallocate the memory needed to hold the vector of values. Following that, the values are listed. Unlike make_array(), it is not necessary to provide the exact size of the vector; the size hint is just that, a hint. If a size hint of zero is supplied, it will be ignored. Any of the DAP2 numeric types can be used with this special form. This is called a 'special form' because it invokes a custom parser that can process values very efficiently.
Example: $Byte(16:2,3,4,5,2,3,4,5,2,3,4,5,2,3,4,5) will return a one dimensional (i.e., a vector) Array of Bytes with values 2, 3, … . The vector is named g<int> just like the array returned by make_array(). The vector can be turned in to a N-dimensional Array using bind_shape() using bind_shape("[4][4]",$Byte(16:2,3,4,5,2,3,4,5,2,3,4,5,2,3,4,5)).
The special forms can make a 1,047,572 element vector on Int32 in 0.4 seconds, including the time required to parse the million plus values.
Performance Measurements
Time to make 1,000,000 (actually 1,048,576) element Int32 array using the special form, where the argument vector<int> was preset to 1,048,576 elements. Times are for 50 repeats.
Summary: Using the special for $Int32(size_hint, values…) is about 10 times faster for a 1 million element vector than make_array(Int32,[1048576],values…). As part of the performance testing, the scanner and parser were run under a sampling runtime analyzer ('Instruments' on OS/X) and the code was optimized so that long sequences of numbers would scan and parse more efficiently. This benefits both the make_array() function and $type() special form.
Raw Timing Data
In all cases, a 1,048,576 element vector of Int32 was built 50 times. The values were serialized and written to /dev/null using the command time besstandalone -c bes.conf -i bescmd/fast_array_test_3.dods.bescmd -r 50 > /dev/null where the .bescmd file lists a massive constraint expression (a million values). The same values were used.
NB: The DAP2 consraint expression scanner was improved based on info from 'instruments', an OS/X profiling tool. Copying values and applying www2id escaping was moved from the scanner, where it was applied it to every token that matched SCAN_WORD, to the parser, where it was used only for non-numeric tokens. This performance tweak makes a big difference in this case since there are a million SCAN_WORD tokens that are not symbols.
Runtimes for make_array() and $type, scanner/parser optimized, two trials
| Time in Seconds | |||
|---|---|---|---|
What |
Real (s) |
User |
System |
$type, with hint |
19.844 |
19.355 |
0.437 |
$type, with hint |
19.817 |
19.369 |
0.427 |
$type, no hint |
19.912 |
19.444 |
0.430 |
$type, no hint |
19.988 |
19.444 |
0.428 |
make_array() |
195.332 |
189.271 |
6.058 |
make_array() |
197.900 |
191.628 |
6.254 |
bind_name() and bind_shape()
These functions take a BaseType* object and bind a name or shape to it (in the latter case the BaseType* must be an Array*). They are intended to be used with make_array() and the $type special forms, but they can be used with any variable in a dataset.
- bind_name(name,variable)
-
The name must not exist in the dataset; variable may be the name of a variable in the dataset (so this function can rename an existing variable) or it can be a variable returned by another function or special form.
- bind_shape(shape expression,variable)
-
The shape expression is a string that gives the number and size of the array’s dimensions; the variable may be the name of a variable in the dataset (so this function can rename an existing variable) or it can be a variable returned by another function or special form.
Here’s an example showing how to combine bind_name, bind_shape and $Byte to build an array of constants: bind_shape("[4][4]",bind_name("bob",$Byte(0:2,3,4,5,2,3,4,5,2,3,4,5,2,3,4,5))). The result, in a browser, is:
Dataset: function_result_coads_climatology.nc bob[0], 2, 3, 4, 5 bob[1], 2, 3, 4, 5 bob[2], 2, 3, 4, 5 bob[3], 2, 3, 4, 5
Unstructured Grid Subsetting
The ugr5() function subsets an Unstructured Grid (aka flexible mesh) if it conforms to the Ugrid Conventions built around netCDf and CF. More information on subsetting files that conform to this convention can be found here.
See ../index.php/OPULS:_UGrid_Subsetting[ugr5 documentation] for more information.
This function is optional with Hyrax and is provided by the ugrid_functions module.
version()
The version function provides a list of the server-side processing functions available on a given server along with their versions. For information on a specific function, call it with no arguments or look at this page.
tabular()
Brief: Transform one or more arrays to a sequence.
This function will transform one or more arrays into a sequence, where each array becomes a column in the sequence, with one exception. If each array has the same shape, then the number of columns in the resulting table is the same as the number of arrays. If one or more arrays has more dimensions than the others, an extra column is added for each of those extra dimensions. Arrays are enumerated in row-major order (the right-most dimension varies fastest).
It’s assumed that for each of the arrays, elements (i0, i1, …, in) are all related. However, the function makes no test to ensure that.
Note: While this version of tabular() will work when some arrays have more dimensions than others, the collection of arrays must have shapes that 'fit together'. This is case the arrays are limited in two ways. First the function is limited to N and N+1 dimension arrays, nothing else, regardless of the value of N. Second, the arrays with N+1 dimensions must all share the same named dimension for the 'additional dimension' and that named shred dimension will appear in the output Sequence as a new column.
- tabular(array1, array2, …, arrayN)
-
Returns a Sequence with N or N+1 columns
roi()
Brief: Subset N arrays using index slicing information
This function should be called with a series of array variables, each of which are N-dimensions or greater, where the N common dimensions should all be the same size. The intent of this function is that a N-dimensional bounding box, provided in indicial space, will be used to subset each of the arrays. There are other functions that can be used to build these bounding boxes using values of dataset variables - see bbox() and bbox_union(). Taken together, the roi(), bbox() and bbox_union() functions can be used to subset a collection of Arrays where some arrays are taken to be dependent variables and others independent variables. The result is a subset of 'discrete coverage' the collection of independent and dependent variables define.
roi(array1, array2, …, arrayN, bbox(…))
roi(array1, array2, …, arrayN, bbox_union(bbox(…),
bbox(…), …, "union")) ::
Subset array1, …, using the bound box given as the last
argument. The assumption is that the arrays will be the range
variables of a coverage and that the bounding boxes will be computed
using the range variables. See the bbox() and bbox_union()
function descriptions.
bbox()
Brief: Return the bounding box for an array
Given an N-dimensional Array of simple numeric types and two minimum and maximum values, return the indices of a N-dimensional bounding box. The indices are returned using an Array of Structure, where each element of the array holds the name, start index and stop index in fields with those names.
It is up to the caller to make use of the returned values; the array is not modified in any way other than to read in it’s values (and set the variable’s read_p property).
The returned Structure Array has the same name as the variable it applies to, so that error messages can reference the source variable.
- bbox(array, min-value, max-value)
-
Given that array is an N-dimensional array, return a DAP Array with N elements. Each element is a DAP Structure with two fields, the indices corresponding to the first and last occurrence of the values min-value and max-value.
bbox_union()
Brief: Combine several bounding boxes, forming their union.
This combines N BBox variables (Array of Structure) forming either their union or intersection, depending on the last parameter’s value ("union" or "inter[section]").
If the function is passed bboxes that have no intersection, an exception is thrown. This is so that callers will know why no data were returned. Otherwise, an empty response, while correct, could be baffling to the caller.
bbox_union(bbox(a1, min-value-1, max-value-1), bbox(a2, min-2, max-2), …, "union"|"intersection") :: Given 1 or more bounding box Array of Structures (as returned by the bbox() function) form their union or intersection and return that bounding box (using the same Array of Structures representation).
10.G.3. Functions Included FreeForm Module
There are a number of date and time functions supported by the FreeForm server.
Projection Functions
Selection Functions
Appendix H: BES XML Commands
10.H.1. BES XML Command Syntax
The BES will accept commands encoded in XML documents (BES XML Commands), and provide responses in kind. Some requests specifically indicate a non XML response (such as a DAP2 binary response) in which case the response will be as requested.
Requests
All elements mentioned in the following are in the http://xml.opendap.org/ns/bes/1.0# namespace unless otherwise noted.
-
Each request document must have a <request> root element.
-
Each <request> must contain one or more BesCommand elements.
-
A <request> may contain multiple BesCommands as long as zero more of those commands returns a response.
Examples (expand with abbreviated xml):-
We can do a set context, set container, define and a get das in the same request document as only the get das request command returns a response.
-
There can not be two show commands within the request document, or a show and a get, or multiple gets.
-
-
Each request element must have an attribute reqID the value of which will be used in the response document. There is no guarantee that the value of reqID be unique within the operational domain of the BES. (It might be unique within the software of the requesting client, but that’s of no concern to the BES).
Responses
*Need a description and such here.
10.H.2. BES Error Response
<BES>
<response reqID="####">
<BESError>
<Type>3</Type>
<Message>Unable to find command for showVersions</Message>
<Administrator>ndp@opendap.org</Administrator>
</BESError>
</response>
</BES>Where Type is one of the following:
-
1. Internal Error - the error is internal to the BES Server
-
2. Internal Fatal Error - error is fatal, can not continue
-
3. Syntax User Error - the requester has a syntax error in request or config
-
4. Forbidden Error - the requester is forbidden to see the resource
-
5. Not Found Error - the resource can not be found
If debugging is enabled during build, the Error object will include the file name and line number where the exception was thrown.
10.H.3. BES Command Set
setContext
Example:
<setContext name="contextName>Value</setContext>
Changes the state of the BES for the current client connection. This allows the client to ask the BES to utilize various response formats.
name Attribute
Identifies which context value is being set.
dap_format context
Value:
-
Major.Minor where both Major and Minor are integer values.
errors context
Current Values:
-
xml -
-
dap2 - When error context is set to dap2 then all errors will returned as DAP2 error objects (definitely not XML).
Proposed Values:
-
dap - When error context is set to dap, all errors will returned as DAP error objects. The version of the DAP that error must conform to is controlled by the dap_format context. It is possible (likely) that in the future DAP errors will be XML documents.
-
bes - Returns a BES Error response XML Document:
<?xml version="1.0" encoding="UTF-8"?>
<request reqID ="####" >
<setContext name="errors">dap2</setContext>
</request>setContainer
Request Example
<?xml version="1.0" encoding="UTF-8"?>
<request reqID ="####" >
<setContainer name="c" space="catalog">data/nc/fnoc1.nc</setContainer>
</request>Define
Request Example
<?xml version="1.0" encoding="UTF-8"?>
<request reqID ="####" >
<define name="d" space="default">
<constraint>a valid default ce</constraint>
<container name="c1">
<constraint>a valid ce</constraint>
<attributes>list of attributes</attributes>
</container>
<container name="c2">
<constraint>a valid ce</constraint>
<attributes>list of attributes</attributes>
</container>
<aggregate handler="someHandler" cmd="someCommand" />
</define>
</request>get
This needs to be expanded to illuminate the missing details from the previoius command set:
-
get 'type' for 'definition' using 'URL';
Type:
-
dds -
-
das -
-
dods -
-
stream -
-
ascii -
-
html_form -
-
info_page -
Request Example
<?xml version="1.0" encoding="UTF-8"?>
<request reqID ="####" >
<get type="data_product" definition="def_name" returnAs="name" url="url" />
</request>Multiple Command Example
Multiple command transaction resulting in a DDS (non XML DAP2) response:
Request Example
<?xml version="1.0" encoding="UTF-8"?>
<request reqID ="####" >
<setContext name="error">dap2</setContext>
<setContainer name="c" space="catalog">data/nc/fnoc1.nc</setContainer>
<define name="d" space="default">
<container name="c">
<constraint>a valid ce</constraint>
<attributes>list of attributes</attributes>
</container>
<aggregate handler="someHandler" cmd="someCommand" />
</define>
<get type="dds" definition="d" returnAs="name" />
</request>Show Version
Request Example
<?xml version="1.0" encoding="UTF-8"?>
<request reqID ="####" >
<showVersion />
</request>Current:
<showVersion>
<response>
<DAP>
<version>2.0</version>
<version>3.0</version>
<version>3.2</version>
</DAP>
<BES>
<lib>
<name>libdap</name>
<version>3.5.3</version>
</lib>
<lib>
<name>bes</name>
<version>3.1.0</version>
</lib>
</BES>
<Handlers>
<lib>
<name>libnc-dods</name>
<version>0.9</version>
</lib>
</Handlers>
</response>
</showVersion>
Proposed:
<?xml version="1.0" encoding="UTF-8"?>
<response reqID="####">
<showVersion>
<service name="dap">
<version>2.0</version>
<version>3.0</version>
<version>3.2</version>
</service>
<library name="bes">3.5.3</library>
<library name="libdap">3.10.0</library>
<module name="netcdf_handler">3.7.9</module>
<module name="freeform_handler">3.7.9</module>
</showVersion>
</response>Show help
Request Example
<?xml version="1.0" encoding="UTF-8"?>
<request reqID ="####" >
<showHelp />
</request>Response Example
<?xml version="1.0" encoding="UTF-8"?>
<response reqID="####">
<showHelp>
<module name="bes" version="3.6.2"><html xmlns= http://www.w3.org/1999/xhtml >Help Information</html></module>
<module name="dap" version="3.10.1">Help Information</module>
<module name="netcdf_handler" version="3.7.9">Help Information including supported responses</module>
</showHelp>
</response>showProcess
This is available only if the BES is compiled in developer mode. A 'production' BES does not support this command.
Request Example
<?xml version="1.0" encoding="UTF-8"?>
<request reqID ="####" >
<showProcess />
</request>Response Example
<?xml version="1.0" encoding="UTF-8"?>
<response reqID="####">
<showProcess>
<process pid="10831" />
</showProcess>
</response>showConfig
This is available only if the BES is compiled in developer mode. A 'production' BES does not support this command.
Request Example
<?xml version="1.0" encoding="UTF-8"?>
<request reqID ="####" >
<showConfig />
</request>Response Example
<?xml version="1.0" encoding="UTF-8"?>
<response reqID="####">
<showConfig>
<file>/Users/pwest/opendap/chunking/etc/bes/bes.conf</file>
<key name="BES.CacheDir">/tmp</key>
....
</showConfig>
</response>showStatus
Request Example
<?xml version="1.0" encoding="UTF-8"?>
<request reqID ="####" >
<showStatus />
</request>Response Example
<?xml version="1.0" encoding="UTF-8"?>
<response reqID="####">
<showStatus>
<status>MST Thu Dec 18 11:51:36 2008</status>
</showStatus>
</response>showContainers
Request Example
<?xml version="1.0" encoding="UTF-8"?>
<request reqID ="####" >
<showContainers />
</request>Response Example
<?xml version="1.0" encoding="UTF-8"?>
<response reqID="####">
<showContainers>
<store name="volatile">
<container name="c" type="nc">data/nc/fnoc1.nc</container>
</store>
</showContainers>
</response>deleteContainer(s), deleteDefinition(s)
Request Example
<?xml version="1.0" encoding="UTF-8"?>
<request reqID ="####" >
<deleteContainers store="storeName" />
<deleteContainer name="containerName" store="storeName" />
<deleteDefinitions store="storeName" />
<deleteDefinition name="defName" store="storeName" />
</request>showDefinitions
Request Example
<?xml version="1.0" encoding="UTF-8"?>
<request reqID ="####" >
<showDefinitions />
</request>Response Example
<?xml version="1.0" encoding="UTF-8"?>
<response reqID="####">
<showDefinitions>
<store name="volatile">
<definition name="d">
<container name="c" type="nc" constraint="">data/nc/fnoc1.nc</container>
<aggregation handler="agg">aggregation_command</aggregation>
</definition>
</store>
</showDefinitions>
</response>showContext
Request Example
<?xml version="1.0" encoding="UTF-8"?>
<request reqID ="####" >
<showContext />
</request>Response Example
<?xml version="1.0" encoding="UTF-8"?>
<response reqID ="####" >
<showContext>
<context name="name1">value1</context>
<context name="name2">value2</context>
...
<context name="namen">valuen</context>
<showContext>
</response>showCatalog
Request
<?xml version="1.0" encoding="UTF-8"?>
<request reqID="####" >
<showCatalog node="[catalog:]nodeName" />
</request>The catalog name is optional, defaulting to the default catalog specified in the BES configuration file. So if you had a catalog named rdh you could specify node="rdh:/" and it would give you the root node for the rdh catalog.
Response
<?xml version="1.0" encoding="UTF-8"?>
<response reqID="####" >
<showCatalog>
<dataset name="nc/test" size="408" lastModified="2006-01-04T19:48:24" catalog="catalog" node="true" count="5">
<dataset name="test.nc" size="12148" lastModified="2005-09-29T16:31:28" node="false">
<service>DAP</service>
</dataset>
<dataset name="testfile.nc" size="43392" lastModified="2005-09-29T16:31:28" catalog="catalog" node="false">
<service>DAP</service>
</dataset>
<dataset name="TestPat.nc" size="262452" lastModified="2005-09-29T16:31:27" catalog="catalog" node="false">
<service>DAP</service>
</dataset>
<dataset name="TestPatDbl.nc" size="2097464" lastModified="2005-09-29T16:31:28" catalog="catalog" node="false">
<service>DAP</service>
</dataset>
<dataset name="TestPatFlt.nc" size="1048884" lastModified="2005-09-29T16:31:27" catalog="catalog" node="false">
<service>DAP</service>
</dataset>
</dataset>
</showCatalog>
</response>showInfo
Request
<?xml version="1.0" encoding="UTF-8"?>
<request reqID="####" >
<showInfo node="nodeName />
</request>Current Response
<?xml version="1.0" encoding="UTF-8"?>
<response reqID="####">
<showInfo>
<dataset thredds_container="true">
<name>nc/test</name>
<size>408</size>
<lastmodified>
<date>2006-01-04</date>
19:48:24
</lastmodified>
<count>5</count>
</dataset>
</showInfo>
</response> <?xml version="1.0" encoding="UTF-8"?>
<response reqID="####">
<showInfo>
<dataset thredds_container="false">
<name>nc/test/TestPatFlt.nc</name>
<size>1048884</size>
<lastmodified>
<date>2005-09-29</date>
16:31:27
</lastmodified>
</dataset>
</showInfo>
</response>Proposed Response
<dataset name="testfile.nc" size="43392" lastModified="YYYY-MM-DDThh:mm:ss" catalog="catalog"
node="true|false" count="#ofChildDatSets">
<service>DAP</service>
</dataset>showServices
Request
<?xml version="1.0" encoding="UTF-8"?>
<request reqID="####" >
<showServiceDescriptions />
</request>Response
<?xml version="1.0" encoding="UTF-8"?>
<response reqID="####">
<showServices>
<service name="DAP">
<command name="ddx">
<description>Words For Humans</description>
<format name="dap2"/>
</command>
<command name="dds">
<description>Words For Humans</description>
<format name="dap2"/>
</command>
</service>
</showServices>
</response>